TP-Link TL-WR841ND
for v13:
The TL-WR841NDv13 is leaking LAN traffic through WAN port during boot, due to lack of port isolation.
The device is a wireless N router with
- 2 detachable antennas
- 4 Port 100/10 Switch
- 1 Port 100/10 Wan Interface
- 4 MB Flash
- 32 MB RAM
- WPS Button
- Wi-Fi On/Off Button
with the exception of v13, which has
- 8 MB Flash
- 64 MB RAM
Note1: The TL-WR841N is identical except that the antennas are not detachable. TP-Link naming scheme is, that devices ending in a D have detachable antennas.
Note2: v5.2, v5.4 etc. are all v5, similarly for v7, v8, v9. The only difference is the firmware version they come with.
Clones
Known clones of this device:
- TP-Link TL-WR841ND v7: Rosewill Wireless N Router RNX-N300RT -- see rnx-n300rt
- TP-Link TL-WR841N v8: ThinkPenguin TPE-NWIFIROUTER2 aka Rosewill RNX-N300RT v2 -- see rnx-n300rt
- TP-Link TL-WR841ND v8: TP-Link TL-WR843ND v1, Mercury MW300R v3 and Fast FW300R v3.
Supported Versions
The TP-Link versioning scheme seems to be:
- major-number.minor-number, where the major-number refers to hardware changes, and the minor-number refer to software (firmware) changes; this includes the bootloader!
- If there is a language-code. e.g. (DE)v1.0, that means, that the TP-Link WebUI is that language. (Of course LuCI has Native Language Support)
- Sometimes, version x. is only available in the PRC and version y. is intended for sale world-wide. The hardware between version x. and version y. can differ significantly but does not have to.
- Sometimes, there is version x. for PRC only and version x. for world-wide sale. If there is a special Chinese version with the same major-number, then that version has usually significantly different hardware.
| Version/Model | Launched | OpenWrt Supported Since | Model Specific Notes |
|---|---|---|---|
| v1.x | 2007 | 10.03 | Added model support |
| v3.x | 2008 | 10.03 | Report |
| v5.x | 2010 | 10.03 | Report |
| v7.x | 2010 | 12.09 | UFO shape -- Fully working with 12.09 |
| v8.x (China) | ? | - | 2 MiB flash is not enough to run OpenWrt, needs hardware mod. Worked with r29631 trunk. |
| v8.x (international) | 2012-Aug | 12.09 | Forum thread |
| v9.x | 2014 | 14.07 | |
| v10.x (China) | ? | - | 1 MiB flash is not enough to run OpenWrt, needs hardware mod. |
| v10.x (international) | 2015 | 15.05.1 | Forum thread. Corresponding ticket: Ticket 20757 |
| v11.x | 2015 | v10 image or 17.01.2 | Forum thread. Only the flash chip seems to be different compared to v10.x. You can use 15.05 images for v10 with sysupgrade -F, overriding the hardware check. Compared to v10.0, the antennas have a different shape (a lot like the antennas shipped with Archer C7), and the WAN LED is now dual-colour, green and orange. For v15.05.1, an image built from SVN r49389 works out of the box. |
| v12.x | 2016 | 17.01.2 | |
| v13.x | 2017 | 18.06 (WiFi unstable on 18.06, stable on 19.07) | Major hardware difference to previous models, now MediaTek based. Requires flashing with recovery method. WAN<->LAN Leakage during boot. |
| v14.x | 2018 | 21.02 | Due to flash size constraints official image is not built but can be built manually with some packages removed. It is possible to run a decent amount of packets when using v19.07. Higher OpenWrt Version WILL HAVE huge problems with the 4MB flash. v14 is not supported on 19.07. Apply the following patch to an 19.07.9 repo to add the v14 hardware: 19.07-wr841nv14-wr840nv62.zip more info here, you can also find there an minimal .config file for starting messing around with the 4MB space |
Community builds
OpenWrt 19.07 ath79 tiny, including LuCI, see this forum thread.
Over 500 days
The TP-Link TL-WRN841N(D) running over 500 days on an Enterprise Level
https://www.dropbox.com/s/lfi35i2toc1iwhv/lede524days.png?dl=0
Hardware
| Version | v3 | v5 | v7 | v8 | v9 | v10 | v11 | v12 | v13 | v14 |
|---|---|---|---|---|---|---|---|---|---|---|
| Instruction set: | MIPS | |||||||||
| Vendor: | Atheros | MediaTek | ||||||||
| bootloader: | uboot | |||||||||
| System-On-Chip: | AR9130 | AR7240 rev 2 | AR7241-AH1A | AR9341 | QCA9533-AL3A | QCA9533-BL3A | QCA9533-AL3A | MT7628NN | ||
| cpu Frq: | 400 MHz | 535 MHz | 550 MHz | 650 MHz | 575 MHz | |||||
| BogoMIPS: | 265.42 | 265.42 | 265.42 | 266.64 | 366.18 | 432.53 | 385.84 | 385.84 | ||
| Flash-Chip: | ST 25P32V6P | Hynix | Eon EN25F32-100HIP | Spansion FL032PIF | Winbond 25Q32FVS1G | Spansion FL032PIF | GigaDevice 25Q64CSIG | GigaDevice 25Q32CSIG | ||
| Flash size: | 4 MiB | 8 MiB | 4 MiB | |||||||
| RAM-Chip: | Hynix HY5DU561622FTP-5 | Zentel A3S56D40ETP-G5 | ESMT M13S2561616A-5T | Winbond W9425G6JH-5 | Zentel A3S56D40GTP-50 | Zentel A3S56D40GTP-50L | ESMT M14D5121632A -2.5B / Winbond W9751G6KB-25 | Zentel A3S56D40GTP-50L | ||
| RAM size: | 32 MiB | 64 MiB | 32 MiB | |||||||
| Wireless: | Atheros AR9100 Rev:7 | Atheros AR9280 Rev:2 | Atheros AR9287-BL1A 2.4GHz 802.11bgn | AR9341 | QCA9533-AL3A | QCA9533-BL3A | QCA9533-AL3A | MT7628NN | ||
| switch: | Marvell 88E6060 | AR7240 built-in | AR7241 built-in | AR9341 built-in | QCA9533-AL3A built-in | QCA9533-BL3A built-in | MT7628NN built-in | |||
| USB: |  | 1.1 mod | 2.0 mod | 2.0 mod | No | | No | 2.0 mod | No | |
| Serial: | Yes | Remove R26 | Remove R26 and bridge R23 | Yes | ||||||
| JTAG: | Yes | | Yes | | No | |||||
Switch configuration
Hardware v8
The port indexes in OpenWrt and in hardware (on the case) are mangled (at least in Barrier Breaker):
| Port | index in /etc/config/network |
|---|---|
| CPU | 0 |
| 1 | 2 |
| 2 | 3 |
| 3 | 4 |
| 4 | 1 |
eth0 (eth1 - in ath79 target) is directly connected to the WAN port.
Hardware v9 and v10
The port indexes in OpenWrt and in hardware (on the case) are swapped:
| Port | index in /etc/config/network |
|---|---|
| CPU | 0 |
| 1 | 4 |
| 2 | 3 |
| 3 | 2 |
| 4 | 1 |
It is possible to run 802.1Q tags on these ports. As of Chaos Calmer mixed (tagged/untagged) VLANs are working, and can be configured via LUCI. The maximum VLAN number is 15
eth1 is directly connected to the WAN port.
Installation
- Flash the squashfs images only, the jffs images will brick the router (not enough space on 4Mb flash) (bug report).
- For DD(trunk) there is a change going on to remove the “N” and “ND”-suffix from the imagename (only “-tl-wr841-v10.bin”).
Installing via web interface:
- Download image for your version.
- Log in to router web interface and select the firmware image you just uploaded as an update.
- Sit and wait while it flashes. It will reboot and be accessible at 192.168.1.1.
 Note: Newest version of tp link firmware (tested on TL-WR841N_V9_150310 / 3.16.9) does not accept openwrt firmware filename, because they are too long ; rename it to something < 64 chars, ending with .bin.
Note: If you get the
Error code: 18005, Upgrade unsuccessfully because the version of the upgraded file was incorrect. Please check the file name.
It means you have to use TFTP to flash openwrt.
Warning! in some cases after reboot you don't have web interface (GUI), only telnet and ssh access. You can install GUI, for details see: luci.essentials, but before install LuCI (GUI) you need to configure your router to have access to internet, for configuration see: internet.connection
TFTP install/recovery via serial
For v8...v13 TFTP install is much easier
Beware that this installation method needs a TTL level serial console usb to TTL like DKU-5 data cable or RS232-TTL level shifter like this: 
and a working TFTP server and should not be attempted unless you have experience with this sort of thing or are eager to learn.
This is taken more or less verbatim from https://forum.openwrt.org/viewtopic.php?id=24203, thanks to dl3daz.
- Download an appropriate image to serve from your TFTP server (for example, openwrt-ar71xx-generic-tl-wr841n-v8-squashfs-factory.bin for v8).
- Hook your routers WAN ethernet port up to your network (for v8.2 it's LAN1 ethernet port)
- Hook up the serial console as explained in the section “serial console”. At the prompt “Autobooting in 1 seconds” type “tpl” quickly to start a uboot console.
- Now we need to set router and server IP addresses (here named ROUTERIP and SERVERIP, substitute these with the real IP addresses).
Type in the console:
setenv ipaddr ROUTERIP
setenv serverip SERVERIP
printenv
For example: Configure this static ip for your LAN card 192.168.1.100. If your computer containing other LAN or Wifi card, disable it!
Type in the console
setenv ipaddr 192.168.1.111
setenv serverip 192.168.1.100
192.168.1.111 is the router ip, 192.168.1.100 is the TFTP server ip.
- Double check that the output of printenv lists the IP addresses you just set.
- Uboot needs the tftp server to be listening on port 69. Make sure your server is configured to listen to that port. Now we can load the firmware over TFTP with “tftpboot 0x80000000 openwrt-ar71xx-generic-tl-wr841n-v8-squashfs-factory.bin”:
ar7240> tftpboot 0x80000000 openwrt-ar71xx-generic-tl-wr841n-v8-squashfs-factory.bin Using eth0 device TFTP from server 192.168.1.100; our IP address is 192.168.1.111 Filename 'openwrt-ar71xx-generic-tl-wr841n-v8-squashfs-factory.bin'. Load address: 0x80000000 Loading: checksum bad ################################################################# ################################################################# ################################################################# ################################################################# ################################################################# ################################################################# ################################################################# ################################################################# ################################################################# ################################################################# ################################################################# ###################################################### done Bytes transferred = 3932160 (3c0000 hex) - Note the “3c0000” in the last line (your number may differ). Now execute the following commands, if necessary replacing 3c0000 with the number you got from tftpboot
Type:
printenv bootcmd
Take note of the address and use it as flash erase start address.
For TL-WR841ND v3:
1. Erase the flash:
 ar7100> erase 0xbf020000 +0x3c0000

First 0x2 last 0x3d sector size 0x10000
  61
Erased 60 sectors
2.Copy RAM content to flash:
 ar7100> cp.b 0x80000000 0xbf020000 0x3c0000
Copy to Flash... write addr: bf020000
done
3.Reset
 ar7100> reset

Resetting...
4. Done.
For TL-WR841ND v5, v7, v8, v9:
1. Erase the flash:
wasp> erase 0x9f020000 +0x3c0000
2. Copy RAM content to flash:
wasp> cp.b 0x80000000 0x9f020000 0x3c0000
3. Set up the boot
wasp> bootm 0x9f020000
## Booting image at 9f020000 ...
Uncompressing Kernel Image ... OK

Starting kernel ...
4. Done.
TFTP recovery via bootloader for v8,v9,v10,v11,v12,v13
As most other current TP-Link routers this device can be flashed and debricked without serial access. Basically, the procedure is as follows:
- Set your PC to use the static IP address
192.168.0.66(the router will have192.168.0.86or192.168.0.2for v13) - Put an OpenWrt factory in the root directory of an TFTP server and name it:
- v8: mr3420v2_tp_recovery.bin or wr841nv8_tp_recovery.bin (for v8.4)
- v9: wr841nv9_tp_recovery.bin
- v10: wr841nv10_tp_recovery.bin
- v11 and v12: wr841nv11_tp_recovery.bin
- v13: tp_recovery.bin
- Power on the router while pressing the reset button until the lock LED is lighting up
- Wait for the router to reboot
TFTP server log may contain info about firmware image name that router requested. Something like:
Read request for file <wr841nv8_tp_recovery.bin> . Mode octet [21/11 09:45:27.574]
For details, see reset_button_method_no_serial_cable_needed
Go back to original firmware
With the TL-WR841ND router, there is a catch: the stock firmware is obtained from the OEM: versions 1,5,7,8,9(versions v1 and v1.5 have same latest fw) and link for v3
- in case the file name of this firmware file does not contain the word “boot” in it, you can simply revert back to original firmware
- in case the file name of this firmware file does contain the word “boot” in it, you need to cut off parts of the image file before flashing it:
The following method applies for the V1, V3, V5, V7, V8, V9, V10 and V13 since the bootloader is the same size.
An example of an image file with the word “boot” in it is wr841nv9_en_3_14_4_up_boot(131129).bin.
Cut the first 0x20200 (that is 131,584 = 257*512) Bytes from original firmware:
dd if=orig.bin of=tplink.bin skip=257 bs=512
You should transfer the firmware image to the /tmp folder and revert back to original firmware (if available you can flash the firmware via the webinterface as well):
Via the safer method using sysupgrade:
sysupgrade /tmp/tplink.bin
Or you use the mtd method:
mtd -r write tplink.bin firmware
For the WR841N v14 follow the procedure above, but you must cut only the first 64k, so
dd if=orig.bin of=tplink.bin skip=129 bs=512
It is also possible to revert to the stock firmware using the method with tftp described in “TFTP install”. (you still need the firmware images without the boot part, unless you're using v13, in which case refer to the instructions for TFTP flashing above).
OEM TP-Link firmware for the TL-WR841ND with the boot part removed or the original firmware if there wasn't a boot part to revert to the original OEM firmware:
- TL-WR841N(D) V1 2008613143645.zip
- TL-WR841N(D) V3 TL-WR841ND-V3-stripped.zip
- TL-WR841N(D) V5 201112613340616.zip
- TL-WR841N(D) V7 TL-WR841ND-V7.zip
- TL-WR841N(D) V8 TL-WR841ND-V8-stripped.zip
- TL-WR841N(D) V9 TL-WR841ND-V9-stripped.zip
- TL-WR841N(D) V10 TL-WR841ND-V10-stripped.zip
Failsafe mode
- When the SYS led (under gear icon) starts to blink push the QSS/reset button for around 5-10 sec. Now the led should blink a lot faster than before.
Debricking
v7
- Disconnect the router from the internet, connect it with a PC via RJ45 cable and perform a 30/30/30 restart
- Change the IP on the PC to 192.168.1.2. Subnet mask must be 255.255.255.0. Restart the router by unplugging the power cable.
- Perform a failsafe boot and quickly use
telnet 192.168.1.1
If this didn't work, check the IP address on the PC or if you were too slow to connect during the failsafe mode. Still not working? Read this!
In telnet, do the following things one after another:
- Define a password
passwd
enter
yourpassword
enter
againyourpassword
enter
- Kill the broken OWrt firmware
mtd -r erase rootfs_data
enter
firstboot
enter
reboot -f
After rebooting, log in again just to check if the router is accessible. If you can't, start again at the beginning.
Now change the network settings on the PC back to “Acquire IP address automatically” and connect the router with the internet. Do a manual reboot by simply turning it off and back on again. The PC should now get an IP address by DHCP. If this is the case, you successfully reset the router. If not, repeat from the beginning or do this if you like.
Basically the router now works like after the initial flash to OWrt. Now you have to configure the internet connection and probably you want to install LUCI. After that, open your browser, connect to 192.168.1.1 and log in with the data you entered via telnet.
v8,v9,v10,v11,v12,v13
Basic configuration
Repeater / Multiple SSID / Virtual access point / Client bridge
With BARRIER BREAKER (Bleeding Edge, r40867)
Tested with the wr841n v9 with Linux OpenWrt-tplink 3.10.36 #1 Thu May 29 06:34:50 UTC 2014 mips GNU/Linux/ or better openwrt BARRIER BREAKER (Bleeding Edge, r40867) . The system supports multiple virtual access points.
Modify the files that follows according to your needs (and, in the case, search for the file definition here in the wiki to understand how it works)
etc/config/wireless
config wifi-device  radio0
        option type     mac80211
        option channel  9 #same channel of the existing wifi network
        option path     'platform/qca953x_wmac'
        option txpower  12 #this depends on your needs, default is 20 dBm. Lower it is healthier (citation needed)
        # REMOVE THIS LINE TO ENABLE WIFI:
        #option disabled 1

config wifi-iface
        option device   radio0
        option network  lan
        option mode     ap
        option ssid     'This_is_a_new_wifi_network'
        option encryption       psk2 #wpa2 psk
        option key      'this_is_the_wifi_password'

config wifi-iface
        option device   radio0
        option network  wan
        option mode     'sta'
        option ssid     'This_is_the_name_of_the_existing_wifi_network'
        option encryption       psk2
        option key      'this_is_the_wifi_password_to_get_the_connection'
etc/config/network
config interface 'loopback'
        option ifname 'lo'
        option proto 'static'
        option ipaddr '127.0.0.1'
        option netmask '255.0.0.0'

config globals 'globals'
        option ula_prefix 'here is written something, no need to modify it'

config interface 'lan'
        option ifname 'eth0'
        option force_link '1'
        option type 'bridge'
        option proto 'static'
        option ipaddr '192.168.11.1' ä modify this according to you needsfor the lan network
        option netmask '255.255.255.0'
        option ip6assign '60'

config interface 'wan'
        #option ifname 'eth1'
        option proto 'dhcp'

config interface 'wan6'
        option ifname '@wan'
        option proto 'dhcpv6'

config switch
        option name 'switch0'
        option reset '1'
        option enable_vlan '1'

config switch_vlan
        option device 'switch0'
        option vlan '1'
        option ports '0 1 2 3 4'
etc/config/dhcp
Pratically unchanged
config dnsmasq
        option domainneeded '1'
        option boguspriv '1'
        option filterwin2k '0'
        option localise_queries '1'
        option rebind_protection '1'
        option rebind_localhost '1'
        option local '/lan/'
        option domain 'lan'
        option expandhosts '1'
        option nonegcache '0'
        option authoritative '1'
        option readethers '1'
        option leasefile '/tmp/dhcp.leases'
        option resolvfile '/tmp/resolv.conf.auto'

config dhcp 'lan'
        option interface 'lan'
        option start '100'
        option limit '150'
        option leasetime '12h'
        option dhcpv6 'hybrid'
        option ra 'hybrid'
        option ndp 'hybrid'

config dhcp 'wan'
        option interface 'wan'
        option ignore '1'

config odhcpd 'odhcpd'
        option maindhcp '0'
        option leasefile '/tmp/hosts/odhcpd'
        option leasetrigger '/usr/sbin/odhcpd-update'

config dhcp 'wan6'
        option dhcpv6 'hybrid'
        option ra 'hybrid'
        option ndp 'hybrid'
        option master '1'
etc/config/firewall
Pratically unchanged because the “client” wifi is connected to the “wan” interface, while the “repeater” wifi is connected to the lan interface, thus the firewall is basically already configured.
config defaults
        option syn_flood        1
        option input            ACCEPT
        option output           ACCEPT
        option forward          REJECT
# Uncomment this line to disable ipv6 rules
#       option disable_ipv6     1

config zone
        option name             lan
        list   network          'lan'
        option input            ACCEPT
        option output           ACCEPT
        option forward          ACCEPT

config zone
        option name             wan
        list   network          'wan'
        list   network          'wan6'
        option input            REJECT
        option output           ACCEPT
        option forward          REJECT
        option masq             1
        option mtu_fix          1

config forwarding
        option src              lan
        option dest             wan
Final actions
Just be sure that the files are saved. To edit the files on windows, either use vi on the openwrt, check for a tutorial online, the basic commands are not difficult; or use winscp with a SCP connection and edit the files with an editor on windows. Then reboot the system and check for the wifi connection.
Remember that if the “client” wifi doesn't work, won't work also the repeater wifi network.
attitude_adjustment 12.09 (final)
The default wireless configuration is different, for example
there is no: option path 'platform/qca953x_wmac' .
Further investigation shown that the wireless is able to provide an AP
if connected to whatever interface defined in /etc/config/network,
while for 'sta' mode (a wifi client) it is possible to obtain it only if
the interface connected to the wireless configuration is not using the bridge option nor having a relation to a switch with more than one port (for example if with eth0 we define a switch over multiple ports) Note: would be better to check this statement more thoroughly.
For example, with the configuration reported above for barrier breaker, the wlan is linked with the wan side, that is using no switch interfaces nor bridge protocol. This works too for 12.09.
Use WPS with WPS button
Prepare and install WPS
- Follow the instructions for installing WPS : See wps_options
- Your '/etc/config/wireless' file should be like that :
config wifi-iface
        option device 'radio0'
        option network 'lan'
        option mode 'ap'
        option ssid 'XXXXXXXXXXXXXXX'
        option key 'XXXXXXXXXXXXXXXXXXXXXXX'
        option wps_pushbutton '1'
        option wps_config 'push_button'
        option encryption 'psk2'
Check configuration
- After reboot, if everything is ok, you can test with this command:
root@OpenWrt /root# hostapd_cli -p /var/run/hostapd-phy0 wps_pbc
Selected interface 'wlan0'
OK
Plug button action
- Now, we can configure the WPS button on back on TL-WR841N to launch this command when we pressed it. Edit the file '/etc/hotplug.d/button/50-wps'
#!/bin/sh
# for debugging button name and action name, uncomment this 2 lines
#logger $BUTTON
#logger $ACTION

if [ "$ACTION" = "pressed" -a "$BUTTON" = "reset" ]; then
        for dir in /var/run/hostapd-*; do
                [ -d "$dir" ] || continue
                hostapd_cli -p "$dir" wps_pbc
        done
fi
If everything goes ok, you should see in Syslog not only the button events, but also succesful WPS authentication.
Wifi on/off toggle by QSS button
Read this howto to use buttons on TP-Link
Found in WR741ND wiki page and coppied. It works on WR841ND too.
(Thanks to obsy) Wifi toggle by QSS button Simply create a new file called 01onoff in /etc/hotplug.d/button/
vi /etc/hotplug.d/button/01onoff
and copy these lines inside (remember to push 'i' for insert)
#!/bin/sh

[ "$BUTTON" = "wps" ] && [ "$ACTION" = "pressed" ] && {
 SW=$(uci get wireless.@wifi-device[0].disabled)
 [ $SW == '0' ] && uci set wireless.@wifi-device[0].disabled=1
 [ $SW == '0' ] || uci set wireless.@wifi-device[0].disabled=0
 wifi
}
Save and exit
(esc :wq)
for the v14 edit the reset button
vi /etc/rc.button/reset
delete all the lines and make it like this:
#!/bin/sh

. /lib/functions.sh

OVERLAY="$( grep ' /overlay ' /proc/mounts )"

case "$ACTION" in
pressed)
        [ -z "$OVERLAY" ] && return 0

        return 5
;;
timeout)
        . /etc/diag.sh
        set_state failsafe
;;
released)
        if [ "$SEEN" -lt 1 ]
        then
                echo "wifi on/off" > /dev/console
                SW=$(uci get wireless.@wifi-device[0].disabled)
 		[ $SW == '0' ] && uci set wireless.@wifi-device[0].disabled=1
		[ $SW == '0' ] || uci set wireless.@wifi-device[0].disabled=0
		wifi
        fi
;;
esac

return 0
thanks again to obsy
Port Mirroring
Atheros switch (which should be present in hardware revisions up to and including v12) port mirroring is supported starting with OpenWRT 18.06.
The following example mirrors port index 3 to port index 4.
/etc/config/network
config switch
        option name 'switch0'
        option reset '1'
        option enable_vlan '1'
        option mirror_monitor_port '4'

config switch_port
        option port '3'
        option enable_mirror_rx '1'
        option enable_mirror_tx '1'
Serial console
Getting serial console is pretty standard fare. You need a MAX323 or similar level-shifter. The pinout on the router is RX - TX - GND - +5V (Power connector).
If you do not have serial port on your PC, use Nokia CA-42 data USB cable.
- TP-Link WR841ND V7.0: The 10k the pullup resistor is not required, connect all four pins (tested with 1a86:7523 QinHeng Electronics HL-340 USB-Serial adapter, make sure to set its voltage to 3V not 5V)
- TP-Link WR841ND V7.1: Also requires the 10k pullup resistor between TX and the 3.3V pin. Without the resistor I just get garbage when I type, but can see some console output.
- TP-LINK WR841ND V7.2: Power conector (+5V) is ignored, just connect RX - TX - GND and router power cord, work fine...
- TP-LINK WR841ND V7.2: Has a VCC of +3.3V and like the TL-MR3420 serial needed to connect a 10k pullup resistor between the TX and the 3.3V pin to get reliable serial:

- TP-Link TL-WR841ND v8.4: was not required 10K resistor. My TTL to RS232 converter has bad marking of Tx and Rx pins. So, it was necessary to connect Tx-Tx and Rx-Rx. The connection of Vcc (3.3V) was necessary too. The connection scheme you can find on the following image:

- TP-Link TL841N v9.0: I had to remove R26. It's a pull-up between RX (device side) and VCC. My FTDI device couldn't send data with R26 attached.
- TP-Link TL-WR841N V9.2: Works fine without removing R26, just normal TX,RX,GND connection works fine.
- TP-LINK TL-WR841N V9.3: Works fine without removing or installing anything, just normal TX,RX,GND connection works fine; but I had to set my TTL to 5V otherwise there's gibberish and TX don't work, took me hours to figure out 3.3V were not enough for stable serial. PS. When using the VCC from the router it is 3.3V.
- TP-Link TL-WR841N v10: Seems to be the same PCB like the version v9. Serial works after remove R26, see v9.0. Tested with CH340G USB/serial device.
- just swap TX and GND pin in serial and no garbage in serial console, but this is read-only.


Tip: Connecting TL-WR841N v8.1 via Arduino Due R3 ( forum link):

Serial port settings
| Version | v3.2 | v5 | v7.X | v8.4 | v9.0 / v10.0 | v11.1 / v12.0 |
|---|---|---|---|---|---|---|
| Image |  |  |  |  v8.4") |  |  |
| U-Boot speed | 9600 | 115200 | ||||
| kernel speed | 115200 - switch automaticaly | 115200 | ||||
| Data format | always 8N1 | |||||
After connecting, you will be greeted by something like this:
AP93 (ar7240) U-boot
DRAM:
sri
#### TAP VALUE 1 = 9, 2 = 9
32 MB
id read 0x100000ff
flash size 4194304, sector count = 64
Flash:  4 MB
Using default environment

In:    serial
Out:   serial
Err:   serial
Net:   ag7240_enet_initialize...
No valid address in Flash. Using fixed address
: cfg1 0xf cfg2 0x7014
eth0: 00:03:7f:09:0b:ad
eth0 up
No valid address in Flash. Using fixed address
: cfg1 0xf cfg2 0x7214
eth1: 00:03:7f:09:0b:ad
ATHRS26: resetting s26
ATHRS26: s26 reset done
eth1 up
eth0, eth1
Autobooting in 1 seconds
You now have one second to enter “tpl” (without the quotes) to get to the Uboot console prompt.
JTAG
Near the two biggest capacitor you could see a HE10 connector with 14 pin (V8).
| Pin | Function | Pin | |
|---|---|---|---|
| 1 | ? | GND | 2 |
| 3 | TCK | GND | 4 |
| 5 | TDI | GND | 6 |
| 7 | TDO | GND | 8 |
| 9 | TMS | GND | 10 |
| 11 | ? | ? | 12 |
| 13 | ? | ? | 14 |
For JTAG interface you need VCC. You could take it on the TP1 point test.
Troubleshooting
Stuck at 130Mbps? Get 300Mbps
This violates regulatory requirements
Edit the file /etc/config/wireless
- Below config 'wifi-device' 'radio0' add
option 'noscan' '1'
- option 'htmode' should be set either to HT40+ or HT40-(HT40+ wont work with Channel 11)
option 'htmode' 'HT40+'
- Restart wireless
wifi
Can not connect to v8?
Check whether eth0/eth1 are switched! In failsafe mode, you have to connect to the wan port.
Bootloader Mods
- you could read about bootloader in general and about Das U-Boot in particular.
U-Boot 1.1.4 modification for routers
Forum member pepe2k made a modification of U-Boot 1.1.4 for Qualcomm Atheros SoCs based devices (the project is still being developed, so new devices and SoCs will be supported in the future). Up to date information, sources can be found on official GitHub repository and binary images here.
This modification started from wr703n-uboot-with-web-failsafe project, but supports more devices, all modern web browsers, has a lot of improvements and other modifications (like U-Boot NetConsole, custom commands, overclocking possibilities etc.).
More information:
- Official repository on GitHub: U-Boot 1.1.4 modification for routers
- Discussion about this project on OpenWrt forum
- An article (in Polish) about one of the first version of this project on www.tech-blog.pl
Hardware Mods
USB 1.1 Port
Tested on WR841n_v5.1
Attention. Firmware of TP-Link TL-MR 3420 is coming to WR841ND v7.2 - verified. (OpenWrt Firmware Attitude Adjustment (r28380) / LuCI Trunk (trunk+svn7612)) But working usb port has not been verified. Probably enough to use this firmware, but do not compile a new one :)
Overview of the board:

Soldering (wire with red accent means D+). R185 and R183 can be shorted then D+/D- will appear in J1.

To get working USB the new firmware build is required. Files to edit are listed below:
1. Edit file target/linux/ar71xx/files/arch/mips/ar71xx/mach-tl-wr841nd.c
    Add line #include "dev-usb.h" after line #include "dev-leds-gpio.h"
    Add line ar71xx_add_device_usb(); before line ar71xx_add_device_mdio(0x0);
2. Edit file target/linux/ar71xx/files/arch/mips/ar71xx/setup.c
Add line ar71xx_pll_wr(0x08, 0x00001030); before line ar71xx_detect_mem_size();
3. Edit file target/linux/ar71xx/files/arch/mips/ar71xx/Kconfig:
config AR71XX_MACH_TL_WR841N_V1
        bool "TP-LINK TL-WR841N v1 support"
        select AR71XX_DEV_M25P80
        select AR71XX_DEV_PB42_PCI if PCI
        select AR71XX_DEV_DSA
        select AR71XX_DEV_GPIO_BUTTONS
        select AR71XX_DEV_LEDS_GPIO
        select AR71XX_DEV_USB
        default n
For newer version of trunk (as of 2013 March) 1.Edit file target/linux/ar71xx/files/arch/mips/ath79/mach-tl-wr841n.c
    Add line #include "dev-usb.h" after line #include "dev-leds-gpio.h"
    Add line ath79_register_usb(); after line ath79_register_eth(0);
2. Edit file target/linux/ar71xx/generic/profiles/tp-link.mk, add packages in the definition of TLWR841 as following.
define Profile/TLWR841
	NAME:=TP-LINK TL-WR841N/ND
	PACKAGES:=kmod-usb-core kmod-usb2 kmod-ledtrig-usbdev
endef
i.e L7805 with 470uF and 100uF can be used to obtain 5V from the stock power supply.
NOTE: in case of v5.1 sections for WR741N instead of WR841N_V1 have to be edited (Kconfig, mach-tl-wr741nd.c).
USB 2.0 Port on v7
tested with WR841 v7.1 and trunk revision 30430. New patch for rev. 32461 available
Hardware mod is on pictures, nothing changed. External Link
Kernel mod is different, because new kernel version is released in revision 30430.
Here is patch for kernel 3.3: https://web.archive.org/web/20190102225415/http://mysicka.ics.muni.cz:80/openwrt/usb-patch-final.patch
Apply this patch and build...
USB 2.0 Port on v8
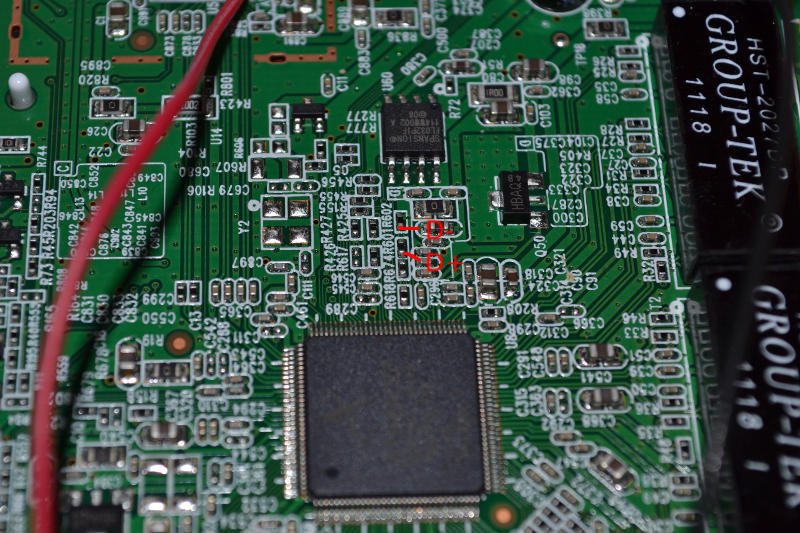
I haven't tested this, but it appears to show where the USB D+ and D- pins can be found on the AR9341: http://ge.tt/m/2IKNi5l/

USB 2.0 Port on v13
Visit this forum thread.
16M Flash & 64M RAM on v8 (China)
v8 (China) uses EON 2M flash, replace with Winbond W25Q128FVSG
Original RAM chip 16M ZENTEL A3S28D40FTP, replace RAM chip Hynix HY5DU121622DTP 64M (DDR)
updated v8 firmware successfully
Hardware info:
| CPU | Atheros AR9341 rev 1 |
| Memory | 64MB DDR |
| Flash | Winbond W25Q128 @ 20MHz (16MB) |
| ETH | Atheros AR8228/AR8229 rev 1 |
| Clock | CPU: 560MHz, DDR: 400MHz, AHB: 200MHz, Ref: 25MHz |
NOTE: ART partition can be extracted from original flash (EON 2M) at last 64K area, address as 0x1F0000. ART data need to be appended to new flash manually, otherwise an ar934x_wmac error occurs without wifi function.
64MB RAM Mod v7
Working chips:
- Hynix HY5DU121622DTP-D43 (From Mustang DDR SO-DIMM 512 MB)
- Hynix HY5DU121622CTP-D43 (From Hynix DDR SO-DIMM PC2700S-25330 512MB DDR 333MHz CL 2.5
- Hynix HY5DU121622AT-J (From DDR 256MB PC400 (BUD968RA))
- Infineon HYB25D512160BE (From Infineon DDR SO-DIMM 512 MB)
- Elpida EDD5116ADTA-6B-E (From Elpida DDR SO-DIMM 512 MB)
- Elpida EDD5116AFTA-5B-E (From Elpida DDR SO-DIMM 512 MB)
- Samsung K4H511638C-UCB3 (From Samsung DDR SO-DIMM 512 MB)
- EtronTech EN6AB160TSA-5G (DDR400 200MHz)
- Micron MT46V32M16P-5B
- Zentel A4S12D30FTP-G5
http://img5.fotos-hochladen.net/uploads/tlwr841nd64mbrkhpt1fyw9.jpg

8MB/16MB FLASH Mod
Flash-Chips (3.3 V)
8 MiB:
  * Spansion S25FL064P
  * Atmel AT25DF641
  * EON EN25Q64
  * Micron M25P64
  * Winbond W25Q64
  * Macronix MX25L64
  * GigaDevice GD25Q64
16 MiB:
  * Winbond W25Q128
  * Macronix MX25L128
  * Spansion S25FL127S
  * Micron N25Q128
  * GigaDevice GD25Q128
CANBus Interface for V8.x

Tags
Hardware Highlights
OpenWrt Support
The TP-Link TL-WR841N(D) has multiple different versions as shown in this table.
| Version | Launch Date | Supported from | Notes | |
|---|---|---|---|---|
| v1.x | 2007 | 10.03.1 | Added model support | |
| v3.x | 2008 | 10.03.1 | Forum thread | |
| v5.x | 2010 | 10.03.1 | Forum thread | |
| v7.x | 2010 | 12.09 | UFO shaped model. | |
| v8.x (China) | ? | No | 2 MiB flash is not enough to run OpenWrt, needs hardware mod. Worked with r29631 trunk. | |
| v8.x (Int.) | 2012 | 12.09 | Forum thread | |
| v9.x | 2014 | 14.07 | 14.07 Barrier Breaker reportedly suffers from slow wifi, upgrade to 15.05 recommended | |
| v10.x | 2015 | 15.05.1 | Forum thread, Trac ticket 20757 | |
| v11.x | 2015 | unknown | Forum thread. Only the flash chip seems to be different compared to v10.x. Supported in trunk as from 2016-04-01. You can use 15.05 images for v10 with sysupgrade -F, overriding the hardware check. |
Firmware downloads
Only OFFICIAL OpenWrt images should be listed here.
| Version | Flash from non-OpenWrt firmware | Upgrade from existing OpenWrt firmware |
|---|---|---|
| v1.x | 15.05.1 Factory image | 15.05.1 Upgrade image |
| v3.x | 15.05.1 Factory image | 15.05.1 Upgrade image |
| v5.x | 15.05.1 Factory image | 15.05.1 Upgrade image |
| v7.x | 15.05.1 Factory image | 15.05.1 Upgrade image |
| v8.x (Int.) | 15.05.1 Factory image | 15.05.1 Upgrade image |
| v9.x | 15.05.1 Factory image | 15.05.1 Upgrade image |
| v10.x | 15.05.1 Factory image | 15.05.1 Upgrade image |