TP-Link TL-WR841ND
Il dispositivo è un router wireless N con:
- 2 Antenne scollegabili
- 4 Interfacce Switch 100/10
- 1 Interfaccia Wan 100/10
- 4 MB di Flash
Nota1: Il modello TL-WR841N è identico tranne per la possibilità di scollegare le antenne. Nella nomenclatura della TP-LINK i modelli che terminano con D hanno le antenne scollegabili (detachable antennas).
Nota2: Le revisioni v5.4, v5.2 etc. sono tutte delle identificate come rev. v5. L'unica differenza è la versione del firmware con cui sono state rilasciate. Nella nomenclatura della TP-Link i numeri dopo la virgola si riferiscono semplicemente a un cambiamento della versione del firmware. l'hardware è identico.
Versioni supportate
| Versione/Modello | Data di lancio prodotto | Supportato da OpenWrt dalla versione | Note Relative al modello specifico |
|---|---|---|---|
| v3.x | - | 10.03 | Report |
| v5.x | - | 10.03 | Report |
| v7.x | - | 12.09 | UFO shape -- Completamente funzionante dalla versione 12.09 |
| v8.x (chinese version) | - | Trunk r29631(modified) | necessita di una modifica harware |
| v8.x (Intl) | Agosto 2012 | Trunk r33623 | DB120 |
Hardware
| Version | v3 | v5 | v7.1 | v7.2 | v8.0 |
|---|---|---|---|---|---|
| Architettura: | MIPS | MIPS | MIPS | MIPS | MIPS |
| Produttore: | Atheros | Atheros | Atheros | Atheros | Atheros |
| Bootloader: | U-Boot | U-Boot | U-Boot | U-Boot | U-Boot |
| System-On-Chip: | AR9130 | AR7240 rev 2 | AR7241 rev 1 | AR7241-AH1A | AR9341 |
| Velocità CPU: | 400 Mhz | 400 Mhz | 400 Mhz | 400 Mhz | 535 Mhz |
| BogoMIPS: | 265.42 | 266.24 | 265.42 | 265.42 | 261.73 |
| Flash-Chip: | ? | ? | ? | cFeon F32-100HIP (?) | FL032PIF |
| Dimensione Flash: | 4 MiB | 4 MiB | 4 MiB | 4 MiB | 4 MiB |
| RAM-Chip: | ? | ? | ? | Zentel A3S56D40ETP-G5 | ? |
| Dimensione RAM: | 32 MiB | 32 MiB | 32 MiB | 32 MiB | 32 MiB |
| Wireless: | Atheros AR9100 Rev:7 | Atheros AR9280 Rev:2 | Atheros AR9287 Rev2, 2.4GHz, 802.11bgn | Atheros AR9287-BL1A 2.4ghz 802.11bgn | AR9341 |
| Ethernet: | ? | AR7240 built-in switch | AR7240/AR9330 built-in switch | ? | ? |
| USB: | ? | Unpopulated | unpopulated | ? | ? |
| Serial: | Si | Si | Si | Si | Si |
| JTAG: | ? | ? | ? | ? | ? |
Installazione
Io ho provato la versione 12.09-rc2 e successivamente ho compilato una mia immagine dal ramo trunk (r36370), nel primo caso ho effettuato l'installazione dall'interfaccia web (originale) del router usando l'immagine http://downloads.openwrt.org/attitude_adjustment/12.09-rc2/ar71xx/generic/openwrt-ar71xx-generic-tl-wr841nd-v3-squashfs-factory.bin completando l'installazione senza alcun problema. Nel secondo caso per un mio errore il sistema non è stato più in grando di avviarsi, ma seguendo la procedura di ripristino trammite u-boot seriale e TFTP sono riuscito a riportare senza troppi problemi il router alla vita.
Installare OpenWrt su TP-Link TL-WR841ND/TL-WR841N:
- Scaricare l'immagine per la vostra versione del router
rev. v3.x: http://downloads.openwrt.org/attitude_adjustment/12.09-rc2/ar71xx/generic/openwrt-ar71xx-generic-tl-wr841nd-v3-squashfs-factory.bin
rev. v5.x: http://downloads.openwrt.org/attitude_adjustment/12.09-rc2/ar71xx/generic/openwrt-ar71xx-generic-tl-wr841nd-v5-squashfs-factory.bin
rev. v7.x: http://downloads.openwrt.org/attitude_adjustment/12.09-rc2/ar71xx/generic/openwrt-ar71xx-generic-tl-wr841nd-v7-squashfs-factory.bin
rev. v8.x: http://downloads.openwrt.org/attitude_adjustment/12.09-rc2/ar71xx/generic/openwrt-ar71xx-generic-tl-wr841n-v8-squashfs-factory.bin
- Collegarsi all'interfaccia web, selezionare l'immagine appena scaricata e caricarla sul router come fosse un aggiornamento
- Sedersi e aspettare. Al termine dell'operazione di Flash il router sarà accessibile all'indirizzo 192.168.1.1.
 Attenzione! in alcuni casi dopo il riavvio potreste non avere a disposizione l'interfaccia web (GUI), ma solo il telnet o l'accesso ssh. Si può installare l'interfaccia web seguendo questa guida : luci.essentials, ma prima di installare LuCI (GUI) è necessario configurare il router per accedere ad internet, per la configurazione potete far riferimento a questa guida: internet.connection
Installazione/Ripristino trammite TFTP
Attenzione questo tipo di installazione necessita di una connessione seriale e di un servet TFTP funzionante evita questo metodo se non hai esperienza o il tempo per imparare. :)
Buona parte della seguente guida è tratta da questo topic https://forum.openwrt.org/viewtopic.php?id=24203, grazie a dl3daz.
- Scarica l'immagine del tuo dispositivo nella cartella del tuo server TFTP.
- Collega la porta Wan alla tua rete
- Collega la console seriale come spiegato nella sezione “console seriale” e utilizza il trucco “tpl” per avere accesso alla console.
- Ora dobbiamo configurare l'ip del router e del server TFTP (al posto di ROUTERIP e SERVERIP, inserisci gli indirizzi reali della tua rete). Scrivi nella console:
setenv ipaddr ROUTERIP
setenv serverip SERVERIP
printenv
- Controlla bene che l'output di printenv sia corretto e contenga gli indirizzi IP appena impostati. Ora è possibile caricare il firmware trammite TFTP con il comando “tftpboot 0x80000000 NOMEIMMAGINE” (al posto di NOMEIMMAGINE, inserisci il nome del file che hai messo nella cartella del server TFTP):
ar7240> tftpboot 0x80000000 NOMEIMMAGINE Using eth0 device TFTP from server 192.168.32.253; our IP address is 192.168.32.246 Filename 'NOMEIMMAGINE'. Load address: 0x80000000 Loading: checksum bad ################################################################# ################################################################# ################################################################# ################################################################# ################################################################# ################################################################# ################################################################# ################################################################# ################################################################# ################################################################# ################################################################# ###################################################### done Bytes transferred = 3932160 (3c0000 hex) - Nota il valore “3c0000” nell'ultima linea (il tuo potrebbe essere diverso). Ora esegui i seguenti comandi, se necessario sostituisci il valore 3c0000 con quello riportato da tftpboot
Per TL-WR841ND v3:
ar7100> erase 0xbf020000 +0x3c0000

First 0x2 last 0x3d sector size 0x10000
  61
Erased 60 sectors
ar7100> cp.b 0x80000000 0xbf020000 0x3c0000
Copy to Flash... write addr: bf020000
done
ar7100> reset

Resetting...
Per TL-WR841ND v5:
ar7240> erase 0x9f020000 +0x3c0000
...
ar7240> cp.b 0x80000000 0x9f020000 0x3c0000
ar7240> bootm 0x9f020000
- Fatto, ora OpenWRT dovrebbe avviarsi come al solito e permetterti di configurarlo:
U-Boot 1.1.4 (Apr 9 2009 - 12:29:57)
Go back to original firmware
- Download the original firmware from TP-Link's site (IMPORTANT: Download a firmware which has does not contain the word boot in it's filename (such as wr741nv1_en_3_9_18_up_boot(100104).bin), extract the file and rename it to something short and simple such as
tplink.bin. - Upload it to
/tmp-directory on your router and execute:mtd -r write /tmp/tplink.bin firmware
- Be careful, if you were hit by the “missing web interface” problem described above, you will be probably see the same issue when flashing back to OEM and the box will lack in telnet or ssh, too, so no way to get out without hardware intervention.
Failsafe mode
- When the SYS led (under gear icon) starts to blink push the QSS button for around 5-10 sec. Now the led should blink a lot faster than before.
Debricking
V 7.2 July 2012
- Disconnect the router from the internet, connect it with a PC via RJ45 cable and perform a 30/30/30 restart
- Change the ip on the PC to 192.168.1.2, subnet mask must be 255.255.255.0 and restart the router by unplugging the power cable
- Perform a failsafe boot, quickly use
telnet 192.168.1.1
If this didnt work check the ip adress on the PC or if you were too slow to connect during the failsafe mode. Still not working? Read this!
In telnet do the following things one after another:
- Define a password
passwd
enter
yourpassword
enter
againyourpassword
enter
- Kill the broken OWRT firmware
mtd -r erase rootfs_data
enter
firstboot
enter
reboot -f
After rebooting log in again just to check if the router is accessable. If you cant start again at the beginning.
Now change the network settings on the PC back to “Aquire IP adress automatically” and connect the router with the internet. Do a manual reboot by simply turning it off and back on again. The PC should now get an ip adress by DHCP. If this is the case you successfully resetted the router. If not repeat from the beginning or do this if you like.
Basically the router now works like after the initial flash to OWRT. Now you have to configure the internet connection and probably you want to install LUCI. After that open your browser, connect to 192.168.1.1 and log in with the data you entered via telnet.
V8.X note
Debricking see the above, but you will have to plug your cable to WAN port in failsafe to be able to telnet 192.168.1.1.
Basic configuration
Wifi on/off toggle by QSS button
Read this howto to use buttons on TP-Link
Found in WR741ND wiki page and coppied. It works on WR841ND too.
(Thanks to obsy) Wifi toggle by QSS button Simply create a new file called 01onoff in /etc/hotplug.d/button/
vi /etc/hotplug.d/button/01onoff
and copy these lines inside (remember to push 'i' for insert)
#!/bin/sh

[ "$BUTTON" = "wps" ] && [ "$ACTION" = "pressed" ] && {
 SW=$(uci get wireless.@wifi-device[0].disabled)
 [ $SW == '0' ] && uci set wireless.@wifi-device[0].disabled=1
 [ $SW == '0' ] || uci set wireless.@wifi-device[0].disabled=0
 wifi
}
Save and exit
(esc :wq)
Serial console
Getting serial console is pretty standard fare. You need a MAX323 or similar level-shifter. The pinout on the router is RX - TX - GND - +5V (Power connector).
If you do not have serial port on your PC, use Nokia CA-42 data USB cable.
For TP-LINK WR841ND V7.2 power conector (+5V) is ignored, just connect RX - TX - GND and router power cord, work fine...
Another user notes: My TP-LINK WR841ND V7.2 has a VCC of +3.3V and like the TL-MR3420 serial needed to connect a 10k pullup resistor between the TX and the 3.3V pin to get reliable serial.
Yet another user notes: My TP-Link WR841ND V7.1 also requires the 10k pullup resistor between TX and the 3.3V pin. Without the resistor I just get garbage when I type, but can see some console output.
Serial port settings:
| Version | v3.2 | v5 | v7.X |
|---|---|---|---|
| Image | 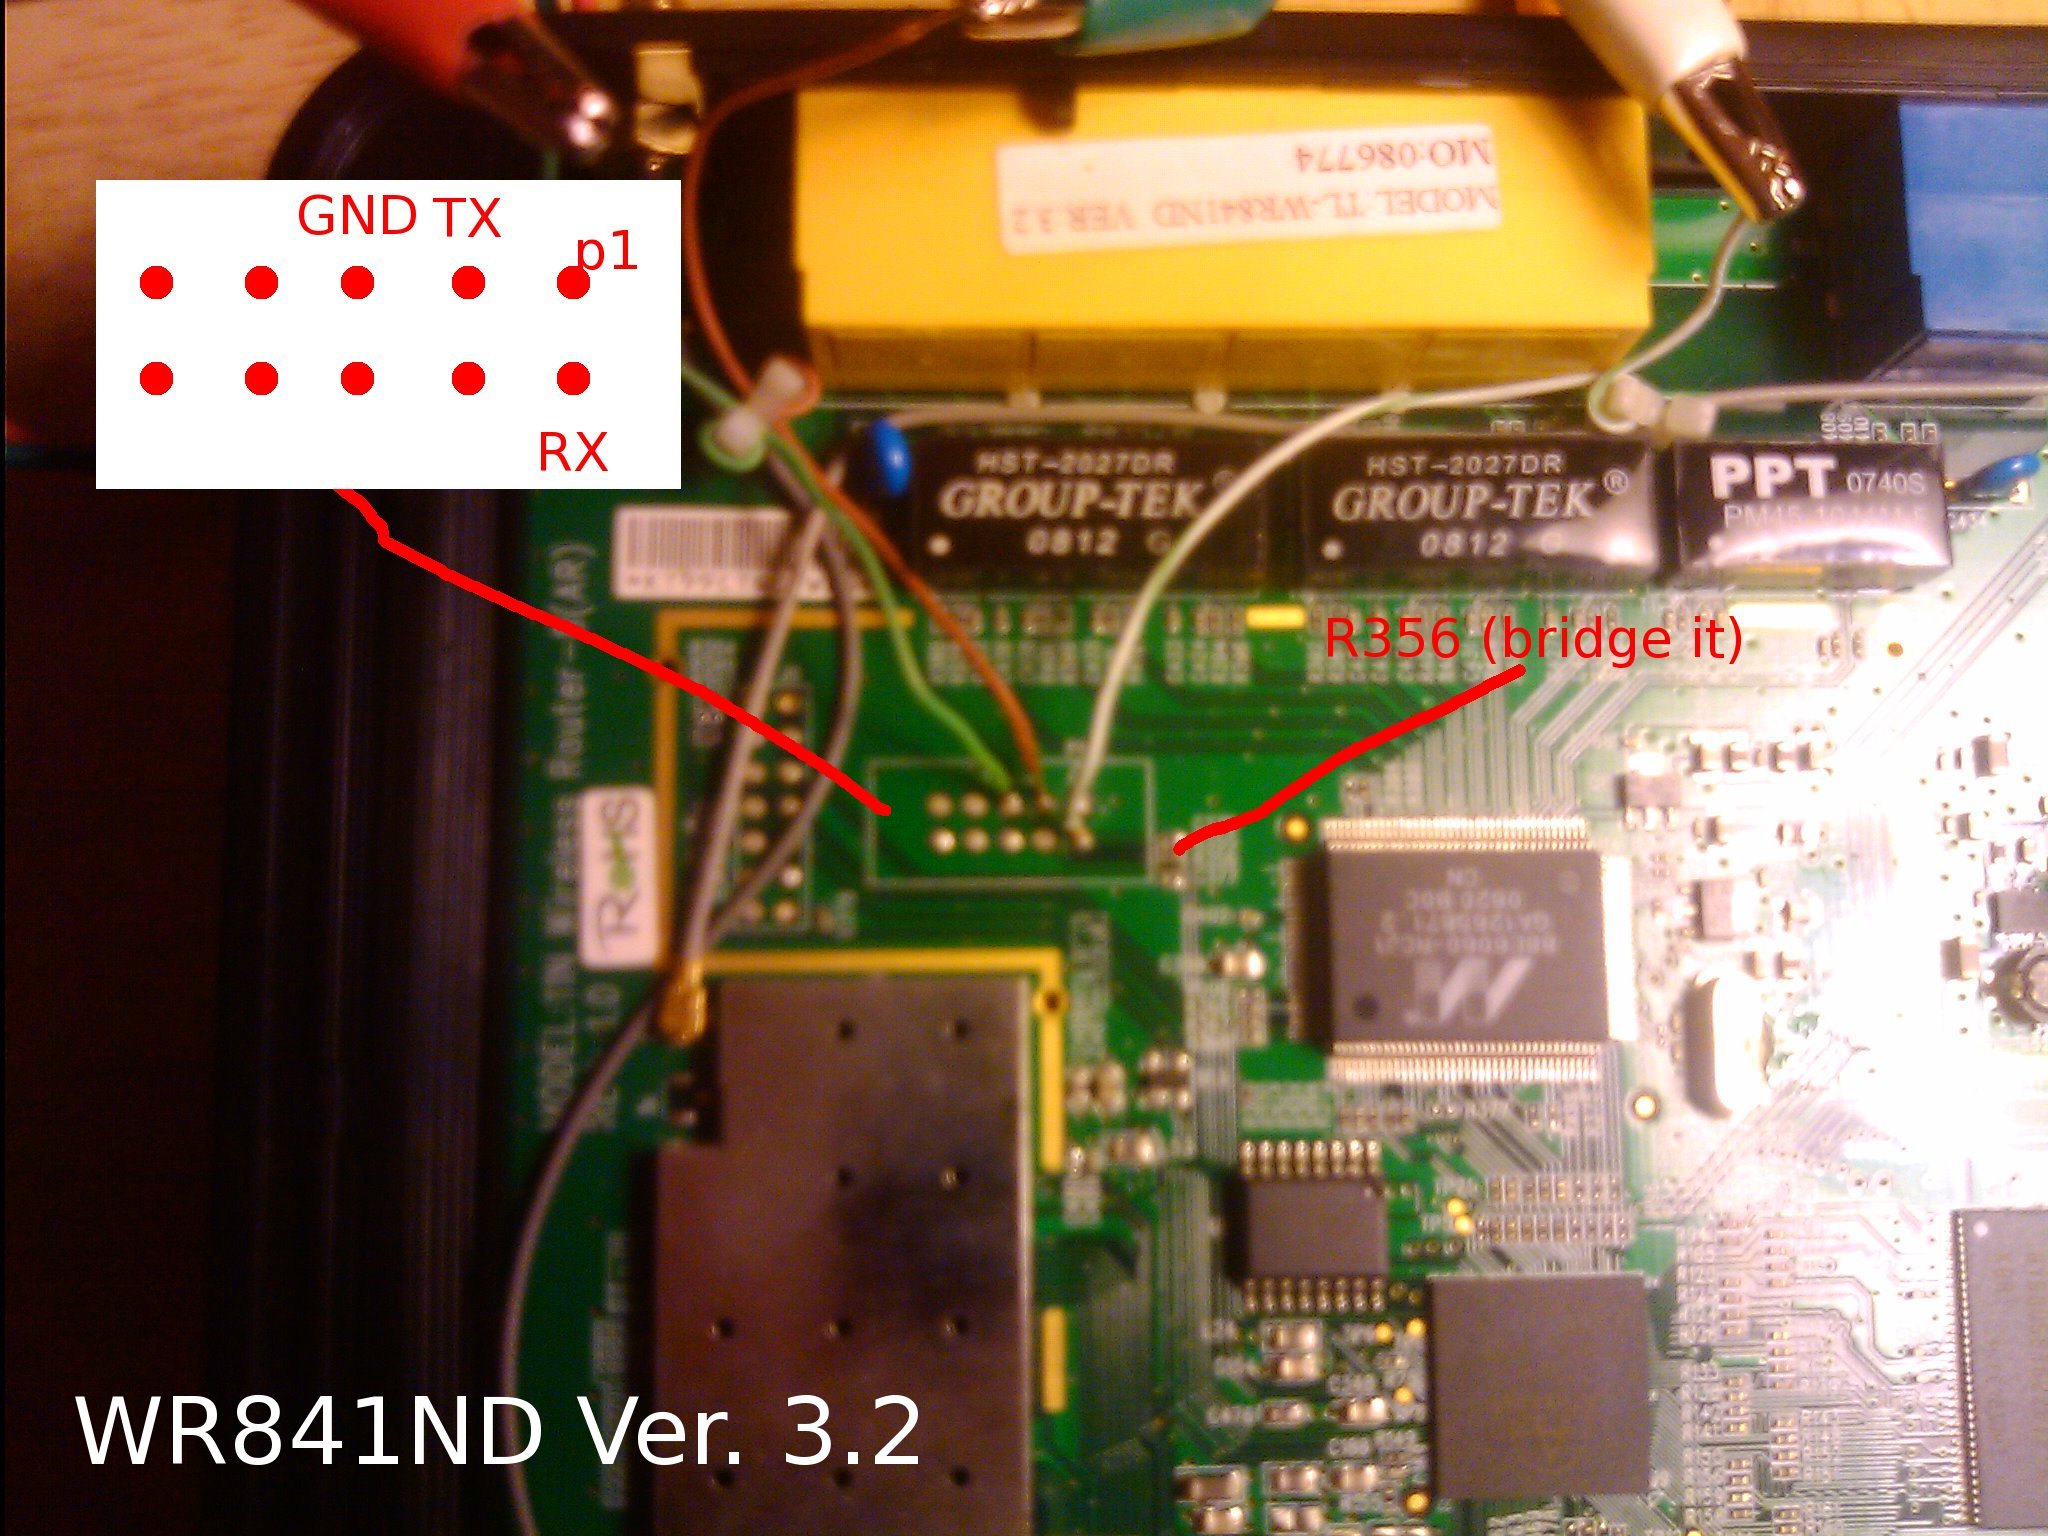 |  |  |
| U-Boot speed | 9600 | 115200 | |
| kernel speed | 115200 - switch automaticaly | 115200 | |
| Data format | always 8N1 | ||
After connecting, you will be greeted by something like this:
AP93 (ar7240) U-boot
DRAM:
sri
#### TAP VALUE 1 = 9, 2 = 9
32 MB
id read 0x100000ff
flash size 4194304, sector count = 64
Flash:  4 MB
Using default environment

In:    serial
Out:   serial
Err:   serial
Net:   ag7240_enet_initialize...
No valid address in Flash. Using fixed address
: cfg1 0xf cfg2 0x7014
eth0: 00:03:7f:09:0b:ad
eth0 up
No valid address in Flash. Using fixed address
: cfg1 0xf cfg2 0x7214
eth1: 00:03:7f:09:0b:ad
ATHRS26: resetting s26
ATHRS26: s26 reset done
eth1 up
eth0, eth1
Autobooting in 1 seconds
You now have one second to enter “tpl” (without the quotes) to get to the Uboot console prompt.
Troubleshooting
Stuck at 130Mbps? Get 300Mbps
This violates regulatory requirements
Edit the file /etc/config/wireless
- Below config 'wifi-device' 'radio0' add
option 'noscan' '1'
- option 'htmode' should be set either to HT40+ or HT40-(HT40+ wont work with Channel 11)
option 'htmode' 'HT40+'
- Restart wireless
wifi
Can not connect to v8?
check whether eth0/eth1 are switched!
Hardware Mods
USB 1.1 Port
Tested on WR841n_v5.1
Attention. Firmware of TP-Link TL-MR 3420 is coming to WR841ND v7.2 - verified. (OpenWrt Firmware Attitude Adjustment (r28380) / LuCI Trunk (trunk+svn7612)) But working usb port has not been verified. Probably enough to use this firmware, but do not compile a new one :)
Overview of the board:

Soldering (wire with red accent means D+). R185 and R183 can be shorted then D+/D- will appear in J1.

To get working USB the new firmware build is required. Files to edit are listed below:
1. Edit file target/linux/ar71xx/files/arch/mips/ar71xx/mach-tl-wr841nd.c
    Add line #include "dev-usb.h" after line #include "dev-leds-gpio.h"
    Add line ar71xx_add_device_usb(); before line ar71xx_add_device_mdio(0x0);
2. Edit file target/linux/ar71xx/files/arch/mips/ar71xx/setup.c
Add line ar71xx_pll_wr(0x08, 0x00001030); before line ar71xx_detect_mem_size();
3. Edit file target/linux/ar71xx/files/arch/mips/ar71xx/Kconfig:
config AR71XX_MACH_TL_WR841N_V1
        bool "TP-LINK TL-WR841N v1 support"
        select AR71XX_DEV_M25P80
        select AR71XX_DEV_PB42_PCI if PCI
        select AR71XX_DEV_DSA
        select AR71XX_DEV_GPIO_BUTTONS
        select AR71XX_DEV_LEDS_GPIO
        select AR71XX_DEV_USB
        default n
For newer version of trunk (as of 2013 March) 1.Edit file target/linux/ar71xx/files/arch/mips/ath79/mach-tl-wr841n.c
    Add line #include "dev-usb.h" after line #include "dev-leds-gpio.h"
    Add line ath79_register_usb(); after line ath79_register_eth(0);
2. Edit file target/linux/ar71xx/generic/profiles/tp-link.mk, add packages in the definition of TLWR841 as following.
define Profile/TLWR841
	NAME:=TP-LINK TL-WR841N/ND
	PACKAGES:=kmod-usb-core kmod-usb2 kmod-ledtrig-usbdev
endef
i.e L7805 with 470uF and 100uF can be used to obtain 5V from the stock power supply.
NOTE: in case of v5.1 sections for WR741N instead of WR841N_V1 have to be edited (Kconfig, mach-tl-wr741nd.c).
USB 2.0 Port on v7
tested with WR841 v7.1 and trunk revision 30430. New patch for rev. 32461 available
Hardware mod is on pictures, nothing changed.
Kernel mod is different, because new kernel version is released in revision 30430.
Here is patch for kernel 3.3: http://mysicka.ics.muni.cz/openwrt/usb-patch-final.patch
Apply this patch and build...
CAN-Bus Interface on v8
Version 8.0 forum thread
Tags
For some Help with the Tags, please have a look here: tags