ASUS WL-HDD

20150419 zo0ok: Unclear if there are two versions with 125MHz/200MHz cpu or if it is not know. Also unclear about platform/chipset. Please clearify here and in ToH. (and remove this note)
Yakumo Wireless Storage 60
The device is supported in OpenWrt (White Russian and later). Confirmed running Version are WhiteRussian, Kamikaze and BackFire. You need to install the openwrt-brcm47xx-squashfs.trx (BackFire) or openwrt-brcm-2.4-squashfs.trx firmware images.
Hardware Highlights
| SoC | CPU speed | Ram | Flash | Network | USB | Serial | JTag |
|---|---|---|---|---|---|---|---|
| Broadcom 4702 | 125 | 200 MHz | 16MiB | 4MiB | 1 x 1 | Yes | Yes | Yes |
Installation
See Installing OpenWrt (generic). Using the tftp-method is described there: Asus Flashing.
BackFire
You may need to change /etc/hotplug.d/net/10-net (see https://dev.openwrt.org/ticket/5312) to get the wireless interface running.
If the device produces a lot of 'process '/bin/ash --login' (pid 1212) exited. Scheduling for restart.' messages in the syslog. Removing 'ttyS0::askfirst:/bin/ash --login' in /etc/inittab solves this problem.
In the installation by default, the two module b43 and b43legacy are loaded but b43 is the only needed. So you can remove the loading of b43legacy at the beginning by removing 30-b43-legacy from the directory /etc/config/modules.d
Kamikaze
The boot_wait NVRAM variable is on by default. Resetting to factory defaults via reset button or mtd erase nvram is not safe on this unit.
WARNING: After installation, you must manually perform “nvram set wan_proto=none; nvram commit”. Otherwise you will have a spurious dhcp client running on eth1, which is actually the LAN interface, and this can cause problems. See https://dev.openwrt.org/ticket/580 and http://forum.openwrt.org/viewtopic.php?pid=35411
IDE drivers and usage
The kernel modules for the ide-chipset are in backfire (brcm-47xx):
kmod-ide-core
kmod-ide-pdc202xx
Then you need the appropriate kernel module for the filesystem, eg.
kmod-fs-ext4
The last step would be setting up a network file, for example Network filesystem (NFS)
USB drivers and usage
USB storage
See UsbStorageHowto. For a second usb-port see in the hardware section.
Run the following to install the modules and tools:
ipkg install kmod-usb-ohci kmod-usb2 kmod-usb-storage kmod-fs-vfat
Notes:
- kmod-fs-vfat might have been kmod-vfat in older releases
- kmod-usb2 is needed as a workaround for some hardware like WL-HDD, see #6425
Add the usb modules to /etc/modules:
...
usbcore
usb-ohci
scsi_mod
sd_mod
usb-storage
fat
vfat
USB network
If you need a second wire ethernet device, it is possible to use a usb ethernet dongle. Possible hardware is listed on the nslu2 homepage. Then you have to compile the usbnet driver, as it isn't in the standard OpenWrt distribution. Alternatively, you can download it from below.
With the Linksys USB200M Rev2 are some problems because of changed hardware. Perfectly supported on linux > 2.6.18 it lacks support in the 2.4.X series. There's a backport to 2.4.27 on http://sourceforge.net/project/showfiles.php?group_id=138561, and with little modifications it compiles on a 2.4.30 well.
After the usb core modules insert the modules
insmod mii
insmod usbnet
and voila:
Feb 26 22:31:09 (none) kern.info kernel: usb.c: registered new driver usbnet
Feb 26 22:31:10 (none) kern.info kernel: eth3: register usbnet usb-00:04.0-1, Linksys usb200m v2 AX88772 USB 2.0 Ethernet
kernel modules: attachment:usbnet_mii.tar.bz2
source patch: attachment:usbnet_ax88772.patch
Run root filesystem from the harddisk
GerardBraad describes some additional steps on how to make the root filesystem run from the harddisk. These instructions can be found in the forum at http://forum.openwrt.org/viewtopic.php?id=7373
In Kamikaze, instead of replacing /sbin/init, alternated method is to create pivotroot script under /etc/init.d, update the script with your H/D device path then run /etc/init.d/pivotroot enable to boot from H/D, or /etc/init.d/pivotroot disable to boot from flash rom. Follow the steps in USBStorageHowto to prepare H/D root file system.
#!/bin/sh /etc/rc.common


START=06

# change this to your boot partition
boot_dev="/dev/discs/disc0/part?"
swap_dev="/dev/discs/disc0/part?"

boot() {
        for module in  ide-core pdc202xx_old ide-detect ide-disk ext2 jbd ext3; do {
                insmod $module
        }; done

        mount "$boot_dev" /jffsroot
        # if everything looks ok, do the pivot root
        [ -x /jffsroot/sbin/init ] && {
                mount -o move /proc /jffsroot/proc && \
                pivot_root /jffsroot /jffsroot/jffsroot && {
                        mount -o move /jffsroot/dev /dev
                        mount -o move /jffsroot/tmp /tmp
                        mount -o move /jffsroot/jffs /jffs 2>&-
                        mount -o move /jffsroot/sys /sys 2>&-
                        swapon "$swap_dev"
                }
                }
}
Network Configuration
As listed in OpenWrt Configuration the network interfaces are configured as eth1 (wired) and eth2 (wireless). They are bridged in default installation. Note: In my Kamikaze 7.09, it's wl0 for wireless interface.
Device as Router
To open the bridge you have to change the interfaces for lan only to eth2, set the wan device to eth1 and configure these devices as you like (static, dynamic, etc) (http://forum.openwrt.org/viewtopic.php?pid=37730)
lan_ifnames=eth2
lan_ifname=br0
wan_ifname=eth1
wan_device=eth1
wan_gateway=
wan_netmask=
If you want to use the wireless interface as lan and the ethernet as wan device, you also have to change the init script for the nvram because it restores it to default bridge behavior at startup. Uncomment two lines in /etc/init.d/S05nvram (maybe there should be a used nvram variable for optional bridge/router mode?):
# hacks for asus
[ "$boardnum" = "asusX" ] && {
        debug "### asus hacks ###"
        case "$(($(nvram get et1phyaddr)))" in
                1) # WL-HDD
# don't need this as a router
#                    lan=eth1
#                    wan=none
Device as WLAN client
I got some strange double pings and lots of
Feb 15 19:27:00 (none) kern.warn kernel: eth2: received packet with own address as source address
entries in the logfile when using it as wireless client. this is a interference with the br0 and physical ethernet device; you can get rid of them by changing the lan interface to the physical instead of the virtual (br0) device.
# when wireless is the LAN interface and wired the WAN
nvram set lan_ifname=eth2
nvram commit
If you have any problem setting up WDS on this WLHDD or signal issue with WLAN, try to set antenna to external by option rxant 0 and option txant 0 for Kamikaze or add nvram settings for Whiterussian.
Hardware
Info
| Architecture: | MIPS |
| Vendor: | Broadcom |
| bootloader: | cfe |
| System-On-Chip: | BCM4702KPB |
| CPU/Speed | BCM3???  / 200 |125 MHz / 200 |125 MHz |
| Flash-Chip: | MX 29LV320ATTC-90 |
| Flash size: | 4 MiB |
| RAM: | Hynix HY57V283220T-7 / SDR-143 |
| RAM size: | 16 MiB |
| Wireless: | Broadcom BCM4306 802.11b/g (onboard) PCI-ID 14e4:4320 (rev 03) |
| Ethernet: | 1x network controller, no switch |
| USB: | Yes 1×1.1, second port possible |
| ATA/IDE: | Promise PDC20265R |
| Serial: | Yes mod |
| JTAG: | Yes |
Photos

Opening the case
Note: This will void your warranty!
If you want to open the device (maybe for exchanging the disk) remove the screws below the two little rubber-pads (could be that there are no screws, as on my yakumo. just pull on). Then slide the mainboard with the HD on it out of the case by carefully pulling the front plate.
Nvram Reset
If you made a mistake while configuring the router and it isn't reachable anymore via network, there is a possibility to reset the device config. To do that, plug the power off during booting, much times, at different timings. You can exploit a bug in the bootloader. The new ip is 192.168.1.1 then (attention, not the standard 192.168.1.220) and boot_wait is on. Now you are able to use tftp for uploading new images. source
Serial
→ port.serial general information about the serial port, serial port cable, etc.
How to connect to the Serial Port of this specific device:
Insert photo of PCB with markings for serial port
Replace EXAMPLE by real values.
| Serial connection parameters for WL-HDD | EXAMPLE 115200, 8N1 |
|---|
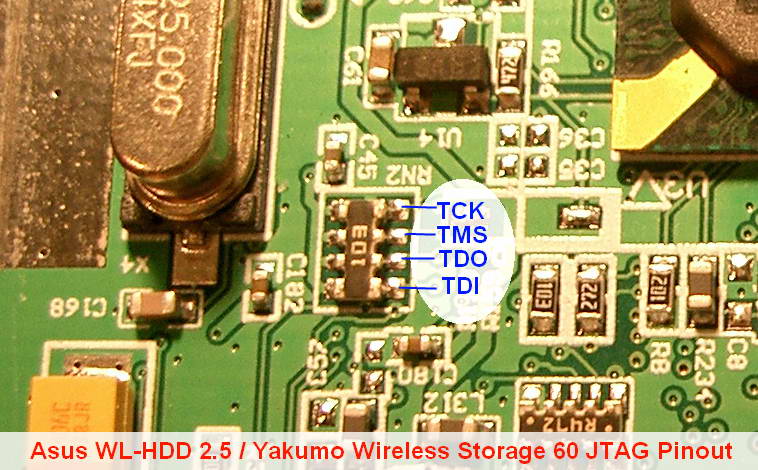
JTAG
→ port.jtag general information about the JTAG port, JTAG cable, etc.
Harddisk
The device is/was available with 60GB discs, but it works perfectly with larger discs - for example a WD 160GB Harddrive: ( WDC WD1600BEVE-00UYT0 )
Power Consumption
The device ships with a 2A 5V switch-mode power supply terminating to a DC plug. The 2A rating may be to cover maximum spin-up current for the disk drive and the maximum USB 1.1 device current.
JamesCameron tested a device as follows:
- OpenWrt 1.0 White Russian RC5,
- hdparm 6.3,
- ASUSTeK Computer Inc. WL-HDD 2.5,
- with an 80GB 5400RPM 8MB cache Seagate Momentus ST98823A drive (Asus specify a 40GB limit, but it is not clear why),
- without USB devices attached,
- without network cable attached,
- with an association to a WORT54G access point two meters away (also OpenWrt 1.0 White Russian RC5),
- at room temperature of 19 degrees C,
- horizontal,
- using regulated 4.96V input,
- using a digital multimeter on 10A scale.
| state | current | comment |
|---|---|---|
| spin-up | 0.91A | disk drive by default spun itself up on power up |
| booting | 0.64A | |
| booted | 0.76A | disk drive consumes more power if it is recently accessed |
| idle | 0.63A | disk drive may have a self-directed standby mode |
| active | 0.91A | running an md5sum of a large file on disk drive |
| standby | 0.48A | disk drive in host-directed standby mode, using hdparm -y, further access by kernel spun the drive up |
| sleep | 0.48A | disk drive in host-directed sleep mode, using hdparm -Y, no apparent effect on power, but prevented further access to drive by kernel |
Internal RTC
The internal RTC (RV5C386A) is supported since changeset #17073 with kmod-rtc-rv5c386a. However since change to kernel 2.6.32 trying to change value of the date, results with message “RTC BATTERY FAILURE” in log. See bug report #7370 and #11267 for the solution.
The following information is outdated.
The internal RTC is not supported out of the box by OpenWrt, but there is a code floating about that provides support for the RtcRv5c386a chip.
The internal RTC can be accessed with the following kernel module: attachment:kmod-rtc.o (source code)
insmod kmod-rtc.o
mknod /dev/rtc c 10 135
And this will show the hardware time:
cat /dev/rtc
The RTC can be set with --systohc, the system time can be set with --hctosys using the following script:
#!/bin/sh
case "$1" in
         --hctosys)
                [ -c /dev/rtc ] && /bin/cat /dev/rtc|(IFS=:;read Y M D dow h m s; /bin/date -s $M$D$h$m$Y.$s)
                ;;
         --systohc)
                [ -c /dev/rtc ] && /bin/date +%Y:%m:%d:%w:%H:%M:%S >/dev/rtc
                ;;
          *)
                echo "Usage: $0 {--systohc|--hctosys}" >&2
                ;;
esac
# From: [[[http://forum.openwrt.org/viewtopic.php?id=5606]]|and [[http://wl500g.info/showthread.php?t=1642]]]
rtc init script:
#!/bin/sh
# I put this init script in there: /etc/init.d/S59rtc
# thanks for improvement of the SXX number!
# check for /dev/rtc (which seems to disappear at a reboot- right?)
# then check if the module is loaded and if not load it an
cat /dev/rtc |  ( ( lsmod |grep -q kmod-rtc ) |  ( insmod /lib/modules/kmod-rtc.o ); ( mknod /dev/rtc c 10 135 ) )
#then execute the script found above
/bin/hwclock.sh --hctosys
Second USB Port
Found on wl500g.info that on a wl500g it is possible to use the second port of the internal hub. As it looks the same on the wl-hdd, i tried this and it works too. Benefits of this hardware mod? First, no need for a external hub if using a printer or something permanently. Second, using it as internal port for another mods (audio?) without external cables.
What to do? Not difficult, just put some wires with two resistors on the pcb, that's it. But: Build it at your own risk, you'll loose the warranty, and I'm not responsible for any damages of the router or of any device connected to it!
Step for step:
Maybe you've seen the log entries of the usb driver:
Jan  1 00:00:15 (none) kern.info kernel: usb.c: new USB bus registered, assigned bus number 1
Jan  1 00:00:15 (none) kern.info kernel: hub.c: USB hub found
Jan  1 00:00:15 (none) kern.info kernel: hub.c: 2 ports detected
The two ports of the hub have on each data line a resistor to the ground. So we solder two wires on the third and fourth pin of the resistor array. In the posting mentioned above they use a resistor serial in each data line of 15 Ohms. I haven't had them, so I'm using some with 10 Ohms. In the original connection between these resistors and the usb-socket is a resistance of 1.5 Ohms, so maybe that's enough too? Anyway. To get the power supply for the port i'm using the pads of a not assembled capacitor. It's not really correct, as there must be a control of the power consumption of the usb device, but it works. I use the socket of a usb extension cable. Voila, here it is:
Feb 25 20:48:36 (none) kern.info kernel: hub.c: new USB device 00:04.0-2, assigned address 2
See the usb_mod photos with the details.
External Interface
This device has some solder pads for a external interface like the WL-500G. For using it please read this forum postings.