Cudy WR3000H v1
The Cudy WR3000H is a Wifi6 Router with 1×2.5 Gb WAN and 4x 1Gb LAN Ports build around 64-bit Cortex-A53 SoC (Filogic 820 1.3GHz dual-core processor). It has a small form factor and 4 antennas. It is very similar to the Cudy WR3000S router: The main difference is a 2.5 Gbit WAN port, whereas the WR3000S has only a 1 Gbit WAN port. There is also a power button.
 ,
, 
Supported Versions
Hardware Highlights
Installation
As of Nov 2025: a new variant of WR3000H v1 (starting with serial number 2543 or later) was shipped with a new flash chip ESMT F50L1G41LC. This new variant is ONLY supported in version 24.10.5 or later. See PR #20962 and OpenWrt Forum thread, and also Cudy Transition Firmware download page.
As of Jan 2026: another new variant of WR3000H v1 was discovered using a different PHY chip (Motorcomm YT8821 2.5GbE) as its WAN port. This new variant is ONLY supported in version 24.10.6 ; 25.12.0-rc3 and Main Snapshot branch by incorporating commits to include the kmod-phy-motorcomm driver.
Assuming you are installing the latest version available, then this should be of no concern anymore.
It would have been wiser for Cudy to release a v2 version of this device rather than changing the hardware without notifying buyers & users. See more in commit messages: 8d407de , 09e5643 and bed6f08
Starting with 25.12.4 a ubootmod version is proposed. This mod unlocks the extra memory available, allowing using more packages and advanced features. It is not necessary for basic use of the router, and should only be considered for advanced users. Furthermore, returning to default setup requires a serial link and advanced skills. Information on how to install in the original commit.
OEM Web UI installation
1) Download the appropriate Cudy-signed OpenWrt image from the Cudy's Google Disk
2) Download the latest OpenWrt stable sysupgrade image https://downloads.openwrt.org/releases/25.12.2/targets/mediatek/filogic/openwrt-25.12.2-mediatek-filogic-cudy_wr3000h-v1-squashfs-sysupgrade.bin
3) Power on the router, proceed with the basic setup via GUI (available at http://192.168.10.1)
4) Once completed, go to the “Advanced Settings” > “Firmware”. Flash the signed Cudy-signed OpenWrt image. Wait for the router to reboot.
5) Once rebooted, open LuCi UI (available at http://192.168.1.1). Go to “System” > “Backup / Flash firmware”. Flash the OpenWrt sysupgrade image. DO NOT keep settings, so uncheck the box during flash.
Serial installation
Installation via serial connection is performed as usual, and described in the initial support commit.
PLEASE NOTE: there's no header on the board, you will have to solder the wires for your 3.3V UART adapter to the board. Pinout is identical to the Cudy WR3000S. Solder points can be found at the back side of the PCB and each of them is clearly marked (see this image for reference).
Flash layout
root@OpenWrt:/# cat /proc/mtd
dev:    size   erasesize  name
mtd0: 00100000 00020000 "BL2"
mtd1: 00080000 00020000 "u-boot-env"
mtd2: 00200000 00020000 "Factory"
mtd3: 00040000 00020000 "bdinfo"
mtd4: 00200000 00020000 "FIP"
mtd5: 04000000 00020000 "ubi"
Easy recovery
Cudy have published a generic guide on how to recover a device when it gets soft bricked, make sure you serve the device specific image via TFTP.
Debricking
Follow these instructions to rollback to the OEM firmware: https://forum.openwrt.org/t/support-for-cudy-wr3000h/217336/49 (Windows-specific). This procedure will require backups of the original partitions - those should be acquired before flashing anything, just as soon as you unpack your router. See OEM TFTP installation section below on how to dump those backups.
Basic configuration
Hardware offloading works with this device (tested with 1GB/s FTTH).
OEM installation via TFTP
Instructions per initial commit message.
1. Connect to the serial port as described in the “Hardware” section.
2. Power on the device + press reset pin. Keep pressing reset pin to enter the U-Boot shell (The recovery.bin image load process must fail).
3. Download the OpenWrt initramfs image. Place it on an TFTP server connected to the Cudy LAN ports. Make sure the server is reachable at 192.168.1.88. Rename the image to “cudy3000h.bin”
4. Download and boot the OpenWrt initramfs image.
$ tftpboot 0x46000000 cudy3000h.bin; bootm 0x46000000
5. IMPORTANT: Make backup from original firmware. System → Backup/Flash Firmware → Save mtdblock contents. All mtdblock one by one, keep unaltered (BL2, u-boot-env, Factory, bdinfo, FIP, and ubi).
6. Transfer the OpenWrt sysupgrade image to the device using scp. Install with sysupgrade.
Photos
Insert photo of front of the casing
Insert photo of back of the casing
Insert photo of backside label
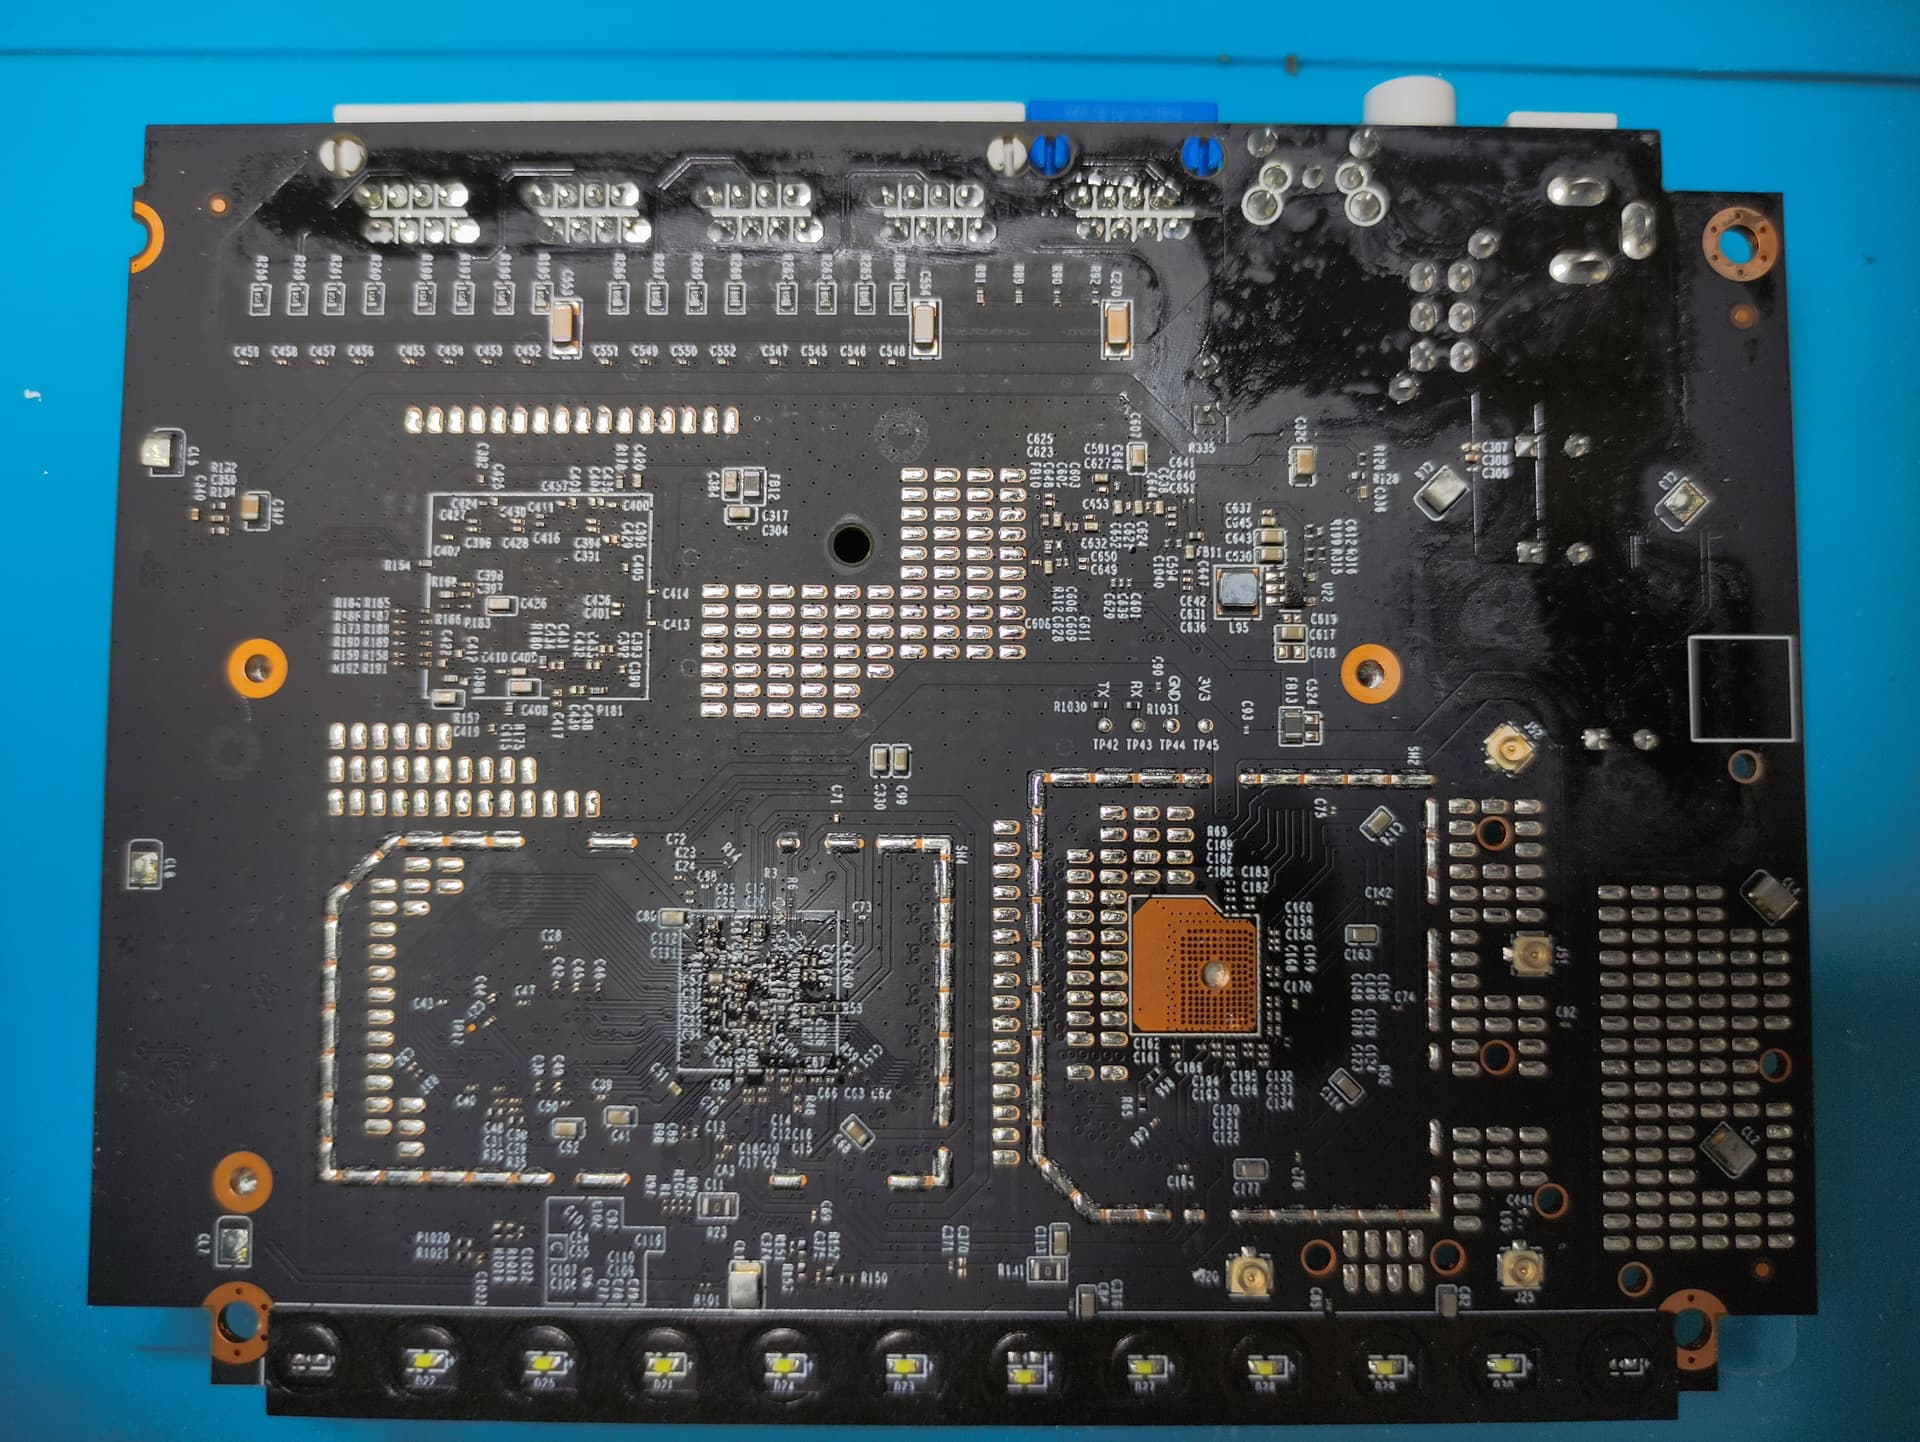
PCB Top:

PCB Bottom:

Opening the case
 Describe what needs to be done to open the device, e.g. remove rubber feet, adhesive labels, screws, ...
*
Serial
→ port.serial general information about the serial port, serial port cable, etc.
How to connect to the Serial Port of this specific device:
Insert photo of PCB with markings for serial port
Replace EXAMPLE by real values.
| Serial connection parameters for Cudy WR3000H 1 | 115200, 8N1, 3.3V |
|---|
JTAG
→ port.jtag general information about the JTAG port, JTAG cable, etc.
How to connect to the JTAG Port of this specific device:
Insert photo of PCB with markings for JTAG port
Bootlogs
OEM bootlog
Older HW revision before the NAND and PHY change:
F0: 102B 0000 FA: 1040 0000 FA: 1040 0000 [0200] F9: 0000 0000 V0: 0000 0000 [0001] 00: 0000 0000 BP: 2400 0041 [0000] G0: 1190 0000 EC: 0000 0000 [1000] T0: 0000 024F [010F] Jump to BL NOTICE: BL2: v2.7(release):cdafd41cf6 NOTICE: BL2: Built : 08:26:26, Sep 5 2024 NOTICE: WDT: disabled NOTICE: EMI: Using DDR3 settings dump toprgu registers data: 1001c000 | 00000000 0000ffe0 00000000 00000000 1001c010 | 00000fff 00000000 00f00000 00000000 1001c020 | 00000000 00000000 00000000 00000000 1001c030 | 003c0003 003c0003 00000000 00000000 1001c040 | 00000000 00000000 00000000 00000000 1001c050 | 00000000 00000000 00000000 00000000 1001c060 | 00000000 00000000 00000000 00000000 1001c070 | 00000000 00000000 00000000 00000000 1001c080 | 00000000 00000000 00000000 00000000 dump drm registers data: 1001d000 | 00000000 00000000 00000000 00000000 1001d010 | 00000000 00000000 00000000 00000000 1001d020 | 00000000 00000000 00000000 00000000 1001d030 | 00a003f1 000000ff 00100000 00000000 1001d040 | 00027e71 000200a0 00020303 000000ff 1001d050 | 00000000 00000000 00000000 00000000 1001d060 | 00000002 00000000 00000000 00000000 drm: 500 = 0xc [DDR Reserve] ddr reserve mode not be enabled yet DDR RESERVE Success 0 [EMI] ComboMCP not ready, using default setting BYTE_swap:0 BYTE_swap:0 Window Sum 480, worse bit 0, min window 60 Window Sum 468, worse bit 8, min window 56 Window Sum 336, worse bit 6, min window 40 Window Sum 314, worse bit 14, min window 36 Window Sum 342, worse bit 1, min window 40 Window Sum 324, worse bit 15, min window 38 Window Sum 354, worse bit 2, min window 42 Window Sum 336, worse bit 14, min window 40 Window Sum 360, worse bit 1, min window 44 Window Sum 346, worse bit 9, min window 42 Window Sum 368, worse bit 0, min window 46 Window Sum 348, worse bit 14, min window 42 Window Sum 384, worse bit 0, min window 48 Window Sum 364, worse bit 14, min window 42 Window Sum 388, worse bit 0, min window 48 Window Sum 378, worse bit 9, min window 46 Window Sum 396, worse bit 0, min window 48 Window Sum 380, worse bit 8, min window 46 NOTICE: EMI: Detected DRAM size: 256MB NOTICE: EMI: complex R/W mem test passed NOTICE: CPU: MT7981 (1298MHz) NOTICE: SPI_NAND parses attributes from parameter page. NOTICE: SPI_NAND Detected ID 0xc8 NOTICE: Page size 2048, Block size 131072, size 134217728 NOTICE: Initializing NMBM ... NOTICE: Signature found at block 1023 [0x07fe0000] NOTICE: First info table with writecount 0 found in block 960 NOTICE: Second info table with writecount 0 found in block 963 NOTICE: NMBM has been successfully attached in read-only mode NOTICE: BL2: Booting BL31 NOTICE: BL31: v2.7(release):cdafd41cf6 NOTICE: BL31: Built : 08:26:26, Sep 5 2024 NOTICE: Hello BL31!!! U-Boot 2022.07-rc3 (Sep 05 2024 - 08:26:26 +0000), Build: jenkins-WR3000H-11 CPU: MediaTek MT7981 Model: mt7981-rfb DRAM: 256 MiB Core: 50 devices, 20 uclasses, devicetree: embed Initializing NMBM ... spi-nand: spi_nand spi_nand@0: GigaDevice SPI NAND was found. spi-nand: spi_nand spi_nand@0: 128 MiB, block size: 128 KiB, page size: 2048, OOB size: 64 Could not find a valid device for nmbm0 Signature found at block 1023 [0x07fe0000] First info table with writecount 0 found in block 960 Second info table with writecount 0 found in block 963 NMBM has been successfully attached Loading Environment from MTD... *** Warning - bad CRC, using default environment In: serial@11002000 Out: serial@11002000 Err: serial@11002000 Net: Warning: ethernet@15100000 (eth0) using random MAC address - 26:ea:21:1e:ec:af eth0: ethernet@15100000 gpio: pin 3 (gpio 3) value is 0 ubi0: attaching mtd7 ubi0: scanning is finished ubi0: attached mtd7 (name "ubi", size 64 MiB) ubi0: PEB size: 131072 bytes (128 KiB), LEB size: 126976 bytes ubi0: min./max. I/O unit sizes: 2048/2048, sub-page size 2048 ubi0: VID header offset: 2048 (aligned 2048), data offset: 4096 ubi0: good PEBs: 512, bad PEBs: 0, corrupted PEBs: 0 ubi0: user volume: 3, internal volumes: 1, max. volumes count: 128 ubi0: max/mean erase counter: 2/0, WL threshold: 4096, image sequence number: 1747276452 ubi0: available PEBs: 0, total reserved PEBs: 512, PEBs reserved for bad PEB handling: 19 Reading from volume 'kernel' to 0x46000000, size 0x0 ... OK ## Loading kernel from FIT Image at 46000000 ... Using 'config-1' configuration Trying 'kernel-1' kernel subimage Description: ARM64 OpenWrt Linux-5.4.246 Type: Kernel Image Compression: lzma compressed Data Start: 0x460000c0 Data Size: 3226169 Bytes = 3.1 MiB Architecture: AArch64 OS: Linux Load Address: 0x48080000 Entry Point: 0x48080000 Hash algo: crc32 Hash value: 001325ec Hash algo: sha1 Hash value: 5fc74182bd275e308739ab663fb762968450f9a7 Verifying Hash Integrity ... crc32+ sha1+ OK ## Loading fdt from FIT Image at 46000000 ... Using 'config-1' configuration Trying 'fdt-1' fdt subimage Description: ARM64 OpenWrt R63 device tree blob Type: Flat Device Tree Compression: uncompressed Data Start: 0x46313c30 Data Size: 19315 Bytes = 18.9 KiB Architecture: AArch64 Hash algo: crc32 Hash value: 98285843 Hash algo: sha1 Hash value: 1a5cb4e39129ba590892809ce37eb685d5936cce Verifying Hash Integrity ... crc32+ sha1+ OK Booting using the fdt blob at 0x46313c30 Uncompressing Kernel Image Loading Device Tree to 000000004f7f1000, end 000000004f7f8b72 ... OK Starting kernel ... [ 0.000000] Booting Linux on physical CPU 0x0000000000 [0x410fd034] [ 0.000000] Linux version 5.4.246 (jenkins@release_server) (gcc version 8.4.0 (OpenWrt GCC 8.4.0 2.3.10)) #0 SMP Thu May 15 02:34:12 2025 [ 0.000000] Machine model: MediaTek MT7981 RFB/R63 [ 0.000000] earlycon: uart8250 at MMIO32 0x0000000011002000 (options '') [ 0.000000] printk: bootconsole [uart8250] enabled [ 0.000000] On node 0 totalpages: 64512 [ 0.000000] DMA32 zone: 1024 pages used for memmap [ 0.000000] DMA32 zone: 0 pages reserved [ 0.000000] DMA32 zone: 64512 pages, LIFO batch:15 [ 0.000000] psci: probing for conduit method from DT. [ 0.000000] psci: PSCIv1.1 detected in firmware. [ 0.000000] psci: Using standard PSCI v0.2 function IDs [ 0.000000] psci: MIGRATE_INFO_TYPE not supported. [ 0.000000] psci: SMC Calling Convention v1.0 [ 0.000000] percpu: Embedded 20 pages/cpu s44120 r8192 d29608 u81920 [ 0.000000] pcpu-alloc: s44120 r8192 d29608 u81920 alloc=20*4096 [ 0.000000] pcpu-alloc: [0] 0 [0] 1 [ 0.000000] Detected VIPT I-cache on CPU0 [ 0.000000] CPU features: detected: GIC system register CPU interface [ 0.000000] CPU features: kernel page table isolation disabled by kernel configuration [ 0.000000] Built 1 zonelists, mobility grouping on. Total pages: 63488 [ 0.000000] Kernel command line: console=ttyS0,115200n1 loglevel=8 earlycon=uart8250,mmio32,0x11002000 [ 0.000000] Dentry cache hash table entries: 32768 (order: 6, 262144 bytes, linear) [ 0.000000] Inode-cache hash table entries: 16384 (order: 5, 131072 bytes, linear) [ 0.000000] mem auto-init: stack:off, heap alloc:off, heap free:off [ 0.000000] Memory: 230716K/258048K available (6654K kernel code, 444K rwdata, 1884K rodata, 448K init, 291K bss, 27332K reserved, 0K cma-reserved) [ 0.000000] SLUB: HWalign=64, Order=0-3, MinObjects=0, CPUs=2, Nodes=1 [ 0.000000] rcu: Hierarchical RCU implementation. [ 0.000000] rcu: CONFIG_RCU_FANOUT set to non-default value of 32. [ 0.000000] rcu: RCU calculated value of scheduler-enlistment delay is 25 jiffies. [ 0.000000] NR_IRQS: 64, nr_irqs: 64, preallocated irqs: 0 [ 0.000000] GICv3: GIC: Using split EOI/Deactivate mode [ 0.000000] GICv3: 640 SPIs implemented [ 0.000000] GICv3: 0 Extended SPIs implemented [ 0.000000] GICv3: Distributor has no Range Selector support [ 0.000000] GICv3: 16 PPIs implemented [ 0.000000] GICv3: no VLPI support, no direct LPI support [ 0.000000] GICv3: CPU0: found redistributor 0 region 0:0x000000000c080000 [ 0.000000] arch_timer: cp15 timer(s) running at 13.00MHz (phys). [ 0.000000] clocksource: arch_sys_counter: mask: 0xffffffffffffff max_cycles: 0x2ff89eacb, max_idle_ns: 440795202429 ns [ 0.000003] sched_clock: 56 bits at 13MHz, resolution 76ns, wraps every 4398046511101ns [ 0.008198] Calibrating delay loop (skipped), value calculated using timer frequency.. 26.00 BogoMIPS (lpj=52000) [ 0.018518] pid_max: default: 32768 minimum: 301 [ 0.023237] Mount-cache hash table entries: 512 (order: 0, 4096 bytes, linear) [ 0.030497] Mountpoint-cache hash table entries: 512 (order: 0, 4096 bytes, linear) [ 0.039067] ASID allocator initialised with 65536 entries [ 0.044570] rcu: Hierarchical SRCU implementation. [ 0.049686] smp: Bringing up secondary CPUs ... [ 0.054562] Detected VIPT I-cache on CPU1 [ 0.054582] GICv3: CPU1: found redistributor 1 region 0:0x000000000c0a0000 [ 0.054603] CPU1: Booted secondary processor 0x0000000001 [0x410fd034] [ 0.054664] smp: Brought up 1 node, 2 CPUs [ 0.076277] SMP: Total of 2 processors activated. [ 0.081003] CPU features: detected: 32-bit EL0 Support [ 0.086164] CPU features: detected: CRC32 instructions [ 0.091429] CPU: All CPU(s) started at EL2 [ 0.095551] alternatives: patching kernel code [ 0.102464] clocksource: jiffies: mask: 0xffffffff max_cycles: 0xffffffff, max_idle_ns: 7645041785100000 ns [ 0.112274] futex hash table entries: 512 (order: 3, 32768 bytes, linear) [ 0.119171] pinctrl core: initialized pinctrl subsystem [ 0.125069] NET: Registered protocol family 16 [ 0.129754] DMA: preallocated 256 KiB pool for atomic allocations [ 0.151577] SCSI subsystem initialized [ 0.155513] libata version 3.00 loaded. [ 0.159613] usbcore: registered new interface driver usbfs [ 0.165190] usbcore: registered new interface driver hub [ 0.170564] usbcore: registered new device driver usb [ 0.176550] rbus 18000000.wbsys: PCI host bridge to bus 0000:00 [ 0.182515] pci_bus 0000:00: root bus resource [mem 0x18000000-0x18ffffff] [ 0.189428] pci_bus 0000:00: root bus resource [bus 00-ff] [ 0.194940] pci_bus 0000:00: scanning bus [ 0.198978] pci 0000:00:00.0: [14c3:7981] type 00 class 0x000280 [ 0.205024] pci 0000:00:00.0: reg 0x10: [mem 0x18000000-0x1800000f 64bit] [ 0.211847] pci 0000:00:00.0: reg 0x18: [mem 0x00000000-0x0000000f] [ 0.218146] pci 0000:00:00.0: reg 0x1c: [mem 0x00000000-0x0000000f] [ 0.224445] pci 0000:00:00.0: reg 0x20: [mem 0x00000000-0x0000000f] [ 0.230744] pci 0000:00:00.0: reg 0x24: [mem 0x00000000-0x0000000f] [ 0.237909] pci_bus 0000:00: fixups for bus [ 0.242121] pci_bus 0000:00: bus scan returning with max=00 [ 0.248496] clocksource: Switched to clocksource arch_sys_counter [ 0.255265] thermal_sys: Registered thermal governor 'fair_share' [ 0.255268] thermal_sys: Registered thermal governor 'bang_bang' [ 0.261409] thermal_sys: Registered thermal governor 'step_wise' [ 0.267446] thermal_sys: Registered thermal governor 'user_space' [ 0.273481] thermal_sys: Registered thermal governor 'power_allocator' [ 0.279846] NET: Registered protocol family 2 [ 0.290875] IP idents hash table entries: 4096 (order: 3, 32768 bytes, linear) [ 0.298592] tcp_listen_portaddr_hash hash table entries: 256 (order: 0, 4096 bytes, linear) [ 0.307083] TCP established hash table entries: 2048 (order: 2, 16384 bytes, linear) [ 0.314884] TCP bind hash table entries: 2048 (order: 3, 32768 bytes, linear) [ 0.322078] TCP: Hash tables configured (established 2048 bind 2048) [ 0.328528] UDP hash table entries: 256 (order: 1, 8192 bytes, linear) [ 0.335099] UDP-Lite hash table entries: 256 (order: 1, 8192 bytes, linear) [ 0.342199] NET: Registered protocol family 1 [ 0.346598] PCI: CLS 0 bytes, default 64 [ 0.351331] workingset: timestamp_bits=46 max_order=16 bucket_order=0 [ 0.360775] squashfs: version 4.0 (2009/01/31) Phillip Lougher [ 0.366658] jffs2: version 2.2 (NAND) (SUMMARY) (LZMA) (RTIME) (CMODE_PRIORITY) (c) 2001-2006 Red Hat, Inc. [ 0.389027] phy phy-usb-phy@11e10000.1: type_sw - reg 0x218, index 0 [ 0.395832] gpio-export gpio_export: 1 gpio(s) exported [ 0.411389] Serial: 8250/16550 driver, 3 ports, IRQ sharing disabled [ 0.418477] printk: console [ttyS0] disabled [ 0.442888] 11002000.serial: ttyS0 at MMIO 0x11002000 (irq = 12, base_baud = 2500000) is a ST16650V2 [ 0.452097] printk: console [ttyS0] enabled [ 0.452097] printk: console [ttyS0] enabled [ 0.460456] printk: bootconsole [uart8250] disabled [ 0.460456] printk: bootconsole [uart8250] disabled [ 0.470769] cacheinfo: Unable to detect cache hierarchy for CPU 0 [ 0.479106] loop: module loaded [ 0.483124] mt7981-pinctrl 11d00000.pinctrl: pin_config_set op failed for pin 19 [ 0.490525] mtk-spi 1100a000.spi: Error applying setting, reverse things back [ 0.498128] spi-nand spi0.0: Failed to calibrate SPI-NAND (err = -22) [ 0.504789] spi-nand spi0.0: GigaDevice SPI NAND was found. Flash Model: F50L1G41LB, ID: C801 [ 0.513321] spi-nand spi0.0: 128 MiB, block size: 128 KiB, page size: 2048, OOB size: 64 [ 0.523997] usbcore: registered new interface driver r8152 [ 0.529555] usbcore: registered new interface driver ax88179_178a [ 0.535775] xhci-mtk 11200000.xhci: 11200000.xhci supply vbus not found, using dummy regulator [ 0.544408] xhci-mtk 11200000.xhci: 11200000.xhci supply vusb33 not found, using dummy regulator [ 0.553291] phy phy-usb-phy@11e10000.0: try to get sw efuse [ 0.558865] phy phy-usb-phy@11e10000.1: try to get sw efuse [ 0.564428] phy phy-usb-phy@11e10000.1: try to get sw efuse+ [ 0.570099] phy phy-usb-phy@11e10000.1: u3 efuse - intr 28, rx_imp f, tx_imp e [ 0.577347] phy_efuse_set set efuse, tx_imp e, rx_imp f intr 28 [ 0.583344] xhci-mtk 11200000.xhci: xHCI Host Controller [ 0.588755] xhci-mtk 11200000.xhci: new USB bus registered, assigned bus number 1 [ 0.599256] xhci-mtk 11200000.xhci: hcc params 0x01403f99 hci version 0x110 quirks 0x0000000000210010 [ 0.608531] xhci-mtk 11200000.xhci: irq 89, io mem 0x11200000 [ 0.614351] xhci-mtk 11200000.xhci: xHCI Host Controller [ 0.619663] xhci-mtk 11200000.xhci: new USB bus registered, assigned bus number 2 [ 0.627141] xhci-mtk 11200000.xhci: Host supports USB 3.2 Enhanced SuperSpeed [ 0.634622] hub 1-0:1.0: USB hub found [ 0.638400] hub 1-0:1.0: 1 port detected [ 0.642597] usb usb2: We don't know the algorithms for LPM for this host, disabling LPM. [ 0.651024] hub 2-0:1.0: USB hub found [ 0.654799] hub 2-0:1.0: 1 port detected [ 0.659188] usbcore: registered new interface driver uas [ 0.664582] usbcore: registered new interface driver usb-storage [ 0.670696] i2c /dev entries driver [ 0.675091] mtk-wdt 1001c000.watchdog: Watchdog enabled (timeout=31 sec, nowayout=0) [ 0.683076] device-mapper: ioctl: 4.41.0-ioctl (2019-09-16) initialised: dm-devel@redhat.com [ 0.693409] NET: Registered protocol family 10 [ 0.698518] Segment Routing with IPv6 [ 0.702226] NET: Registered protocol family 17 [ 0.706711] Bridge firewalling registered [ 0.710715] 8021q: 802.1Q VLAN Support v1.8 [ 0.723733] nmbm nmbm_spim_nand: Signature found at block 1023 [0x07fe0000] [ 0.731614] nmbm nmbm_spim_nand: First info table with writecount 0 found in block 960 [ 0.742162] nmbm nmbm_spim_nand: Second info table with writecount 0 found in block 963 [ 0.750166] nmbm nmbm_spim_nand: NMBM has been successfully attached [ 0.756793] 6 fixed-partitions partitions found on MTD device nmbm_spim_nand [ 0.763850] Creating 6 MTD partitions on "nmbm_spim_nand": [ 0.769331] 0x000000000000-0x000000100000 : "BL2" [ 0.774558] 0x000000100000-0x000000180000 : "u-boot-env" [ 0.780358] 0x000000180000-0x000000380000 : "Factory" [ 0.785920] 0x000000380000-0x0000003c0000 : "bdinfo" [ 0.791387] 0x0000003c0000-0x0000005c0000 : "FIP" [ 0.796602] 0x0000005c0000-0x0000045c0000 : "ubi" [ 0.802375] [mtk_hw_init] reset_lock:0, force:0 [ 0.806936] [mtk_hw_init] execute fe cold reset [ 0.822472] mtk_soc_eth 15100000.ethernet: MDC is running on 2500000 Hz [ 0.850448] mtk_soc_eth 15100000.ethernet eth0: mediatek frame engine at 0xffffffc011900000, irq 79 [ 0.860132] mtk_soc_eth 15100000.ethernet eth1: mediatek frame engine at 0xffffffc011900000, irq 79 [ 0.869193] (unnamed net_device) (dummy): netif_napi_add() called with weight 256 [ 1.440536] mt753x gsw@0: LAN/WAN VLAN setting=wllll [ 1.445769] mt753x gsw@0: Switch is MediaTek MT7531AE rev 1 [ 1.455529] mt753x gsw@0: HWSTRAP=0xff XTAL=25MHz [ 3.137080] mt753x gsw@0: >>>>>>>>>>>>>>>>>>>>>>>>>>>>> START CALIBRATION: [ 3.145062] mt753x gsw@0: -------- gephy-calbration (port:0) -------- [ 3.160266] CALDLY = 40 [ 3.217541] 0x1e-e0 = 2929 [ 3.221938] 0x1f-115 = 5 [ 3.224459] GE Rext AnaCal Done! (9)(0x29) [ 3.283984] GE R50 AnaCal Done! (9) (0x34)(0xb4) [ 3.338914] GE R50 AnaCal Done! (9) (0x34)(0xb4) [ 3.393847] GE R50 AnaCal Done! (9) (0x34)(0xb4) [ 3.453331] GE R50 AnaCal Done! (10) (0x32)(0xb2) [ 3.461182] GE 1e_174(0xb4b4), 1e_175(0xb4b2) [ 3.498451] GE Tx offset AnaCal Done! (pair-0)(2)(0x21) 0x1e_172=0x2120 [ 3.527875] GE Tx offset AnaCal Done! (pair-1)(3)(0x3) 0x1e_172=0x2103 [ 3.566321] GE Tx offset AnaCal Done! (pair-2)(5)(0x24) 0x1e_173=0x2420 [ 3.595742] GE Tx offset AnaCal Done! (pair-3)(3)(0x22) 0x1e_173=0x2422 [ 3.663544] GE Tx amp AnaCal Done! (pair-0)(1e_12 = 0x5014) [ 3.694656] GE Tx amp AnaCal Done! (pair-1)(1e_17 = 0x1616) [ 3.729216] GE Tx amp AnaCal Done! (pair-2)(1e_19 = 0x1820) [ 3.786423] GE Tx amp AnaCal Done! (pair-3)(1e_21 = 0x1d25) [ 3.833129] PORT 0 RX_DC_OFFSET [ 3.845792] before pairA output = 1e [ 3.851142] after pairA output = 0 [ 3.856237] before pairB output = 1e [ 3.861587] after pairB output = 0 [ 3.866683] before pairC output = f [ 3.871945] after pairC output = 0 [ 3.877042] before pairD output = f [ 3.882304] after pairD output = ff [ 3.886041] mt753x gsw@0: -------- gephy-calbration (port:1) -------- [ 3.901243] CALDLY = 40 [ 3.963364] GE R50 AnaCal Done! (11) (0x31)(0xb1) [ 4.022938] GE R50 AnaCal Done! (10) (0x32)(0xb2) [ 4.077955] GE R50 AnaCal Done! (9) (0x34)(0xb4) [ 4.141994] GE R50 AnaCal Done! (11) (0x31)(0xb1) [ 4.149847] GE 1e_174(0xb1b2), 1e_175(0xb4b1) [ 4.191671] GE Tx offset AnaCal Done! (pair-0)(3)(0x22) 0x1e_172=0x2220 [ 4.225650] GE Tx offset AnaCal Done! (pair-1)(4)(0x23) 0x1e_172=0x2223 [ 4.255075] GE Tx offset AnaCal Done! (pair-2)(3)(0x22) 0x1e_173=0x2220 [ 4.275389] GE Tx offset AnaCal Done! (pair-3)(1)(0x20) 0x1e_173=0x2220 [ 4.343194] GE Tx amp AnaCal Done! (pair-0)(1e_12 = 0x5415) [ 4.379970] GE Tx amp AnaCal Done! (pair-1)(1e_17 = 0x1a1a) [ 4.431518] GE Tx amp AnaCal Done! (pair-2)(1e_19 = 0x1c24) [ 4.494389] GE Tx amp AnaCal Done! (pair-3)(1e_21 = 0x1e26) [ 4.541097] PORT 1 RX_DC_OFFSET [ 4.553764] before pairA output = f [ 4.559026] after pairA output = 0 [ 4.564122] before pairB output = 1d [ 4.569470] after pairB output = 1 [ 4.574566] before pairC output = e [ 4.579829] after pairC output = fe [ 4.585011] before pairD output = f [ 4.590273] after pairD output = ff [ 4.594010] mt753x gsw@0: -------- gephy-calbration (port:2) -------- [ 4.609212] CALDLY = 40 [ 4.675884] GE R50 AnaCal Done! (12) (0x30)(0xb0) [ 4.744563] GE R50 AnaCal Done! (12) (0x30)(0xb0) [ 4.813244] GE R50 AnaCal Done! (12) (0x30)(0xb0) [ 4.877367] GE R50 AnaCal Done! (11) (0x31)(0xb1) [ 4.885217] GE 1e_174(0xb0b0), 1e_175(0xb0b1) [ 4.917935] GE Tx offset AnaCal Done! (pair-0)(1)(0x1) 0x1e_172=0x120 [ 4.951739] GE Tx offset AnaCal Done! (pair-1)(4)(0x23) 0x1e_172=0x123 [ 4.985629] GE Tx offset AnaCal Done! (pair-2)(4)(0x23) 0x1e_173=0x2320 [ 5.005941] GE Tx offset AnaCal Done! (pair-3)(1)(0x1) 0x1e_173=0x2301 [ 5.096311] GE Tx amp AnaCal Done! (pair-0)(1e_12 = 0x781e) [ 5.155734] GE Tx amp AnaCal Done! (pair-1)(1e_17 = 0x1d1d) [ 5.235598] GE Tx amp AnaCal Done! (pair-2)(1e_19 = 0x222a) [ 5.264497] GE Tx amp AnaCal Done! (pair-3)(1e_21 = 0x161e) [ 5.311204] PORT 2 RX_DC_OFFSET [ 5.323874] before pairA output = 1d [ 5.329223] after pairA output = 0 [ 5.334318] before pairB output = 1e [ 5.339668] after pairB output = 0 [ 5.344768] before pairC output = 1d [ 5.350114] after pairC output = ff [ 5.355296] before pairD output = f [ 5.360558] after pairD output = ff [ 5.364289] mt753x gsw@0: -------- gephy-calbration (port:3) -------- [ 5.379493] CALDLY = 40 [ 5.441615] GE R50 AnaCal Done! (11) (0x31)(0xb1) [ 5.496633] GE R50 AnaCal Done! (9) (0x34)(0xb4) [ 5.556117] GE R50 AnaCal Done! (10) (0x32)(0xb2) [ 5.611136] GE R50 AnaCal Done! (9) (0x34)(0xb4) [ 5.618900] GE 1e_174(0xb1b4), 1e_175(0xb2b4) [ 5.660728] GE Tx offset AnaCal Done! (pair-0)(3)(0x22) 0x1e_172=0x2220 [ 5.694704] GE Tx offset AnaCal Done! (pair-1)(4)(0x4) 0x1e_172=0x2204 [ 5.719485] GE Tx offset AnaCal Done! (pair-2)(2)(0x2) 0x1e_173=0x220 [ 5.739624] GE Tx offset AnaCal Done! (pair-3)(1)(0x1) 0x1e_173=0x201 [ 5.801595] GE Tx amp AnaCal Done! (pair-0)(1e_12 = 0x5c17) [ 5.838370] GE Tx amp AnaCal Done! (pair-1)(1e_17 = 0x1616) [ 5.867270] GE Tx amp AnaCal Done! (pair-2)(1e_19 = 0x171f) [ 5.901830] GE Tx amp AnaCal Done! (pair-3)(1e_21 = 0x1a22) [ 5.948540] PORT 3 RX_DC_OFFSET [ 5.961203] before pairA output = 1e [ 5.966553] after pairA output = ff [ 5.971736] before pairB output = f [ 5.976998] after pairB output = 1 [ 5.982089] before pairC output = 1e [ 5.987443] after pairC output = 0 [ 5.992541] before pairD output = 1e [ 5.997887] after pairD output = ff [ 6.001624] mt753x gsw@0: -------- gephy-calbration (port:4) -------- [ 6.016828] CALDLY = 40 [ 6.051620] GE R50 AnaCal Done! (5) (0x42)(0xc2) [ 6.088330] GE R50 AnaCal Done! (5) (0x42)(0xc2) [ 6.125042] GE R50 AnaCal Done! (5) (0x42)(0xc2) [ 6.170860] GE R50 AnaCal Done! (7) (0x37)(0xb7) [ 6.178625] GE 1e_174(0xc2c2), 1e_175(0xc2b7) [ 6.220448] GE Tx offset AnaCal Done! (pair-0)(3)(0x22) 0x1e_172=0x2220 [ 6.245316] GE Tx offset AnaCal Done! (pair-1)(2)(0x21) 0x1e_172=0x2221 [ 6.274737] GE Tx offset AnaCal Done! (pair-2)(3)(0x22) 0x1e_173=0x2220 [ 6.299604] GE Tx offset AnaCal Done! (pair-3)(2)(0x2) 0x1e_173=0x2202 [ 6.452253] GE Tx amp AnaCal Done! (pair-0)(1e_12 = 0x1c07) [ 6.568303] GE Tx amp AnaCal Done! (pair-1)(1e_17 = 0x707) [ 6.710367] GE Tx amp AnaCal Done! (pair-2)(1e_19 = 0x30b) [ 6.807128] GE Tx amp AnaCal Done! (pair-3)(1e_21 = 0xb13) [ 6.853750] PORT 4 RX_DC_OFFSET [ 6.866417] before pairA output = f [ 6.871679] after pairA output = fe [ 6.876862] before pairB output = e [ 6.882119] after pairB output = ff [ 6.887301] before pairC output = e [ 6.892563] after pairC output = 0 [ 6.897654] before pairD output = f [ 6.902915] after pairD output = 0 [ 6.911675] UBI: auto-attach mtd6 [ 6.915003] ubi0: attaching mtd6 [ 7.122424] ubi0: scanning is finished [ 7.131267] ubi0: attached mtd6 (name "ubi", size 64 MiB) [ 7.136674] ubi0: PEB size: 131072 bytes (128 KiB), LEB size: 126976 bytes [ 7.143540] ubi0: min./max. I/O unit sizes: 2048/2048, sub-page size 2048 [ 7.150317] ubi0: VID header offset: 2048 (aligned 2048), data offset: 4096 [ 7.157267] ubi0: good PEBs: 512, bad PEBs: 0, corrupted PEBs: 0 [ 7.163263] ubi0: user volume: 3, internal volumes: 1, max. volumes count: 128 [ 7.170484] ubi0: max/mean erase counter: 2/0, WL threshold: 4096, image sequence number: 1747276452 [ 7.179609] ubi0: available PEBs: 0, total reserved PEBs: 512, PEBs reserved for bad PEB handling: 19 [ 7.188820] ubi0: background thread "ubi_bgt0d" started, PID 700 [ 7.189473] block ubiblock0_1: created from ubi0:1(rootfs) [ 7.200314] ubiblock: device ubiblock0_1 (rootfs) set to be root filesystem [ 7.207269] hctosys: unable to open rtc device (rtc0) [ 7.215585] VFS: Mounted root (squashfs filesystem) readonly on device 253:0. [ 7.222934] Freeing unused kernel memory: 448K [ 7.240535] Run /sbin/init as init process [ 7.467298] init: Console is alive [ 7.470837] init: - watchdog - [ 7.922068] kmodloader: loading kernel modules from /etc/modules-boot.d/* [ 7.946719] conninfra@(mtk_conninfra_drv_init:644) Before platform_driver_register [ 7.954395] Get Index(0-TOP_MISC_BASE) phy_addr(0x11d10000) vir_addr=(0xffffffc010aa5000) size=(0x1000) [ 7.963780] Get Index(1-TOPRGU_BASE) phy_addr(0x1001c000) vir_addr=(0xffffffc010aad000) size=(0x1000) [ 7.972990] Get Index(2-GPIO_BASE) phy_addr(0x11d00000) vir_addr=(0xffffffc010aaf000) size=(0x1000) [ 7.982024] Get Index(3-IOCFG_TR_BASE) phy_addr(0x11f00000) vir_addr=(0xffffffc010ab1000) size=(0x1000) [ 7.991403] Get Index(4-IOCFG_TL_BASE) phy_addr(0x11f10000) vir_addr=(0xffffffc010ab3000) size=(0x1000) [ 8.000787] Get Index(5-INFRACFG_AO_BASE) phy_addr(0x10003000) vir_addr=(0xffffffc010ab5000) size=(0x1000) [ 8.010428] Get Index(6-CONN_INFRA_CFG_BASE) phy_addr(0x18001000) vir_addr=(0xffffffc010abd000) size=(0x1000) [ 8.020327] Get Index(7-CONN_INFRA_SYSRAM_BASE) phy_addr(0x18050000) vir_addr=(0xffffffc010abf000) size=(0x1000) [ 8.030486] Get Index(8-CONN_INFRA_CLKGEN_ON_TOP_BASE) phy_addr(0x18009000) vir_addr=(0xffffffc010ac1000) size=(0x1000) [ 8.041253] Get Index(9-CONN_HOST_CSR_TOP_BASE) phy_addr(0x18060000) vir_addr=(0xffffffc010ac3000) size=(0x1000) [ 8.051412] Get Index(10-CONN_INFRA_BUS_CR_BASE) phy_addr(0x1800e000) vir_addr=(0xffffffc010ac5000) size=(0x1000) [ 8.061675] Get Index(11-CONN_INFRA_RGU_BASE) phy_addr(0x18000000) vir_addr=(0xffffffc010b0e000) size=(0x1000) [ 8.071661] Get Index(12-CONN_WT_SLP_CTL_REG_BASE) phy_addr(0x18005000) vir_addr=(0xffffffc010b10000) size=(0x1000) [ 8.082081] Get Index(13-INST2_CONN_WT_SLP_CTL_REG_BASE) phy_addr(0x18085000) vir_addr=(0xffffffc010b12000) size=(0x1000) [ 8.093021] Get Index(14-CONN_RF_SPI_MST_REG_BASE) phy_addr(0x18004000) vir_addr=(0xffffffc010b14000) size=(0x1000) [ 8.103444] Get Index(15-INST2_CONN_RF_SPI_MST_REG_BASE) phy_addr(0x18084000) vir_addr=(0xffffffc010b16000) size=(0x1000) [ 8.114387] Get Index(16-CONN_SEMAPHORE_BASE) phy_addr(0x18070000) vir_addr=(0xffffffc010b20000) size=(0x10000) [ 8.124461] Get Index(17-CONN_AFE_CTL_BASE) phy_addr(0x18003000) vir_addr=(0xffffffc010b18000) size=(0x1000) [ 8.134274] Get Index(18-CONN_AFE_CTL_2ND_BASE) phy_addr(0x18083000) vir_addr=(0xffffffc010b1a000) size=(0x1000) [ 8.144435] Get Index(19-WF_TOP_SLPPROT_ON_BASE) phy_addr(0x184c0000) vir_addr=(0xffffffc010b40000) size=(0x10000) [ 8.154768] Get Index(20-WF_TOP_CFG_BASE) phy_addr(0x184b0000) vir_addr=(0xffffffc010b1c000) size=(0x1000) [ 8.164410] Get Index(21-WF_MCU_CONFIG_LS_BASE) phy_addr(0x184f0000) vir_addr=(0xffffffc010b1e000) size=(0x1000) [ 8.174570] Get Index(22-WF_MCU_BUS_CR_BASE) phy_addr(0x18400000) vir_addr=(0xffffffc010b31000) size=(0x1000) [ 8.184470] Get Index(23-WF_MCUSYS_INFRA_BUS_FULL_U_DEBUG_CTRL_AO_BASE) phy_addr(0x18500000) vir_addr=(0xffffffc010b33000) size=(0x1000) [ 8.196713] Get Index(24-WF_TOP_CFG_ON_BASE) phy_addr(0x184c0000) vir_addr=(0xffffffc010b70000) size=(0x10000) [ 8.206702] conninfra@(consys_plt_hw_init:162) adie_cfg_type = 1, one_adie_dbdc = 1 [ 8.214351] [emi_mng_init] gConEmiPhyBase = [0x47c80000] size = [0x100000] fw size = [0x100000] ops=[(____ptrval____)] [ 8.225133] conninfra@(mtk_conninfra_drv_init:650) After platform_driver_register [ 8.232985] ConnInfra Dev: init (0) [ 8.237922] conninfra@(_consys_polling_chipid_int:306) Read CONNSYS HW IP version successfully! (0x02090000) [ 8.247745] conninfra@(connsys_d_die_cfg:377) D-die efuse: 0x00000000 [ 8.255203] conninfra@(_connsys_a_die_cfg_7976:932) adie_idx[0], A-die CHIP ID = 0x7976, HW Version = 0x8a10 [ 8.266021] conninfra@(consys_spi_write_nolock:513) addr=0x0a00, val=0xffffffff [ 8.274325] conninfra@(consys_spi_write_nolock:513) addr=0x04ac, val=0x0000001c [ 8.282628] conninfra@(consys_spi_write_nolock:513) addr=0x0144, val=0x00000002 [ 8.291936] conninfra@(consys_spi_write_nolock:513) addr=0x0148, val=0x00000000 [ 8.301245] conninfra@(consys_spi_write_nolock:513) addr=0x0148, val=0x43a60000 [ 8.314584] conninfra@(connsys_a_die_efuse_read_nolock:749) efuse = [0x00000001, 0x00c40000, 0x008800be, 0x00000000] [ 8.326096] conninfra@(consys_spi_write_nolock:513) addr=0x0144, val=0x00000002 [ 8.335405] conninfra@(consys_spi_write_nolock:513) addr=0x0148, val=0x23a6003a [ 8.344714] conninfra@(consys_spi_write_nolock:513) addr=0x0148, val=0x63a7003a [ 8.358052] conninfra@(connsys_a_die_efuse_read_nolock:749) efuse = [0x00000001, 0x00c40000, 0x008800be, 0x00000000] [ 8.369563] conninfra@(consys_spi_write_nolock:513) addr=0x0144, val=0x00000002 [ 8.378874] conninfra@(consys_spi_write_nolock:513) addr=0x0148, val=0x23a7003a [ 8.388184] conninfra@(consys_spi_write_nolock:513) addr=0x0148, val=0x63ac003a [ 8.401522] conninfra@(connsys_a_die_efuse_read_nolock:749) efuse = [0x00000001, 0x00c40000, 0x008800be, 0x00000000] [ 8.413038] conninfra@(consys_spi_write_nolock:513) addr=0x0038, val=0x4a563b00 [ 8.421340] conninfra@(consys_spi_write_nolock:513) addr=0x065c, val=0x1d59080f [ 8.429642] conninfra@(consys_spi_write_nolock:513) addr=0x0664, val=0x34c00fe0 [ 8.437946] conninfra@(consys_spi_write_nolock:513) addr=0x0070, val=0x88888005 [ 8.447206] conninfra@(consys_spi_write_nolock:513) addr=0x0070, val=0x00000005 [ 8.455441] conninfra@(_consys_polling_chipid_int:306) Read CONNSYS HW IP version successfully! (0x02090000) [ 8.465253] conninfra@(_consys_hw_conninfra_wakeup:470) conninfra_wakeup refcnt=[0]->[1] wakeup!! [ 8.474115] conninfra@(_consys_hw_conninfra_sleep:490) conninfra_sleep refcnt=[1]->[0] sleep!! [ 8.482716] conninfra@(opfunc_power_on_internal:241) [Conninfra Pwr On] BT=[0] FM=[0] GPS=[0] WF=[0] CONNINFRA=[1] [ 8.497304] mediatek_soc_hnat 15100000.hnat: wan = eth1 [ 8.502568] mediatek_soc_hnat 15100000.hnat: lan = eth0 [ 8.507789] mediatek_soc_hnat 15100000.hnat: lan2 = eth2 [ 8.513092] mediatek_soc_hnat 15100000.hnat: ppd = eth0 [ 8.518309] mediatek_soc_hnat 15100000.hnat: gmac num = 2 [ 8.523699] mediatek_soc_hnat 15100000.hnat: ppe num = 1 [ 8.529432] mediatek_soc_hnat 15100000.hnat: PPE0 entry number = 8192 [ 8.546201] mediatek_soc_hnat 15100000.hnat: PPE0 hwnat start [ 8.551998] hnat roaming work enable [ 8.558605] warp_module_init(): module init and register callback for warp [ 8.565509] create warp_ctrl ok!!! [ 8.568941] wed_get_slot_map(): assign slot_id:0 for entry: 0! [ 8.574778] wed_get_slot_map(): assign slot_id:1 for entry: 1! [ 8.581105] kmodloader: done loading kernel modules from /etc/modules-boot.d/* [ 8.598558] init: - preinit - [ 8.892511] random: crng init done [ 8.899759] mtk_soc_eth 15100000.ethernet eth0: configuring for fixed/2500base-x link mode [ 8.908206] mtk_soc_eth 15100000.ethernet eth0: Link is Up - 2.5Gbps/Full - flow control rx/tx [ 8.978775] UBIFS (ubi0:2): Mounting in unauthenticated mode [ 8.984543] UBIFS (ubi0:2): background thread "ubifs_bgt0_2" started, PID 773 [ 9.016429] UBIFS (ubi0:2): recovery needed [ 9.076082] UBIFS (ubi0:2): recovery completed [ 9.080583] UBIFS (ubi0:2): UBIFS: mounted UBI device 0, volume 2, name "rootfs_data" [ 9.088406] UBIFS (ubi0:2): LEB size: 126976 bytes (124 KiB), min./max. I/O unit sizes: 2048 bytes/2048 bytes [ 9.098309] UBIFS (ubi0:2): FS size: 44314624 bytes (42 MiB, 349 LEBs), journal size 2158592 bytes (2 MiB, 17 LEBs) [ 9.108730] UBIFS (ubi0:2): reserved for root: 2093089 bytes (2044 KiB) [ 9.115336] UBIFS (ubi0:2): media format: w5/r0 (latest is w5/r0), UUID 7739B546-F76A-491F-BFFE-5D530F915B9E, small LPT model [ 9.131770] mount_root: switching to ubifs overlay [ 9.144579] urandom-seed: Seeding with /etc/urandom.seed [ 9.607310] procd: - early - [ 9.610261] procd: - watchdog - [ 10.157998] procd: - watchdog - [ 10.163040] procd: - ubus - [ 10.218155] procd: - init - [ 10.222533] mt753x gsw@0: Port 0 Link is Up - 1Gbps/Full [ 10.227976] gmac: port0 linkup [ 10.627709] urngd: v1.0.2 started. [ 10.657656] kmodloader: loading kernel modules from /etc/modules.d/* [ 10.678987] NET: Registered protocol family 15 [ 10.684737] Initializing XFRM netlink socket [ 10.690192] tun: Universal TUN/TAP device driver, 1.6 [ 10.707182] l2tp_core: L2TP core driver, V2.0 [ 10.712704] l2tp_netlink: L2TP netlink interface [ 10.718430] nat46: module (version 362640b41ae52b732d9e9729e61ac555492442a3) loaded. [ 10.727118] gre: GRE over IPv4 demultiplexor driver [ 10.733209] ip_gre: GRE over IPv4 tunneling driver [ 10.765106] ipv6_pass_through: module license 'Proprietary' taints kernel. [ 10.772022] Disabling lock debugging due to kernel taint [ 11.889201] conninfra@(conninfra_pwr_on:120) [conninfra_pwr_on] drv=[3] [ 11.896759] conninfra@(_consys_polling_chipid_int:306) Read CONNSYS HW IP version successfully! (0x02090000) [ 11.914608] Adie Type: 0x7976 [ 11.914610] SKU Type: 3000 [ 11.918528] conninfra@(opfunc_power_on_internal:241) [Conninfra Pwr On] BT=[0] FM=[0] GPS=[0] WF=[1] CONNINFRA=[1] [ 11.932621] WiFi@C12L1,get_dbg_setting_by_profile() 4480: debug level setting=INDEX0_debug_level not found!! [ 11.942466] WiFi@C12L1,get_dbg_setting_by_profile() 4503: debug option setting=INDEX0_debug_option not found!! [ 11.952526] mt_rbus 0000:00:00.0: runtime IRQ mapping not provided by arch [ 11.965920] mt7981_init()--> [ 11.968819] Use the default iPAiLNA bin image! [ 11.973293] <--mt7981_init() [ 11.976298] WiFi@C12L1,match_index_by_chipname() 758: not find chip name INDEX1 [ 11.983620] WiFi@C12L1,match_index_by_chipname() 758: not find chip name INDEX2 [ 11.990936] WiFi@C12L1,match_index_by_chipname() 758: not find chip name INDEX3 [ 11.998254] WiFi@C12L1,match_index_by_chipname() 758: not find chip name INDEX4 [ 12.005573] WiFi@C12L1,match_index_by_chipname() 758: not find chip name INDEX5 [ 12.012890] WiFi@C12L1,match_index_by_chipname() 758: not find chip name INDEX6 [ 12.020205] WiFi@C12L1,match_index_by_chipname() 758: not find chip name INDEX7 [ 12.027521] WiFi@C12L1,match_index_by_chipname() 758: not find chip name INDEX8 [ 12.034842] WiFi@C12L1,match_index_by_chipname() 758: not find chip name INDEX9 [ 12.042378] mt7981 nlwifi attach OK [ 12.054008] mtk_warp_proxy: module uses symbols from proprietary module mt_wifi, inheriting taint. [ 12.086131] wireguard: WireGuard 1.0.20210219 loaded. See www.wireguard.com for information. [ 12.094583] wireguard: Copyright (C) 2015-2019 Jason A. Donenfeld <Jason@zx2c4.com>. All Rights Reserved. [ 12.118962] xt_time: kernel timezone is -0000 [ 12.157479] PPP generic driver version 2.4.2 [ 12.163052] PPP MPPE Compression module registered [ 12.169146] NET: Registered protocol family 24 [ 12.174956] PPTP driver version 0.8.5 [ 12.192387] l2tp_ppp: PPPoL2TP kernel driver, V2.0 [ 12.202248] kmodloader: done loading kernel modules from /etc/modules.d/* [ 12.287227] client_get_axi_slot_id(): wrong BUS_TYPE [ 12.292206] warp_cap_support(): chip_id=7981 is in WHNAT support list [ 12.298655] warp_entry_acquire(): bus slot:0, hook to WARP, entry id=0, entry: 000000008459ad83 [ 12.307346] client_hif_specific_get(): hw->base_phy_addr 0x18000000!! [ 12.313776] client_chip_specific_get(): 0x7981 chip id 0x7981!! [ 12.319779] warp_entry_get_by_pdev(): return entry[0] [ 12.324985] warp_msg_register():warp,pid,1690,id,0,wed_idx,0 [ 12.330644] warp_dev0 15010000.wed: Using 32bit DMA for streaming map [ 12.337098] warp_dev0 15010000.wed: Using 32bit DMA for coherent map [ 12.343471] wed_init(0): res_start = 0x15010000, size = 1000, irq=7,base_addr=0xffffffc010b55000 [ 12.352617] wed_ring_init(): wed tx ring init result = 0 [ 12.358082] wed_ring_init(): wed rx ring init result = 0 [ 12.369826] create wed ok!!! [ 12.372748] wdma_init(): wdma(0) base_addr=0xffffffc010be5800, base_phy_addr=0x15104800 [ 12.381417] warp_woif_bus_init_hw(): bus:0000000004b1b141, txring: 20, pa: 0x0000000046994000, 0x0000000046994000, 24, 28, 3c [ 12.392717] warp_woif_bus_init_hw(): bus:0000000004b1b141, rxring: 50, pa: 0x0000000046996000, 0x0000000046996000, 54, 58, 6c [ 12.404034] get_region_info(): wed_idx = 0, base_addr = 0x00000000f96fa5cf, size = 0x40000, res.start = 0x47d80000, shared:0 [ 12.415249] get_region_info(): wed_idx = 0, base_addr = 0x000000004b12fec0, size = 0x8000, res.start = 0x151e0000, shared:0 [ 12.426400] get_region_info(): wed_idx = 0, base_addr = 0x0000000084f9b38d, size = 0x240000, res.start = 0x47dc0000, shared:1 [ 12.437699] get_region_info(): wed_idx = 0, base_addr = 0x000000002c9742cc, size = 0x1000, res.start = 0x15194000, shared:0 [ 12.448812] warp_fwdl_mcu_mode(): mcu mode, need fwdl [ 12.492772] ########## WO Firmware ########## [ 12.497137] Chip ID: 0x0000 [ 12.499918] ECO version:0 [ 12.502536] Version: DEV_000000 [ 12.505670] Build date: 20231228201845 [ 12.509410] Total region:3 [ 12.512103] ################################# [ 12.516454] Parsing tailer region 0 [ 12.519936] Target address: 0x151e0000 [ 12.523769] Download size: 22112 [ 12.527104] Parsing tailer region 1 [ 12.530586] Target address: 0x47d80000 [ 12.534413] Download size: 86960 [ 12.537786] Parsing tailer region 2 [ 12.541266] Target address: 0x47dc0000 [ 12.545093] Download size: 2345040 [ 12.550506] warp_fwdl_ready_check_mcu_mode(): waiting for wocpu [ 12.571186] warp_fwdl_ready_check_mcu_mode(): wocpu is ready [ 12.576877] warp_woctrl_init_state(), wo_state: WO_STATE_ENABLE [ 12.582800] wo_proc_init done 0000000094085bc8 [ 12.587323] wo_exep_proc_init done 0000000094085bc8 [ 12.592303] wo_exception_init(0): exp log= 0x000000000a3c9784, phy_addr= 0x00000000452b0000 size= 32768 [ 12.681049] WiFi@C12L1,RTMPWirelessModeCfg() 607: Init: BSS0 PhyMode=78 [ 12.687662] WiFi@C12L1,RTMPWirelessModeCfg() 607: Init: BSS1 PhyMode=78 [ 12.694268] WiFi@C12L1,RTMPWirelessModeCfg() 607: Init: BSS2 PhyMode=78 [ 12.700872] WiFi@C12L1,RTMPWirelessModeCfg() 607: Init: BSS3 PhyMode=177 [ 12.707564] WiFi@C12L1,RTMPWirelessModeCfg() 607: Init: BSS4 PhyMode=177 [ 12.714256] WiFi@C12L1,RTMPWirelessModeCfg() 607: Init: BSS5 PhyMode=177 [ 12.771337] WiFi@C15L1,Set_PMFMFPC_Proc() 1722: [PMF] :: apidx=0, Desired MFPC=1 [ 12.778724] WiFi@C15L1,Set_PMFMFPC_Proc() 1722: [PMF] :: apidx=1, Desired MFPC=1 [ 12.786115] WiFi@C15L1,Set_PMFMFPC_Proc() 1722: [PMF] :: apidx=2, Desired MFPC=1 [ 12.793500] WiFi@C15L1,Set_PMFMFPC_Proc() 1722: [PMF] :: apidx=3, Desired MFPC=1 [ 12.800886] WiFi@C15L1,Set_PMFMFPC_Proc() 1722: [PMF] :: apidx=4, Desired MFPC=1 [ 12.808271] WiFi@C15L1,Set_PMFMFPC_Proc() 1722: [PMF] :: apidx=5, Desired MFPC=1 [ 12.821905] WiFi@C12L1,rtmp_read_ap_client_from_file() 1635: APCLI[0] ApCliMuMimoDlEnable = 0 [ 12.830420] WiFi@C12L1,rtmp_read_ap_client_from_file() 1635: APCLI[1] ApCliMuMimoDlEnable = 0 [ 12.839111] WiFi@C12L1,rtmp_read_ap_client_from_file() 1654: APCLI[0] ApCliMuMimoUlEnable = 0 [ 12.847627] WiFi@C12L1,rtmp_read_ap_client_from_file() 1654: APCLI[1] ApCliMuMimoUlEnable = 0 [ 12.856512] WiFi@C03L1,AndesSendCmdMsg() 754: Could not send in band command due to diablefRTMP_ADAPTER_MCU_SEND_IN_BAND_CMD [ 12.867719] WiFi@C03L1,AndesSendCmdMsg() 754: Could not send in band command due to diablefRTMP_ADAPTER_MCU_SEND_IN_BAND_CMD [ 12.953434] wdma_dma_ctrl(): WDMA_GLO_CFG=50404e70, txrx = 0 [ 12.962443] wdma_dma_ctrl(): WDMA_GLO_CFG=40404e70, txrx = 0 [ 12.975952] warp_tx_ring_init_hw(): configure ring 0 setting [ 12.981649] warp_tx_ring_init_hw(): wed:000000004b96a3fd wifi:00000000559580bc: 24420=46998000,24424=2048,24428=0 [ 12.991908] warp_tx_ring_init_hw(): configure ring 1 setting [ 12.997562] warp_tx_ring_init_hw(): wed:000000004b96a3fd wifi:00000000559580bc: 24430=46980000,24434=2048,24438=0 [ 13.007927] set_rrocfg,0 [ 13.033317] wdma_dma_ctrl(): WDMA_GLO_CFG=40404e74, txrx = 3 [ 13.038968] using E1 ROM patch [ 13.042015] using E1 RAM [ 13.044545] current sync CR = 0x1 [ 13.047847] Built date: 20231228201236a [ 13.051768] Platform: ALPS [ 13.054556] HW/SW version: 0x8a108a10 [ 13.058299] Patch version: 0xffffffff [ 13.072374] current sync CR = 0x1 [ 13.075687] Chip ID: 0x14 [ 13.078389] Eco version: 0x00 [ 13.081435] Region number: 0x0b [ 13.084658] Format version: 0x02 [ 13.087959] Format flag: 0x01 [ 13.091007] Ram version: ____000000 [ 13.094579] Built date: 20231228201255 [ 13.098414] Common crc: 0xb19053d0 [ 13.101895] Release info: header tag = 0, total length = 64 [ 13.107547] tag 1, padding length = 1, tag length = 59 [ 13.112763] payload: t-neptune-main-mt7915-1953-MT7981_MP2111_IMP-20231228201156 [ 13.141327] Chip ID: 0x00 [ 13.144033] Eco version: 0x00 [ 13.147085] Region number: 0x03 [ 13.150307] Format version: 0x02 [ 13.153614] Format flag: 0x01 [ 13.156662] Ram version: DEV_000000 [ 13.160228] Built date: 20231228201757 [ 13.164062] Common crc: 0x9d94838d [ 13.167544] Release info: header tag = 0, total length = 0 [ 13.258352] current sync CR = 0x7 [ 13.261701] efuse_probe: efuse = deaddead [ 13.406805] WiFi@C02L1,is_cal_free_ic() 831: [a-die version:1] [ 15.764425] WiFi@C17L1,RTMPReadTxPwrPerRate() 450: (450): Don't Support this now! [ 15.771940] WiFi@C01L1,AntCfgInit() 3165: Not support for HIF_MT yet! [ 15.796433] WiFi@C17L1,tx_pwr_comp_init() 641: NotSupportYet! [ 15.802232] WiFi@C12L1,SCS_init() 880: INIT SCSEnable [0]= 1 [ 15.807894] WiFi@C12L1,SCS_init() 887: INIT SCSEnable [1]= 0 [ 15.813854] WiFi@C14L1,IPMacTable_init() 348: IPMacTable already inited! [ 15.840692] wdma_dma_ctrl(): WDMA_GLO_CFG=50804e75, txrx = 3 [ 15.846634] WiFi@C00L1,set_ack_timeout_mode_byband() 13556: CTS/ACK Timeout Range should between [0xFFFF:0]!! [ 15.856543] WiFi@C00L1,set_datcfg_ack_cts_timeout() 13644: DAT config band(0) cck_timeout Fail! [ 15.865231] WiFi@C00L1,set_ack_timeout_mode_byband() 13556: CTS/ACK Timeout Range should between [0xFFFF:0]!! [ 15.875133] WiFi@C00L1,set_datcfg_ack_cts_timeout() 13655: DAT config band(0) ofdm_timeout Fail! [ 15.883906] WiFi@C00L1,set_ack_timeout_mode_byband() 13556: CTS/ACK Timeout Range should between [0xFFFF:0]!! [ 15.893806] WiFi@C00L1,set_datcfg_ack_cts_timeout() 13666: DAT config band(0) ofdma_timeout Fail! [ 15.902667] WiFi@C00L1,set_ack_timeout_mode_byband() 13556: CTS/ACK Timeout Range should between [0xFFFF:0]!! [ 15.912568] WiFi@C00L1,set_datcfg_ack_cts_timeout() 13644: DAT config band(1) cck_timeout Fail! [ 15.921255] WiFi@C00L1,set_ack_timeout_mode_byband() 13556: CTS/ACK Timeout Range should between [0xFFFF:0]!! [ 15.931156] WiFi@C00L1,set_datcfg_ack_cts_timeout() 13655: DAT config band(1) ofdm_timeout Fail! [ 15.939928] WiFi@C00L1,set_ack_timeout_mode_byband() 13556: CTS/ACK Timeout Range should between [0xFFFF:0]!! [ 15.949830] WiFi@C00L1,set_datcfg_ack_cts_timeout() 13666: DAT config band(1) ofdma_timeout Fail! [ 15.961901] phy_freq_adjust : no prim_ch value for adjust! [ 15.968397] phy_freq_adjust : no prim_ch value for adjust! [ 15.973950] phy_freq_adjust : no prim_ch value for adjust! [ 16.112560] WiFi@C00L1,MtCmdCr4RedSet() 914: MtCmdCr4RedSet: (ret = 0) [ 16.119489] WiFi@C23L1,DfsBuildChannelList() 4093: [RDM]: wdev is not 5G. [ 16.126326] phy_freq_adjust : no prim_ch value for adjust! [ 16.132303] WiFi@C23L1,HcGetBandByChannel() 1238: No hdev parking on channel:0, just return a default band_idx 0! [ 18.878661] WiFi@C23L1,DfsBuildChannelList() 4093: [RDM]: wdev is not 5G. [ 18.963846] WiFi@C00L1,TxCCKStreamCtrl() 20928: set wrong parameters [ 18.980503] PrintSrCmd: [ 18.980503] u1CmdSubId = 1, u1ArgNum = 0, u1DbdcIdx = 0, u1Status = 0 [ 18.980503] u1DropTaIdx = 0, u1StaIdx = 0, u4Value = 0 [ 18.994497] PrintSrCmd: [ 18.994497] u1CmdSubId = 5, u1ArgNum = 0, u1DbdcIdx = 0, u1Status = 0 [ 18.994497] u1DropTaIdx = 0, u1StaIdx = 0, u4Value = 0 [ 19.008488] PrintSrCmd: [ 19.008488] u1CmdSubId = 3, u1ArgNum = 0, u1DbdcIdx = 0, u1Status = 0 [ 19.008488] u1DropTaIdx = 0, u1StaIdx = 0, u4Value = 0 [ 19.022474] PrintSrCmd: [ 19.022474] u1CmdSubId = 23, u1ArgNum = 0, u1DbdcIdx = 0, u1Status = 0 [ 19.022474] u1DropTaIdx = 0, u1StaIdx = 0, u4Value = 0 [ 19.036543] PrintSrCmd: [ 19.036543] u1CmdSubId = 31, u1ArgNum = 0, u1DbdcIdx = 0, u1Status = 0 [ 19.036543] u1DropTaIdx = 0, u1StaIdx = 0, u4Value = 0 [ 19.050613] PrintSrCmd: [ 19.050613] u1CmdSubId = 33, u1ArgNum = 0, u1DbdcIdx = 0, u1Status = 0 [ 19.050613] u1DropTaIdx = 0, u1StaIdx = 0, u4Value = 0 [ 19.064733] mtk_ppe_dev_register_hook : ineterface ra0 register (1) [ 19.067233] [mtf_txpower_all_rate_info] band_idx:0 pwr:46 ChBand:2G ePAGain:0 [ 19.084224] extif_put_dev(ra0) [ 19.087326] mtk_ppe_dev_unregister_hook : ineterface ra0 set null (1) [ 23.024280] mtk_soc_eth 15100000.ethernet eth0: Link is Down [ 23.046750] mtk_soc_eth 15100000.ethernet eth0: configuring for fixed/2500base-x link mode [ 23.057472] mtk_soc_eth 15100000.ethernet eth0: Link is Up - 2.5Gbps/Full - flow control rx/tx [ 23.067374] br-lan: port 1(eth0) entered blocking state [ 23.072651] br-lan: port 1(eth0) entered disabled state [ 23.078049] device eth0 entered promiscuous mode [ 23.087207] br-lan: port 1(eth0) entered blocking state [ 23.092459] br-lan: port 1(eth0) entered forwarding state [ 23.103816] mtk_soc_eth 15100000.ethernet eth1: configuring for fixed/2500base-x link mode [ 23.116026] mtk_soc_eth 15100000.ethernet eth1: Link is Up - 2.5Gbps/Full - flow control rx/tx [ 23.116250] br-wan: port 1(eth1) entered blocking state [ 23.129898] br-wan: port 1(eth1) entered disabled state [ 23.135306] device eth1 entered promiscuous mode [ 23.153902] br-wan: port 1(eth1) entered blocking state [ 23.159170] br-wan: port 1(eth1) entered forwarding state [ 23.243873] wan-detect: service: [ 23.387696] device eth1 left promiscuous mode [ 23.392173] br-wan: port 1(eth1) entered disabled state [ 23.426476] mtk_soc_eth 15100000.ethernet eth1: Link is Down [ 23.474781] mtk_soc_eth 15100000.ethernet eth1: configuring for fixed/2500base-x link mode [ 23.500661] mtk_soc_eth 15100000.ethernet eth1: Link is Up - 2.5Gbps/Full - flow control rx/tx [ 23.509664] IPv6: ADDRCONF(NETDEV_CHANGE): eth1: link becomes ready [ 23.527684] br-lan: port 2(eth1) entered blocking state [ 23.532953] br-lan: port 2(eth1) entered disabled state [ 23.538386] device eth1 entered promiscuous mode [ 23.543131] br-lan: port 2(eth1) entered blocking state [ 23.548381] br-lan: port 2(eth1) entered forwarding state [ 23.599945] wan-detect: macaddr 80:af:ca:a1:7d:9a, proto dhcp [ 23.610823] hyfi_bridge_dev_event:197:Interface br-wan is down, ptr = 000000002ff594a7 [ 23.879216] WiFi@C23L1,DfsBuildChannelList() 4093: [RDM]: wdev is not 5G. [ 23.886210] WiFi@C23L1,DfsBuildChannelList() 4093: [RDM]: wdev is not 5G. [ 23.915040] phy_freq_adjust : no prim_ch value for adjust! [ 23.935602] WiFi@C23L1,HcGetBandByChannel() 1238: No hdev parking on channel:0, just return a default band_idx 0! [ 26.690380] WiFi@C23L1,DfsBuildChannelList() 4093: [RDM]: wdev is not 5G. [ 26.783092] WiFi@C00L1,TxCCKStreamCtrl() 20928: set wrong parameters [ 26.799683] PrintSrCmd: [ 26.799683] u1CmdSubId = 1, u1ArgNum = 0, u1DbdcIdx = 0, u1Status = 0 [ 26.799683] u1DropTaIdx = 0, u1StaIdx = 0, u4Value = 0 [ 26.813676] PrintSrCmd: [ 26.813676] u1CmdSubId = 5, u1ArgNum = 0, u1DbdcIdx = 0, u1Status = 0 [ 26.813676] u1DropTaIdx = 0, u1StaIdx = 0, u4Value = 0 [ 26.827666] PrintSrCmd: [ 26.827666] u1CmdSubId = 3, u1ArgNum = 0, u1DbdcIdx = 0, u1Status = 0 [ 26.827666] u1DropTaIdx = 0, u1StaIdx = 0, u4Value = 0 [ 26.841654] PrintSrCmd: [ 26.841654] u1CmdSubId = 23, u1ArgNum = 0, u1DbdcIdx = 0, u1Status = 0 [ 26.841654] u1DropTaIdx = 0, u1StaIdx = 0, u4Value = 0 [ 26.855728] PrintSrCmd: [ 26.855728] u1CmdSubId = 31, u1ArgNum = 0, u1DbdcIdx = 0, u1Status = 0 [ 26.855728] u1DropTaIdx = 0, u1StaIdx = 0, u4Value = 0 [ 26.869805] PrintSrCmd: [ 26.869805] u1CmdSubId = 33, u1ArgNum = 0, u1DbdcIdx = 0, u1Status = 0 [ 26.869805] u1DropTaIdx = 0, u1StaIdx = 0, u4Value = 0 [ 26.883922] extif_set_dev(ra0) [ 26.886426] [mtf_txpower_all_rate_info] band_idx:0 pwr:46 ChBand:2G ePAGain:0 [ 26.886977] mtk_ppe_dev_register_hook : ineterface ra0 register (1) [ 26.900518] IPv6: ADDRCONF(NETDEV_CHANGE): ra0: link becomes ready [ 27.134814] br-lan: port 3(ra0) entered blocking state [ 27.139981] br-lan: port 3(ra0) entered disabled state [ 27.145299] device ra0 entered promiscuous mode [ 27.149901] br-lan: port 3(ra0) entered blocking state [ 27.155060] br-lan: port 3(ra0) entered forwarding state [ 27.186839] WiFi@C00L1,ApAutoChannelAtBootUp() 521: not 5G A band [ 27.192957] WiFi@C08L1,ap_run_at_boot() 668: ACS is disable !! [ 27.281158] WiFi@C00L1,TxCCKStreamCtrl() 20928: set wrong parameters [ 27.297890] PrintSrCmd: [ 27.297890] u1CmdSubId = 1, u1ArgNum = 0, u1DbdcIdx = 0, u1Status = 0 [ 27.297890] u1DropTaIdx = 0, u1StaIdx = 0, u4Value = 0 [ 27.311948] PrintSrCmd: [ 27.311948] u1CmdSubId = 5, u1ArgNum = 0, u1DbdcIdx = 0, u1Status = 0 [ 27.311948] u1DropTaIdx = 0, u1StaIdx = 0, u4Value = 0 [ 27.326000] PrintSrCmd: [ 27.326000] u1CmdSubId = 3, u1ArgNum = 0, u1DbdcIdx = 0, u1Status = 0 [ 27.326000] u1DropTaIdx = 0, u1StaIdx = 0, u4Value = 0 [ 27.340076] PrintSrCmd: [ 27.340076] u1CmdSubId = 23, u1ArgNum = 0, u1DbdcIdx = 0, u1Status = 0 [ 27.340076] u1DropTaIdx = 0, u1StaIdx = 0, u4Value = 0 [ 27.354232] PrintSrCmd: [ 27.354232] u1CmdSubId = 31, u1ArgNum = 0, u1DbdcIdx = 0, u1Status = 0 [ 27.354232] u1DropTaIdx = 0, u1StaIdx = 0, u4Value = 0 [ 27.368375] PrintSrCmd: [ 27.368375] u1CmdSubId = 33, u1ArgNum = 0, u1DbdcIdx = 0, u1Status = 0 [ 27.368375] u1DropTaIdx = 0, u1StaIdx = 0, u4Value = 0 [ 27.382573] mtk_ppe_dev_register_hook : ra2 is in hwnat blackList, not to register [ 27.390279] [mtf_txpower_all_rate_info] band_idx:0 pwr:46 ChBand:2G ePAGain:0 [ 27.593811] wan-detect: service: [ 27.599332] wan-detect: stop detect [ 27.658104] br-lan: port 4(ra2) entered blocking state [ 27.663294] br-lan: port 4(ra2) entered disabled state [ 27.668643] device ra2 entered promiscuous mode [ 27.673285] br-lan: port 4(ra2) entered blocking state [ 27.678446] br-lan: port 4(ra2) entered forwarding state [ 27.753375] SetThermalProtectDutyCfg(): band_idx: 0, level_idx: 0, duty: 100 [ 27.753835] wan-detect: macaddr 80:af:ca:a1:7d:9a, proto dhcp [ 27.768069] SetThermalProtectDutyCfg(): band_idx: 0, level_idx: 1, duty: 20 [ 27.780359] SetThermalProtectDutyCfg(): band_idx: 0, level_idx: 2, duty: 15 [ 27.791627] SetThermalProtectDutyCfg(): band_idx: 0, level_idx: 3, duty: 10 [ 27.802993] SetThermalProtectEnable(): band_idx: 0, protection_type: 1, trigger_type: 1 [ 27.811057] SetThermalProtectEnable(): trigger_temp: 115, restore_temp: 108, recheck_time: 5 [ 27.822964] SetThermalProtectEnable(): band_idx: 0, protection_type: 2, trigger_type: 1 [ 27.831021] SetThermalProtectEnable(): trigger_temp: 124, restore_temp: 0, recheck_time: 5 [ 27.839435] (Thermal Protect) Radio Notify. [ 27.843653] band_idx: 0, level_idx: 0 [ 28.212020] hyfi_netlink_receive:72:Device not found: br-wan [ 28.551574] sh (5577): drop_caches: 3 [ 28.644792] sh (5560): drop_caches: 3 [ 29.107432] phy_freq_adjust : no prim_ch value for adjust! [ 29.113019] phy_freq_adjust : no prim_ch value for adjust! [ 29.118533] phy_freq_adjust : no prim_ch value for adjust! [ 29.124077] phy_freq_adjust : no prim_ch value for adjust! [ 29.129670] phy_freq_adjust : no prim_ch value for adjust! [ 29.135207] phy_freq_adjust : no prim_ch value for adjust! [ 29.205235] phy_freq_adjust : no prim_ch value for adjust! [ 29.210754] phy_freq_adjust : no prim_ch value for adjust! [ 29.219052] phy_freq_adjust : no prim_ch value for adjust! [ 29.259957] 7981@C23L1,HcGetBandByChannel() 1238: No hdev parking on channel:0, just return a default band_idx 0! TR069-cwmp works in Router mode only [ 31.367707] PrintSrCmd: [ 31.367707] u1CmdSubId = 1, u1ArgNum = 0, u1DbdcIdx = 1, u1Status = 0 [ 31.367707] u1DropTaIdx = 0, u1StaIdx = 0, u4Value = 0 [ 31.381708] PrintSrCmd: [ 31.381708] u1CmdSubId = 5, u1ArgNum = 0, u1DbdcIdx = 1, u1Status = 0 [ 31.381708] u1DropTaIdx = 0, u1StaIdx = 0, u4Value = 0 [ 31.395703] PrintSrCmd: [ 31.395703] u1CmdSubId = 3, u1ArgNum = 0, u1DbdcIdx = 1, u1Status = 0 [ 31.395703] u1DropTaIdx = 0, u1StaIdx = 0, u4Value = 0 [ 31.409690] PrintSrCmd: [ 31.409690] u1CmdSubId = 23, u1ArgNum = 0, u1DbdcIdx = 1, u1Status = 0 [ 31.409690] u1DropTaIdx = 0, u1StaIdx = 0, u4Value = 0 [ 31.423764] PrintSrCmd: [ 31.423764] u1CmdSubId = 31, u1ArgNum = 0, u1DbdcIdx = 1, u1Status = 0 [ 31.423764] u1DropTaIdx = 0, u1StaIdx = 0, u4Value = 0 [ 31.437840] PrintSrCmd: [ 31.437840] u1CmdSubId = 33, u1ArgNum = 0, u1DbdcIdx = 1, u1Status = 0 [ 31.437840] u1DropTaIdx = 0, u1StaIdx = 0, u4Value = 0 [ 31.451947] mtk_ppe_dev_register_hook : ineterface rax0 register (2) [ 31.454451] [mtf_txpower_all_rate_info] band_idx:1 pwr:46 ChBand:5G ePAGain:0 [ 31.665054] br-lan: port 5(rax0) entered blocking state [ 31.670318] br-lan: port 5(rax0) entered disabled state [ 31.675769] device rax0 entered promiscuous mode [ 31.680564] br-lan: port 5(rax0) entered blocking state [ 31.685814] br-lan: port 5(rax0) entered forwarding state [ 31.730408] 7981@C00L1,ApAutoChannelAtBootUp() 515: zero-wait DFS is not enabled [ 31.737845] 7981@C08L1,ap_run_at_boot() 668: ACS is disable !! [ 31.838851] PrintSrCmd: [ 31.838851] u1CmdSubId = 1, u1ArgNum = 0, u1DbdcIdx = 1, u1Status = 0 [ 31.838851] u1DropTaIdx = 0, u1StaIdx = 0, u4Value = 0 [ 31.852848] PrintSrCmd: [ 31.852848] u1CmdSubId = 5, u1ArgNum = 0, u1DbdcIdx = 1, u1Status = 0 [ 31.852848] u1DropTaIdx = 0, u1StaIdx = 0, u4Value = 0 [ 31.866843] PrintSrCmd: [ 31.866843] u1CmdSubId = 3, u1ArgNum = 0, u1DbdcIdx = 1, u1Status = 0 [ 31.866843] u1DropTaIdx = 0, u1StaIdx = 0, u4Value = 0 [ 31.880836] PrintSrCmd: [ 31.880836] u1CmdSubId = 23, u1ArgNum = 0, u1DbdcIdx = 1, u1Status = 0 [ 31.880836] u1DropTaIdx = 0, u1StaIdx = 0, u4Value = 0 [ 31.894913] PrintSrCmd: [ 31.894913] u1CmdSubId = 31, u1ArgNum = 0, u1DbdcIdx = 1, u1Status = 0 [ 31.894913] u1DropTaIdx = 0, u1StaIdx = 0, u4Value = 0 [ 31.909001] PrintSrCmd: [ 31.909001] u1CmdSubId = 33, u1ArgNum = 0, u1DbdcIdx = 1, u1Status = 0 [ 31.909001] u1DropTaIdx = 0, u1StaIdx = 0, u4Value = 0 [ 31.923109] mtk_ppe_dev_register_hook : rax2 is in hwnat blackList, not to register [ 31.925634] [mtf_txpower_all_rate_info] band_idx:1 pwr:46 ChBand:5G ePAGain:0 [ 32.101836] br-lan: port 6(rax2) entered blocking state [ 32.107114] br-lan: port 6(rax2) entered disabled state [ 32.112573] device rax2 entered promiscuous mode [ 32.117291] br-lan: port 6(rax2) entered blocking state [ 32.122524] br-lan: port 6(rax2) entered forwarding state [ 32.189361] SetThermalProtectDutyCfg(): band_idx: 1, level_idx: 0, duty: 100 [ 32.198321] SetThermalProtectDutyCfg(): band_idx: 1, level_idx: 1, duty: 20 [ 32.207431] SetThermalProtectDutyCfg(): band_idx: 1, level_idx: 2, duty: 15 [ 32.218643] SetThermalProtectDutyCfg(): band_idx: 1, level_idx: 3, duty: 10 [ 32.229856] SetThermalProtectEnable(): band_idx: 1, protection_type: 1, trigger_type: 1 [ 32.237928] SetThermalProtectEnable(): trigger_temp: 115, restore_temp: 108, recheck_time: 5 [ 32.248128] SetThermalProtectEnable(): band_idx: 1, protection_type: 2, trigger_type: 1 [ 32.256187] SetThermalProtectEnable(): trigger_temp: 124, restore_temp: 0, recheck_time: 5 [ 32.264595] (Thermal Protect) Radio Notify. [ 32.268779] band_idx: 1, level_idx: 0 [ 37.079774] rtl8221b phy init (VERID=6720) [ 39.876648] SCAN DONE, Reset FSM/CNTL IDLE. [ 41.260929] gmac: port38 linkup [ 44.702131] wan-detect: ifname eth1 proto dhcp detect [ 44.770670] device eth1 left promiscuous mode [ 44.775148] br-lan: port 2(eth1) entered disabled state [ 44.797362] br-wan: port 1(eth1) entered blocking state [ 44.802604] br-wan: port 1(eth1) entered disabled state [ 44.808002] device eth1 entered promiscuous mode [ 44.816581] br-wan: port 1(eth1) entered blocking state [ 44.821824] br-wan: port 1(eth1) entered forwarding state [ 44.827367] hyfi_bridge_dev_event:209:Interface br-wan is up, ptr = 00000000556fc509 [ 45.824514] IPv6: ADDRCONF(NETDEV_CHANGE): br-wan: link becomes ready [ 47.232988] device eth0 left promiscuous mode [ 47.237507] br-lan: port 1(eth0) entered disabled state [ 47.264525] br-wan: port 2(eth0) entered blocking state [ 47.269775] br-wan: port 2(eth0) entered disabled state [ 47.275208] device eth0 entered promiscuous mode [ 47.279935] br-wan: port 2(eth0) entered blocking state [ 47.285220] br-wan: port 2(eth0) entered forwarding state [ 47.344827] device ra0 left promiscuous mode [ 47.349208] br-lan: port 3(ra0) entered disabled state [ 47.381294] br-wan: port 3(ra0) entered blocking state [ 47.386489] br-wan: port 3(ra0) entered disabled state [ 47.391816] device ra0 entered promiscuous mode [ 47.396423] br-wan: port 3(ra0) entered blocking state [ 47.401577] br-wan: port 3(ra0) entered forwarding state [ 47.428741] device ra2 left promiscuous mode [ 47.433127] br-lan: port 4(ra2) entered disabled state [ 47.463583] br-wan: port 4(ra2) entered blocking state [ 47.468749] br-wan: port 4(ra2) entered disabled state [ 47.474114] device ra2 entered promiscuous mode [ 47.478798] br-wan: port 4(ra2) entered blocking state [ 47.483968] br-wan: port 4(ra2) entered forwarding state [ 47.496256] device rax0 left promiscuous mode [ 47.500775] br-lan: port 5(rax0) entered disabled state [ 47.533001] br-wan: port 5(rax0) entered blocking state [ 47.538256] br-wan: port 5(rax0) entered disabled state [ 47.543690] device rax0 entered promiscuous mode [ 47.548444] br-wan: port 5(rax0) entered blocking state [ 47.553712] br-wan: port 5(rax0) entered forwarding state [ 47.574765] device rax2 left promiscuous mode [ 47.579251] br-lan: port 6(rax2) entered disabled state [ 47.676211] br-wan: port 6(rax2) entered blocking state [ 47.681469] br-wan: port 6(rax2) entered disabled state [ 47.686919] device rax2 entered promiscuous mode [ 47.691656] br-wan: port 6(rax2) entered blocking state [ 47.696889] br-wan: port 6(rax2) entered forwarding state TR069-cwmp works in Router mode only [ 51.058012] SCAN DONE, Reset FSM/CNTL IDLE. Warning: Section @zone[1] (wan) cannot resolve device of network 'wan6' Warning: Section @zone[1] (wan) cannot resolve device of network 'wisp' Warning: Section @zone[1] (wan) cannot resolve device of network 'wan2' Warning: Section @zone[2] (vpn) cannot resolve device of network 'vpn' Warning: Section @zone[3] (guest) cannot resolve device of network 'guest' Warning: Section @zone[2] (vpn) has no device, network, subnet or extra options Warning: Section @zone[3] (guest) has no device, network, subnet or extra options * Clearing IPv4 filter table * Clearing IPv4 nat table * Clearing IPv4 mangle table * Clearing IPv4 raw table * Populating IPv4 filter table * Rule 'Allow-DHCP-Renew' * Rule 'Allow-Ping' * Rule 'Allow-IGMP' * Rule 'Allow-IPSec-ESP' * Rule 'Allow-ISAKMP' * Rule 'Allow-L2TP' * Rule #10 * Rule #11 * Rule #12 * Rule #13 * Rule 'ike' * Rule 'ipsec' * Rule 'ah' * Rule 'esp' * Rule 'l2tp' * Rule 'pptp' * Rule 'gre' * Rule 'Allow-mDNS' * Forward 'lan' -> 'wan' * Forward 'lan' -> 'vpn' * Forward 'guest' -> 'wan' * Zone 'lan' * Zone 'wan' * Zone 'vpn' * Zone 'guest' * Populating IPv4 nat table * Zone 'lan' * Zone 'wan' * Zone 'vpn' * Zone 'guest' * Populating IPv4 mangle table * Zone 'lan' * Zone 'wan' * Zone 'vpn' * Zone 'guest' * Populating IPv4 raw table * Zone 'lan' - Using automatic conntrack helper attachment * Zone 'wan' * Zone 'vpn' * Zone 'guest' - Using automatic conntrack helper attachment * Clearing IPv6 filter table * Clearing IPv6 mangle table * Populating IPv6 filter table * Rule 'Allow-DHCPv6' * Rule 'Allow-MLD' * Rule 'Allow-ICMPv6-Input' * Rule 'Allow-ICMPv6-Forward' * Rule 'Allow-IPSec-ESP' * Rule 'Allow-ISAKMP' * Rule 'Allow-L2TP' * Rule #13 * Rule 'ike' * Rule 'ipsec' * Rule 'ah' * Rule 'esp' * Rule 'l2tp' * Rule 'pptp' * Rule 'gre' * Rule 'Allow-mDNS' * Forward 'lan' -> 'wan' * Forward 'lan' -> 'vpn' * Forward 'guest' -> 'wan' * Zone 'lan' * Zone 'wan' * Zone 'vpn' * Zone 'guest' * Populating IPv6 mangle table * Zone 'lan' * Zone 'wan' * Zone 'vpn' * Zone 'guest' * Flushing conntrack: 192.168.10.1 * Set tcp_ecn to off * Set tcp_syncookies to on * Set tcp_window_scaling to on * Running script '/usr/share/filter/firewall.include' * Running script '/usr/share/vpn/firewall.include' * Running script '/usr/share/parental_control/firewall.include' * Running script '/usr/share/cwmp/firewall.include' * Running script '/usr/share/miniupnpd/firewall.include'
OpenWrt bootlog
Older HW revision before the NAND and PHY change:
F0: 102B 0000 FA: 1040 0000 FA: 1040 0000 [0200] F9: 0000 0000 V0: 0000 0000 [0001] 00: 0000 0000 BP: 2400 0041 [0000] G0: 1190 0000 EC: 0000 0000 [1000] T0: 0000 024F [010F] Jump to BL NOTICE: BL2: v2.7(release):cdafd41cf6 NOTICE: BL2: Built : 08:26:26, Sep 5 2024 NOTICE: WDT: disabled NOTICE: EMI: Using DDR3 settings dump toprgu registers data: 1001c000 | 00000000 0000ffe0 00000000 00000000 1001c010 | 00000fff 00000000 00f00000 00000000 1001c020 | 00000000 00000000 00000000 00000000 1001c030 | 003c0003 003c0003 00000000 00000000 1001c040 | 00000000 00000000 00000000 00000000 1001c050 | 00000000 00000000 00000000 00000000 1001c060 | 00000000 00000000 00000000 00000000 1001c070 | 00000000 00000000 00000000 00000000 1001c080 | 00000000 00000000 00000000 00000000 dump drm registers data: 1001d000 | 00000000 00000000 00000000 00000000 1001d010 | 00000000 00000000 00000000 00000000 1001d020 | 00000000 00000000 00000000 00000000 1001d030 | 00a083f1 000003ff 00100000 00000000 1001d040 | 00000000 00000000 00020303 000000ff 1001d050 | 00000000 00000000 00000000 00000000 1001d060 | 00000002 00000000 00000000 00000000 drm: 500 = 0x8 [DDR Reserve] ddr reserve mode not be enabled yet DDR RESERVE Success 0 [EMI] ComboMCP not ready, using default setting BYTE_swap:0 BYTE_swap:0 Window Sum 480, worse bit 0, min window 60 Window Sum 480, worse bit 8, min window 56 Window Sum 338, worse bit 1, min window 40 Window Sum 312, worse bit 14, min window 36 Window Sum 348, worse bit 1, min window 42 Window Sum 322, worse bit 14, min window 38 Window Sum 356, worse bit 2, min window 42 Window Sum 338, worse bit 14, min window 40 Window Sum 366, worse bit 1, min window 44 Window Sum 346, worse bit 14, min window 40 Window Sum 378, worse bit 0, min window 46 Window Sum 354, worse bit 14, min window 42 Window Sum 390, worse bit 1, min window 48 Window Sum 360, worse bit 14, min window 42 Window Sum 392, worse bit 1, min window 48 Window Sum 376, worse bit 15, min window 44 Window Sum 404, worse bit 0, min window 50 Window Sum 380, worse bit 15, min window 44 Window Sum 390, worse bit 14, min window 46 NOTICE: EMI: Detected DRAM size: 256MB NOTICE: EMI: complex R/W mem test passed NOTICE: CPU: MT7981 (1300MHz) NOTICE: SPI_NAND parses attributes from parameter page. NOTICE: SPI_NAND Detected ID 0xc8 NOTICE: Page size 2048, Block size 131072, size 134217728 NOTICE: Initializing NMBM ... NOTICE: Signature found at block 1023 [0x07fe0000] NOTICE: First info table with writecount 0 found in block 960 NOTICE: Second info table with writecount 0 found in block 963 NOTICE: NMBM has been successfully attached in read-only mode NOTICE: BL2: Booting BL31 NOTICE: BL31: v2.7(release):cdafd41cf6 NOTICE: BL31: Built : 08:26:26, Sep 5 2024 NOTICE: Hello BL31!!! U-Boot 2022.07-rc3 (Sep 05 2024 - 08:26:26 +0000), Build: jenkins-WR3000H-11 CPU: MediaTek MT7981 Model: mt7981-rfb DRAM: 256 MiB Core: 50 devices, 20 uclasses, devicetree: embed Initializing NMBM ... spi-nand: spi_nand spi_nand@0: GigaDevice SPI NAND was found. spi-nand: spi_nand spi_nand@0: 128 MiB, block size: 128 KiB, page size: 2048, OOB size: 64 Could not find a valid device for nmbm0 Signature found at block 1023 [0x07fe0000] First info table with writecount 0 found in block 960 Second info table with writecount 0 found in block 963 NMBM has been successfully attached Loading Environment from MTD... *** Warning - bad CRC, using default environment In: serial@11002000 Out: serial@11002000 Err: serial@11002000 Net: Warning: ethernet@15100000 (eth0) using random MAC address - 26:82:32:27:fb:65 eth0: ethernet@15100000 gpio: pin 3 (gpio 3) value is 0 ubi0: attaching mtd7 ubi0: scanning is finished ubi0: attached mtd7 (name "ubi", size 64 MiB) ubi0: PEB size: 131072 bytes (128 KiB), LEB size: 126976 bytes ubi0: min./max. I/O unit sizes: 2048/2048, sub-page size 2048 ubi0: VID header offset: 2048 (aligned 2048), data offset: 4096 ubi0: good PEBs: 512, bad PEBs: 0, corrupted PEBs: 0 ubi0: user volume: 3, internal volumes: 1, max. volumes count: 128 ubi0: max/mean erase counter: 6/4, WL threshold: 4096, image sequence number: 1451693571 ubi0: available PEBs: 2, total reserved PEBs: 510, PEBs reserved for bad PEB handling: 19 Reading from volume 'kernel' to 0x46000000, size 0x0 ... OK ## Loading kernel from FIT Image at 46000000 ... Using 'config-1' configuration Trying 'kernel-1' kernel subimage Description: ARM64 OpenWrt Linux-6.6.119 Type: Kernel Image Compression: lzma compressed Data Start: 0x460000e8 Data Size: 4135285 Bytes = 3.9 MiB Architecture: AArch64 OS: Linux Load Address: 0x48000000 Entry Point: 0x48000000 Hash algo: crc32 Hash value: d7f790c9 Hash algo: sha1 Hash value: 4b49e01b509fe342a3c37265ae13a061fa211416 Verifying Hash Integrity ... crc32+ sha1+ OK ## Loading fdt from FIT Image at 46000000 ... Using 'config-1' configuration Trying 'fdt-1' fdt subimage Description: ARM64 OpenWrt cudy_wr3000h-v1 device tree blob Type: Flat Device Tree Compression: uncompressed Data Start: 0x463f1ba0 Data Size: 23931 Bytes = 23.4 KiB Architecture: AArch64 Hash algo: crc32 Hash value: d1054c43 Hash algo: sha1 Hash value: db5e3175621236e46dcef514fc2ed0a7795aff53 Verifying Hash Integrity ... crc32+ sha1+ OK Booting using the fdt blob at 0x463f1ba0 Uncompressing Kernel Image Loading Device Tree to 000000004f7f0000, end 000000004f7f8d7a ... OK Starting kernel ... [ 0.000000] Booting Linux on physical CPU 0x0000000000 [0x410fd034] [ 0.000000] Linux version 6.6.119 (builder@buildhost) (aarch64-openwrt-linux-musl-gcc (OpenWrt GCC 13.3.0 r29087-d9c5716d1d) 13.3.0, GNU ld (GNU Binutils) 2.42) #0 SMP Wed Dec 17 21:08:22 2025 [ 0.000000] Machine model: Cudy WR3000H v1 [ 0.000000] OF: reserved mem: 0x0000000042ff0000..0x0000000042ffffff (64 KiB) map non-reusable ramoops@42ff0000 [ 0.000000] OF: reserved mem: 0x0000000043000000..0x000000004302ffff (192 KiB) nomap non-reusable secmon@43000000 [ 0.000000] OF: reserved mem: 0x0000000047c80000..0x0000000047d7ffff (1024 KiB) nomap non-reusable wmcpu-reserved@47c80000 [ 0.000000] OF: reserved mem: 0x0000000047d80000..0x0000000047dbffff (256 KiB) nomap non-reusable wo-emi@47d80000 [ 0.000000] OF: reserved mem: 0x0000000047dc0000..0x0000000047ffffff (2304 KiB) nomap non-reusable wo-data@47dc0000 [ 0.000000] Zone ranges: [ 0.000000] DMA [mem 0x0000000040000000-0x000000004fffffff] [ 0.000000] DMA32 empty [ 0.000000] Normal empty [ 0.000000] Movable zone start for each node [ 0.000000] Early memory node ranges [ 0.000000] node 0: [mem 0x0000000040000000-0x0000000042ffffff] [ 0.000000] node 0: [mem 0x0000000043000000-0x000000004302ffff] [ 0.000000] node 0: [mem 0x0000000043030000-0x0000000047c7ffff] [ 0.000000] node 0: [mem 0x0000000047c80000-0x0000000047ffffff] [ 0.000000] node 0: [mem 0x0000000048000000-0x000000004fffffff] [ 0.000000] Initmem setup node 0 [mem 0x0000000040000000-0x000000004fffffff] [ 0.000000] psci: probing for conduit method from DT. [ 0.000000] psci: PSCIv1.1 detected in firmware. [ 0.000000] psci: Using standard PSCI v0.2 function IDs [ 0.000000] psci: MIGRATE_INFO_TYPE not supported. [ 0.000000] psci: SMC Calling Convention v1.2 [ 0.000000] percpu: Embedded 18 pages/cpu s35112 r8192 d30424 u73728 [ 0.000000] pcpu-alloc: s35112 r8192 d30424 u73728 alloc=18*4096 [ 0.000000] pcpu-alloc: [0] 0 [0] 1 [ 0.000000] Detected VIPT I-cache on CPU0 [ 0.000000] CPU features: detected: GIC system register CPU interface [ 0.000000] CPU features: kernel page table isolation disabled by kernel configuration [ 0.000000] alternatives: applying boot alternatives [ 0.000000] Kernel command line: [ 0.000000] Dentry cache hash table entries: 32768 (order: 6, 262144 bytes, linear) [ 0.000000] Inode-cache hash table entries: 16384 (order: 5, 131072 bytes, linear) [ 0.000000] Built 1 zonelists, mobility grouping on. Total pages: 64512 [ 0.000000] mem auto-init: stack:off, heap alloc:off, heap free:off [ 0.000000] software IO TLB: SWIOTLB bounce buffer size adjusted to 0MB [ 0.000000] software IO TLB: area num 2. [ 0.000000] software IO TLB: SWIOTLB bounce buffer size roundup to 0MB [ 0.000000] software IO TLB: mapped [mem 0x000000004fe46000-0x000000004fec6000] (0MB) [ 0.000000] Memory: 239816K/262144K available (9088K kernel code, 1002K rwdata, 1676K rodata, 448K init, 305K bss, 22328K reserved, 0K cma-reserved) [ 0.000000] SLUB: HWalign=64, Order=0-3, MinObjects=0, CPUs=2, Nodes=1 [ 0.000000] rcu: Hierarchical RCU implementation. [ 0.000000] rcu: RCU restricting CPUs from NR_CPUS=4 to nr_cpu_ids=2. [ 0.000000] Tracing variant of Tasks RCU enabled. [ 0.000000] rcu: RCU calculated value of scheduler-enlistment delay is 10 jiffies. [ 0.000000] rcu: Adjusting geometry for rcu_fanout_leaf=16, nr_cpu_ids=2 [ 0.000000] NR_IRQS: 64, nr_irqs: 64, preallocated irqs: 0 [ 0.000000] GICv3: GIC: Using split EOI/Deactivate mode [ 0.000000] GICv3: 640 SPIs implemented [ 0.000000] GICv3: 0 Extended SPIs implemented [ 0.000000] Root IRQ handler: 0xffffffc080010080 [ 0.000000] GICv3: GICv3 features: 16 PPIs [ 0.000000] GICv3: CPU0: found redistributor 0 region 0:0x000000000c080000 [ 0.000000] rcu: srcu_init: Setting srcu_struct sizes based on contention. [ 0.000000] arch_timer: cp15 timer(s) running at 13.00MHz (phys). [ 0.000000] clocksource: arch_sys_counter: mask: 0xffffffffffffff max_cycles: 0x2ff89eacb, max_idle_ns: 440795202429 ns [ 0.000000] sched_clock: 56 bits at 13MHz, resolution 76ns, wraps every 4398046511101ns [ 0.000080] Calibrating delay loop (skipped), value calculated using timer frequency.. 26.00 BogoMIPS (lpj=130000) [ 0.000089] pid_max: default: 32768 minimum: 301 [ 0.002953] Mount-cache hash table entries: 512 (order: 0, 4096 bytes, linear) [ 0.002961] Mountpoint-cache hash table entries: 512 (order: 0, 4096 bytes, linear) [ 0.005106] cacheinfo: Unable to detect cache hierarchy for CPU 0 [ 0.005640] RCU Tasks Trace: Setting shift to 1 and lim to 1 rcu_task_cb_adjust=1 rcu_task_cpu_ids=2. [ 0.005780] rcu: Hierarchical SRCU implementation. [ 0.005782] rcu: Max phase no-delay instances is 1000. [ 0.006205] smp: Bringing up secondary CPUs ... [ 0.006563] Detected VIPT I-cache on CPU1 [ 0.006605] GICv3: CPU1: found redistributor 1 region 0:0x000000000c0a0000 [ 0.006633] CPU1: Booted secondary processor 0x0000000001 [0x410fd034] [ 0.006702] smp: Brought up 1 node, 2 CPUs [ 0.006707] SMP: Total of 2 processors activated. [ 0.006711] CPU features: detected: 32-bit EL0 Support [ 0.006714] CPU features: detected: CRC32 instructions [ 0.006745] CPU features: emulated: Privileged Access Never (PAN) using TTBR0_EL1 switching [ 0.006749] CPU: All CPU(s) started at EL2 [ 0.006750] alternatives: applying system-wide alternatives [ 0.010334] clocksource: jiffies: mask: 0xffffffff max_cycles: 0xffffffff, max_idle_ns: 19112604462750000 ns [ 0.010350] futex hash table entries: 512 (order: 3, 32768 bytes, linear) [ 0.011619] pinctrl core: initialized pinctrl subsystem [ 0.012786] NET: Registered PF_NETLINK/PF_ROUTE protocol family [ 0.013130] DMA: preallocated 128 KiB GFP_KERNEL pool for atomic allocations [ 0.013154] DMA: preallocated 128 KiB GFP_KERNEL|GFP_DMA pool for atomic allocations [ 0.013175] DMA: preallocated 128 KiB GFP_KERNEL|GFP_DMA32 pool for atomic allocations [ 0.013561] thermal_sys: Registered thermal governor 'fair_share' [ 0.013564] thermal_sys: Registered thermal governor 'bang_bang' [ 0.013567] thermal_sys: Registered thermal governor 'step_wise' [ 0.013569] thermal_sys: Registered thermal governor 'user_space' [ 0.013607] ASID allocator initialised with 65536 entries [ 0.014510] pstore: Using crash dump compression: deflate [ 0.014514] pstore: Registered ramoops as persistent store backend [ 0.014517] ramoops: using 0x10000@0x42ff0000, ecc: 0 [ 0.015964] /soc/interrupt-controller@c000000: Fixed dependency cycle(s) with /soc/interrupt-controller@c000000 [ 0.021370] Modules: 29600 pages in range for non-PLT usage [ 0.021378] Modules: 521120 pages in range for PLT usage [ 0.022353] cryptd: max_cpu_qlen set to 1000 [ 0.023435] SCSI subsystem initialized [ 0.023653] libata version 3.00 loaded. [ 0.025270] clocksource: Switched to clocksource arch_sys_counter [ 0.027500] NET: Registered PF_INET protocol family [ 0.027604] IP idents hash table entries: 4096 (order: 3, 32768 bytes, linear) [ 0.028860] tcp_listen_portaddr_hash hash table entries: 256 (order: 0, 4096 bytes, linear) [ 0.028872] Table-perturb hash table entries: 65536 (order: 6, 262144 bytes, linear) [ 0.028881] TCP established hash table entries: 2048 (order: 2, 16384 bytes, linear) [ 0.028899] TCP bind hash table entries: 2048 (order: 4, 65536 bytes, linear) [ 0.028949] TCP: Hash tables configured (established 2048 bind 2048) [ 0.029257] MPTCP token hash table entries: 256 (order: 1, 6144 bytes, linear) [ 0.029357] UDP hash table entries: 256 (order: 1, 8192 bytes, linear) [ 0.029373] UDP-Lite hash table entries: 256 (order: 1, 8192 bytes, linear) [ 0.029570] NET: Registered PF_UNIX/PF_LOCAL protocol family [ 0.029594] PCI: CLS 0 bytes, default 64 [ 0.031035] workingset: timestamp_bits=46 max_order=16 bucket_order=0 [ 0.035964] squashfs: version 4.0 (2009/01/31) Phillip Lougher [ 0.035973] jffs2: version 2.2 (NAND) (SUMMARY) (LZMA) (RTIME) (CMODE_PRIORITY) (c) 2001-2006 Red Hat, Inc. [ 0.093457] Block layer SCSI generic (bsg) driver version 0.4 loaded (major 251) [ 0.103852] Serial: 8250/16550 driver, 16 ports, IRQ sharing enabled [ 0.107526] printk: console [ttyS0] disabled [ 0.127888] 11002000.serial: ttyS0 at MMIO 0x11002000 (irq = 72, base_baud = 2500000) is a ST16650V2 [ 0.127927] printk: console [ttyS0] enabled [ 0.890113] loop: module loaded [ 0.896464] spi-nand spi0.0: calibration result: 0x3 [ 0.901515] spi-nand spi0.0: ESMT SPI NAND was found. [ 0.906572] spi-nand spi0.0: 128 MiB, block size: 128 KiB, page size: 2048, OOB size: 64 [ 0.915036] Signature found at block 1023 [0x07fe0000] [ 0.920175] NMBM management region starts at block 960 [0x07800000] [ 0.927704] First info table with writecount 0 found in block 960 [ 0.936561] Second info table with writecount 0 found in block 963 [ 0.942740] NMBM has been successfully attached [ 0.947599] 6 fixed-partitions partitions found on MTD device spi0.0 [ 0.954184] Creating 6 MTD partitions on "spi0.0": [ 0.959018] 0x000000000000-0x000000100000 : "BL2" [ 0.964876] 0x000000100000-0x000000180000 : "u-boot-env" [ 0.970905] 0x000000180000-0x000000380000 : "Factory" [ 0.977672] 0x000000380000-0x0000003c0000 : "bdinfo" [ 0.983698] 0x0000003c0000-0x0000005c0000 : "FIP" [ 0.989891] 0x0000005c0000-0x0000045c0000 : "ubi" [ 1.025747] ubi0: default fastmap pool size: 25 [ 1.030277] ubi0: default fastmap WL pool size: 12 [ 1.035056] ubi0: attaching mtd5 [ 1.255156] ubi0: scanning is finished [ 1.264773] ubi0: attached mtd5 (name "ubi", size 64 MiB) [ 1.270192] ubi0: PEB size: 131072 bytes (128 KiB), LEB size: 126976 bytes [ 1.277062] ubi0: min./max. I/O unit sizes: 2048/2048, sub-page size 2048 [ 1.283837] ubi0: VID header offset: 2048 (aligned 2048), data offset: 4096 [ 1.290791] ubi0: good PEBs: 512, bad PEBs: 0, corrupted PEBs: 0 [ 1.296789] ubi0: user volume: 3, internal volumes: 1, max. volumes count: 128 [ 1.303996] ubi0: max/mean erase counter: 6/4, WL threshold: 4096, image sequence number: 1451693571 [ 1.313116] ubi0: available PEBs: 0, total reserved PEBs: 512, PEBs reserved for bad PEB handling: 19 [ 1.322330] ubi0: background thread "ubi_bgt0d" started, PID 250 [ 1.323052] block ubiblock0_1: created from ubi0:1(rootfs) [ 1.333821] ubiblock: device ubiblock0_1 (rootfs) set to be root filesystem [ 1.849463] mtk_soc_eth 15100000.ethernet eth0: mediatek frame engine at 0xffffffc081700000, irq 75 [ 1.859376] mtk_soc_eth 15100000.ethernet eth1: mediatek frame engine at 0xffffffc081700000, irq 75 [ 1.869099] i2c_dev: i2c /dev entries driver [ 1.875127] mtk-wdt 1001c000.watchdog: Watchdog enabled (timeout=31 sec, nowayout=0) [ 1.884377] NET: Registered PF_INET6 protocol family [ 1.890753] Segment Routing with IPv6 [ 1.894442] In-situ OAM (IOAM) with IPv6 [ 1.898450] NET: Registered PF_PACKET protocol family [ 1.903528] bridge: filtering via arp/ip/ip6tables is no longer available by default. Update your scripts to load br_netfilter if you need this. [ 1.916856] 8021q: 802.1Q VLAN Support v1.8 [ 2.016421] mt7530-mdio mdio-bus:1f: configuring for fixed/2500base-x link mode [ 2.025148] mt7530-mdio mdio-bus:1f: Link is Up - 2.5Gbps/Full - flow control rx/tx [ 2.036246] mt7530-mdio mdio-bus:1f lan4 (uninitialized): PHY [mt7530-0:00] driver [MediaTek MT7531 PHY] (irq=79) [ 2.058502] mt7530-mdio mdio-bus:1f lan3 (uninitialized): PHY [mt7530-0:01] driver [MediaTek MT7531 PHY] (irq=80) [ 2.080538] mt7530-mdio mdio-bus:1f lan2 (uninitialized): PHY [mt7530-0:02] driver [MediaTek MT7531 PHY] (irq=81) [ 2.102569] mt7530-mdio mdio-bus:1f lan1 (uninitialized): PHY [mt7530-0:03] driver [MediaTek MT7531 PHY] (irq=82) [ 2.114144] mtk_soc_eth 15100000.ethernet eth0: entered promiscuous mode [ 2.120898] DSA: tree 0 setup [ 2.124311] clk: Disabling unused clocks [ 2.133689] VFS: Mounted root (squashfs filesystem) readonly on device 254:0. [ 2.141038] Freeing unused kernel memory: 448K [ 2.145617] Run /sbin/init as init process [ 2.149702] with arguments: [ 2.152656] /sbin/init [ 2.155391] with environment: [ 2.158519] HOME=/ [ 2.160867] TERM=linux [ 2.364055] init: Console is alive [ 2.367649] init: - watchdog - [ 2.718697] kmodloader: loading kernel modules from /etc/modules-boot.d/* [ 2.745999] gpio_button_hotplug: loading out-of-tree module taints kernel. [ 2.756112] kmodloader: done loading kernel modules from /etc/modules-boot.d/* [ 2.764541] init: - preinit - [ 3.091517] mtk_soc_eth 15100000.ethernet wan: renamed from eth1 [ 3.144112] mtk_soc_eth 15100000.ethernet eth0: configuring for fixed/2500base-x link mode [ 3.153951] mtk_soc_eth 15100000.ethernet eth0: Link is Up - 2.5Gbps/Full - flow control rx/tx [ 3.185009] mt7530-mdio mdio-bus:1f lan1: configuring for phy/gmii link mode Press the [f] key and hit [enter] to enter failsafe mode Press the [1], [2], [3] or [4] key and hit [enter] to select the debug level [ 5.855280] random: crng init done [ 7.421106] UBIFS (ubi0:2): Mounting in unauthenticated mode [ 7.426883] UBIFS (ubi0:2): background thread "ubifs_bgt0_2" started, PID 773 [ 7.452828] UBIFS (ubi0:2): recovery needed [ 7.553460] UBIFS (ubi0:2): recovery completed [ 7.557983] UBIFS (ubi0:2): UBIFS: mounted UBI device 0, volume 2, name "rootfs_data" [ 7.565810] UBIFS (ubi0:2): LEB size: 126976 bytes (124 KiB), min./max. I/O unit sizes: 2048 bytes/2048 bytes [ 7.575714] UBIFS (ubi0:2): FS size: 51552256 bytes (49 MiB, 406 LEBs), max 416 LEBs, journal size 2539520 bytes (2 MiB, 20 LEBs) [ 7.587353] UBIFS (ubi0:2): reserved for root: 2434939 bytes (2377 KiB) [ 7.593953] UBIFS (ubi0:2): media format: w5/r0 (latest is w5/r0), UUID 2757784B-B5F6-4977-B7CB-FFA8131A0E7C, small LPT model [ 7.608131] mount_root: switching to ubifs overlay [ 7.617863] overlayfs: null uuid detected in lower fs '/', falling back to xino=off,index=off,nfs_export=off. [ 7.633050] urandom-seed: Seeding with /etc/urandom.seed [ 7.684947] procd: - early - [ 7.687944] procd: - watchdog - [ 8.235842] procd: - watchdog - [ 8.240419] procd: - ubus - [ 8.397229] procd: - init - Please press Enter to activate this console. [ 8.765741] kmodloader: loading kernel modules from /etc/modules.d/* [ 8.804216] crypto-safexcel 10320000.crypto: EIP97:230(0,1,4,4)-HIA:270(0,5,5),PE:150/433(alg:7fcdfc00)/0/0/0 [ 8.881075] Loading modules backported from Linux version v6.12.61-0-gdcbeffaf66d0 [ 8.888653] Backport generated by backports.git v6.1.110-1-35-g410656ef [ 8.968082] urngd: v1.0.2 started. [ 9.228961] mt798x-wmac 18000000.wifi: HW/SW Version: 0x8a108a10, Build Time: 20240823161240a [ 9.228961] [ 9.430647] mt798x-wmac 18000000.wifi: WM Firmware Version: ____000000, Build Time: 20240823161304 [ 9.526593] mt798x-wmac 18000000.wifi: WA Firmware Version: DEV_000000, Build Time: 20240823161841 [ 9.623908] mt798x-wmac 18000000.wifi: registering led 'mt76-phy0' [ 9.707407] mt798x-wmac 18000000.wifi: registering led 'mt76-phy1' [ 9.806815] PPP generic driver version 2.4.2 [ 9.812882] NET: Registered PF_PPPOX protocol family [ 9.815076] mtdblock: MTD device 'bdinfo' is NAND, please consider using UBI block devices instead. [ 9.830436] kmodloader: done loading kernel modules from /etc/modules.d/* [ 10.070281] mtdblock: MTD device 'bdinfo' is NAND, please consider using UBI block devices instead. [ 13.126807] mtk_soc_eth 15100000.ethernet eth0: Link is Down [ 13.142511] mtk_soc_eth 15100000.ethernet eth0: configuring for fixed/2500base-x link mode [ 13.151577] mtk_soc_eth 15100000.ethernet eth0: Link is Up - 2.5Gbps/Full - flow control rx/tx [ 13.158482] mt7530-mdio mdio-bus:1f lan1: configuring for phy/gmii link mode [ 13.171792] br-lan: port 1(lan1) entered blocking state [ 13.177079] br-lan: port 1(lan1) entered disabled state [ 13.182337] mt7530-mdio mdio-bus:1f lan1: entered allmulticast mode [ 13.188643] mtk_soc_eth 15100000.ethernet eth0: entered allmulticast mode [ 13.198678] mt7530-mdio mdio-bus:1f lan1: entered promiscuous mode [ 13.218066] mt7530-mdio mdio-bus:1f lan2: configuring for phy/gmii link mode [ 13.229134] br-lan: port 2(lan2) entered blocking state [ 13.234367] br-lan: port 2(lan2) entered disabled state [ 13.239720] mt7530-mdio mdio-bus:1f lan2: entered allmulticast mode [ 13.248069] mt7530-mdio mdio-bus:1f lan2: entered promiscuous mode [ 13.263141] mt7530-mdio mdio-bus:1f lan3: configuring for phy/gmii link mode [ 13.271631] br-lan: port 3(lan3) entered blocking state [ 13.276896] br-lan: port 3(lan3) entered disabled state [ 13.282154] mt7530-mdio mdio-bus:1f lan3: entered allmulticast mode [ 13.290487] mt7530-mdio mdio-bus:1f lan3: entered promiscuous mode [ 13.306356] mt7530-mdio mdio-bus:1f lan4: configuring for phy/gmii link mode [ 13.317585] br-lan: port 4(lan4) entered blocking state [ 13.322814] br-lan: port 4(lan4) entered disabled state [ 13.328108] mt7530-mdio mdio-bus:1f lan4: entered allmulticast mode [ 13.336635] mt7530-mdio mdio-bus:1f lan4: entered promiscuous mode [ 13.587380] mtk_soc_eth 15100000.ethernet wan: PHY [mdio-bus:06] driver [RTL8221B-VB-CG 2.5Gbps PHY (C45)] (irq=POLL) [ 13.598085] mtk_soc_eth 15100000.ethernet wan: configuring for phy/2500base-x link mode [ 13.646758] br-lan: port 5(wan) entered blocking state [ 13.651901] br-lan: port 5(wan) entered disabled state [ 13.657103] mtk_soc_eth 15100000.ethernet wan: entered allmulticast mode [ 13.664985] mtk_soc_eth 15100000.ethernet wan: entered promiscuous mode [ 15.550109] br-lan: port 6(phy0-ap0) entered blocking state [ 15.555747] br-lan: port 6(phy0-ap0) entered disabled state [ 15.561363] mt798x-wmac 18000000.wifi phy0-ap0: entered allmulticast mode [ 15.568437] mt798x-wmac 18000000.wifi phy0-ap0: entered promiscuous mode [ 15.723035] br-lan: port 6(phy0-ap0) entered blocking state [ 15.728628] br-lan: port 6(phy0-ap0) entered listening state [ 24.155272] br-lan: port 6(phy0-ap0) entered learning state [ 32.475274] br-lan: port 6(phy0-ap0) entered forwarding state [ 32.481032] br-lan: topology change detected, propagating
Notes
- OpenWrt Forum thread:
- GitHub PR on adding U-boot layout image for Cudy WR3000P/H/S/E v1