Table of Contents
Globalscale MOCHAbin

Supported Versions
Hardware Highlights
Installation
OEM installation using the TFTP method
- Copy dtb from build_dir to bin/ and run tftpserver there:
$ cp ./build_dir/target-aarch64_cortex-a72_musl/linux-mvebu_cortexa72/image-armada-7040-mochabin.dtb bin/targets/mvebu/cortexa72/
$ in.tftpd -L -s bin/targets/mvebu/cortexa72/
- Connect to the device UART via microUSB port and power on the device.
- Power on the device and hit any key to stop the autoboot.
- Set serverip (host IP) and ipaddr (any free IP address on the same subnet), e.g:
- Host:
$ setenv serverip 192.168.1.10
- Device:
$ setenv ipaddr 192.168.1.15
- Set the ethernet device (Example for the 1G WAN):
$ setenv ethact mvpp2-2
- Ping server to confirm network is working:
$ ping $serverip
Using mvpp2-2 device
host 192.168.1.15 is alive
- Tftpboot the firmware:
$ tftpboot $kernel_addr_r openwrt-mvebu-cortexa72-globalscale_mochabin-initramfs-kernel.bin
$ tftpboot $fdt_addr_r image-armada-7040-mochabin.dtb
- Boot the image:
$ booti $kernel_addr_r - $fdt_addr_r
- Once the initramfs is booted, transfer openwrt-mvebu-cortexa72-globalscale_mochabin-squashfs-sdcard.img.gz to /tmp dir on the device.
- Gunzip and dd the image:
$ gunzip /tmp/openwrt-mvebu-cortexa72-globalscale_mochabin-squashfs-sdcard.img.gz
$ dd if=/tmp/openwrt-mvebu-cortexa72-globalscale_mochabin-squashfs-sdcard.img of=/dev/mmcblk0 && sync
- Reboot the device.
- Hit any key to stop the autoboot.
- Reset U-boot env and set the bootcmd:
$ env default -a $ setenv bootcmd 'load mmc 0 ${loadaddr} boot.scr && source ${loadaddr}' - Optionally I would advise to edit the console env variable to remove earlycon as that causes the kernel to never use the driver for the serial console. Earlycon should be used only for debugging before the kernel can configure the console and will otherwise cause various issues with the console.
$ setenv console 'console=ttyS0,115200'
- Save and reset
$ saveenv
$ reset
- OpenWrt should boot from eMMC now.
Upgrading OpenWrt
 These are generic instructions. Update with your router's specifics.
LuCI Web Upgrade Process
- Browse to
http://192.168.1.1/cgi-bin/luci/mini/system/upgrade/LuCI Upgrade URL - Upload image file for sysupgrade to LuCI
- Wait for reboot
Terminal Upgrade Process
If you don't have a GUI (LuCI) available, you can alternatively upgrade via the command line. There are two command line methods for upgrading:
sysupgrademtd
Note: It is important that you put the firmware image into the ramdisk (/tmp) before you start flashing.
sysupgrade
- Login as root via SSH on 192.168.1.1, then enter the following commands:
cd /tmp
wget http://downloads.openwrt.org/snapshots/trunk/XXX/xxx.abc
sysupgrade /tmp/xxx.abc
mtd
If sysupgrade does not support this router, use mtd.
- Login as root via SSH on 192.168.1.1, then enter the following commands:
cd /tmp
wget http://downloads.openwrt.org/snapshots/trunk/XXX/xxx.abc
mtd write /tmp/xxx.abc linux && reboot
Using the internal Wifi6
The Qualcomm (QCA6391) is not yet supported (v22.03.04). To enable Wifi6, if the Qualcomm adapter is built in, the latest snapshot have to be used (https://downloads.openwrt.org/snapshots/targets/mvebu/cortexa72/openwrt-mvebu-cortexa72-globalscale_mochabin-squashfs-sdcard.img.gz, 06/11/23 when writing).
After booting the device, the following commands via SSH need to be executed:
opkg update
opkg install kmod-ath11k kmod-ath11k-pci ath11k-firmware-qca6390
Expanding the eMMC partition
Check your partitions, especially for partition /dev/loop0 having filesystem type f2fs:
root@OpenWrt:~# df -Th
Filesystem           Type            Size      Used Available Use% Mounted on
/dev/root            squashfs        3.5M      3.5M         0 100% /rom
tmpfs                tmpfs           3.9G      1.1M      3.9G   0% /tmp
/dev/loop0           f2fs           98.8M     61.5M     37.3M   62% /overlay
overlayfs:/overlay   overlay        98.8M     61.5M     37.3M   62% /
tmpfs                tmpfs         512.0K         0    512.0K   0% /dev
Install the following packages:
opkg update
opkg install losetup e2fsprogs resize2fs block-mount kmod-fs-f2fs f2fs-tools cfdisk kmod-fs-ext4 parted rsync
Confirm, that the device /dev/loop0 is located on the 2nd partition of mmcblk0 by checking the back file column:
root@OpenWrt:~# losetup
NAME       SIZELIMIT  OFFSET AUTOCLEAR RO BACK-FILE  DIO LOG-SEC
/dev/loop0         0 3604480         1  0 /mmcblk0p2   0     512
Resize the partition mmcblk0p2 by using cfdsik:
root@OpenWrt:~# cfdisk /dev/mmcblk0
Steps for resizing:
- Chose the 2nd partition,
- Move the cursor to resize,
- Enter the final size you want, default is 14.7GB.
- Confirm the change by the menu entry “Write”.
Set variables, that are used later:
LOOP="$(losetup -n -O NAME | sort | sed -n -e "1p")"
ROOT="$(losetup -n -O BACK-FILE ${LOOP} | sed -e "s|^|/dev|")"
OFFS="$(losetup -n -O OFFSET ${LOOP})"
Check the variables withe echo command:
root@OpenWrt:~# echo ${OFFS} ${LOOP} ${ROOT}
3604480 /dev/loop0 /dev/mmcblk0p2
The loop device setup:
LOOP="$(losetup -f)"
losetup -o ${OFFS} ${LOOP} ${ROOT}
Finalize the partition resize:
fsck.f2fs -f ${LOOP}  #and go for default options if given any
mount ${LOOP} /mnt
umount ${LOOP}
resize.f2fs ${LOOP}
reboot
After reboot, you can confirm the full partition size on SSH and LuCi:
root@OpenWrt:~# df -Th
Filesystem           Type            Size      Used Available Use% Mounted on
/dev/root            squashfs        3.5M      3.5M         0 100% /rom
tmpfs                tmpfs           3.9G    240.0K      3.9G   0% /tmp
/dev/loop0           f2fs           14.7G    609.8M     14.1G   4% /overlay
overlayfs:/overlay   overlay        14.7G    609.8M     14.1G   4% /
tmpfs                tmpfs         512.0K         0    512.0K   0% /dev
Debricking
Failsafe mode
Basic configuration
→ Basic configuration After flashing, proceed with this.
Set up your Internet connection, configure wireless, configure USB port, etc.
Specific Configuration
Please fill in real values for this device, then remove the EXAMPLEs
Network interfaces
The default network configuration is:
| Interface Name | Description | Default configuration |
|---|---|---|
| br-lan | EXAMPLE LAN & WiFi | EXAMPLE 192.168.1.1/24 |
| vlan0 (eth0.0) | EXAMPLE LAN ports (1 to 4) | EXAMPLE None |
| vlan1 (eth0.1) | EXAMPLE WAN port | EXAMPLE DHCP |
| wl0 | EXAMPLE WiFi | EXAMPLE Disabled |
Switch Ports (for VLANs)
Please fill in real values for this device, then remove the EXAMPLEs
Numbers 0-3 are Ports 1-4 as labeled on the unit, number 4 is the Internet (WAN) on the unit, 5 is the internal connection to the router itself. Don't be fooled: Port 1 on the unit is number 3 when configuring VLANs. vlan0 = eth0.0, vlan1 = eth0.1 and so on.
| Port | Switch port |
|---|---|
| Internet (WAN) | EXAMPLE 4 |
| LAN 1 | EXAMPLE 3 |
| LAN 2 | EXAMPLE 2 |
| LAN 3 | EXAMPLE 1 |
| LAN 4 | EXAMPLE 0 |
Buttons
→ hardware.button on howto use and configure the hardware button(s). Here, we merely name the buttons, so we can use them in the above Howto.
Please fill in real values for this device, then remove the EXAMPLEs
The Globalscale MOCHAbin has the following buttons:
| BUTTON | Event |
|---|---|
| EXAMPLE Reset | reset |
| EXAMPLE Secure Easy Setup | ses |
| EXAMPLE No buttons at all. | - |
Hardware
Info
- This table is automatically generated, once the correct filters for Brand and Model are set.
- If you see “Nothing.” instead of a table, please edit this section and adjust the filters with the proper Brand and Model. Just try, it's easy.
- If you still don't see a table here, or a table filled with '¿': Is there already a Techdata page available for Globalscale MOCHAbin ? If not: Create one.
- If you see a table with the desired device data, everything is OK and you can delete this text and the
<WRAP>that encloses it. - If it still doesn't work: Don't panic, calm down, take a deep breath and contact a wiki admin (tmomas) for help.
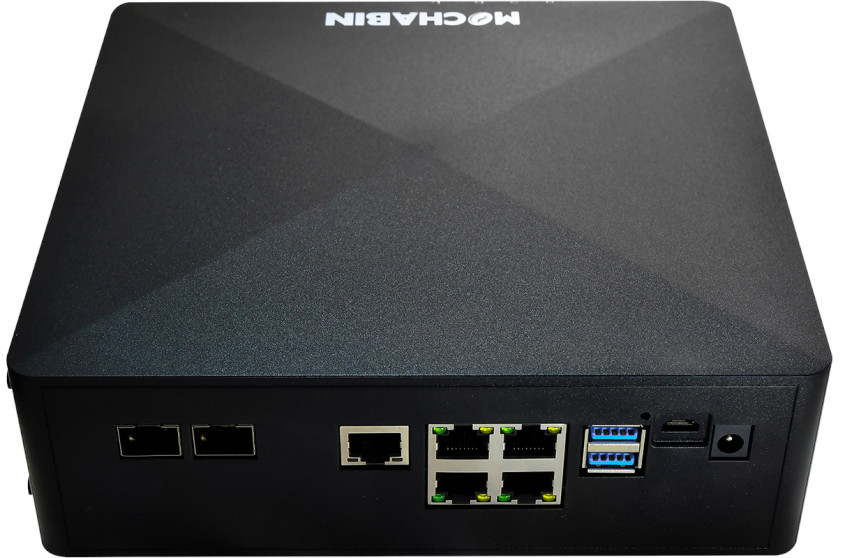
Photos
Front:
Insert photo of front of the casing
Back:
Opening the case
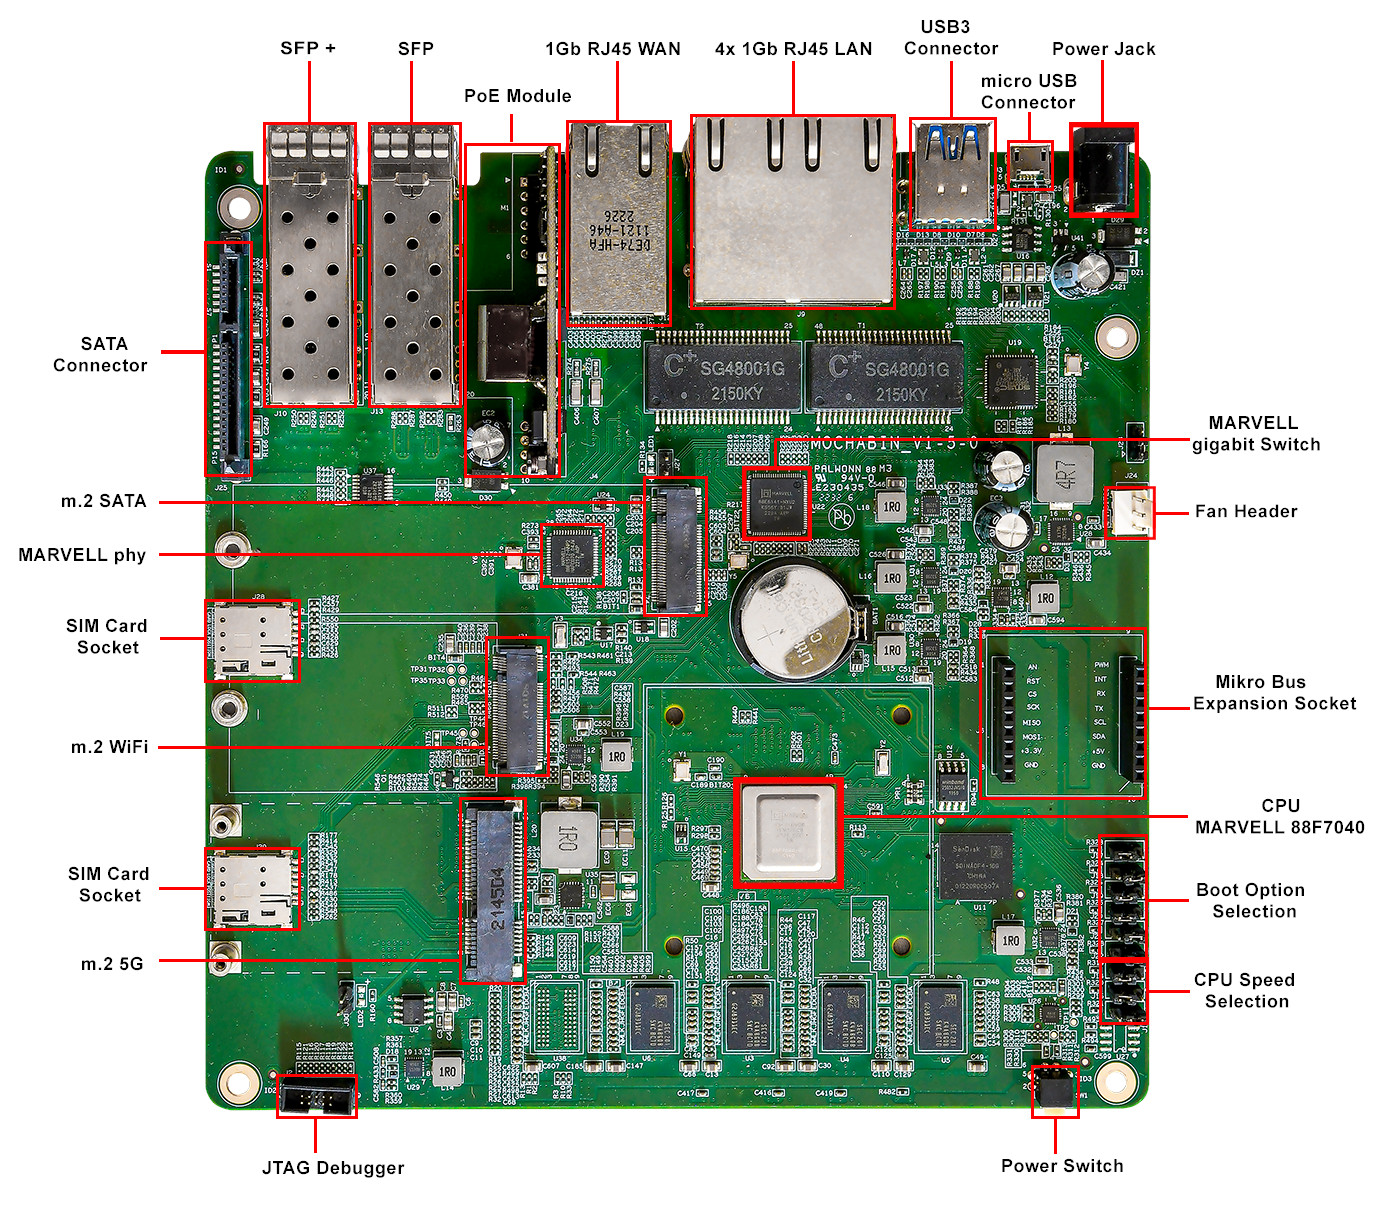
Main PCB:
Serial
→ port.serial general information about the serial port, serial port cable, etc.
How to connect to the Serial Port of this specific device:
- Connect the micro USB port to the computer. (The UART adapter is integrated on the board)
| Serial connection parameters for Globalscale MOCHAbin | 115200, 8N1 |
|---|
JTAG
→ port.jtag general information about the JTAG port, JTAG cable, etc.
JTAG schematic:

Bootloader mods
Hardware mods
None so far.
Bootlogs
OEM bootlog
BootROM - 2.03 Starting CP-0 IOROM 1.07 Booting from SPI NOR flash 1 (0x32) Found valid image at boot postion 0x000 lmv_ddr: mv_ddr-devel-18.12.0-g41927ee (Sep 05 2022 - 14:40:38) mv_ddr: completed successfully llBL2: Initiating SCP_BL2 transfer to SCP ll
U-Boot 2018.03-devel-18.12.3-gb794de0054 (Sep 05 2022 - 14:38:22 +0800)
Model: Marvell Armada 7040 Mochabin development board SoC: Armada7040-B0; AP806-B0; CP115-A0 Clock: CPU 1400 [MHz]
      DDR     800  [MHz]
      FABRIC  800  [MHz]
      MSS     200  [MHz]
LLC Enabled (Exclusive Mode) DRAM: 8 GiB Bus spi@700680 CS0 configured for direct access 00000000f9000000:0x1000000 SF: Detected w25q32bv with page size 256 Bytes, erase size 4 KiB, total 4 MiB Comphy chip #0: Comphy-0: SGMII1 3.125 Gbps Comphy-1: USB3_HOST0 Comphy-2: SATA0 Comphy-3: SATA1 Comphy-4: SFI0 10.3125 Gbps Comphy-5: PEX2 UTMI PHY 0 initialized to USB Host0 UTMI PHY 1 initialized to USB Host1 SATA link 0 timeout. Target spinup took 0 ms. AHCI 0001.0000 32 slots 2 ports 6 Gbps 0x3 impl SATA mode flags: 64bit ncq led only pmp fbss pio slum part sxs PCIE-0: Link down MMC: sdhci@6e0000: 0 Loading Environment from SPI Flash... OK Model: Marvell Armada 7040 Mochabin development board Net: eth0: mvpp2-0 [PRIME], eth1: mvpp2-1, eth2: mvpp2-2 Hit any key to stop autoboot: 0
OpenWrt bootlog
COPY HERE THE BOOTLOG ONCE OPENWRT IS INSTALLED AND RUNNING
Notes
Space for additional notes, links to forum threads or other resources.
- ...